General University
14 March 1996
Sirs:
The accompanying manual instructs students and administrators
at General University in the use of Educational Systems Products'
on-line student registration system. The manual has been issued
so that you will be familiar with the system prior to our demonstration,
and to assist you in training your staff.
While the system displays informative help, first time
users may prefer to consult a manual. The manual has
been modularized to separate student and administrative systems.
General University may choose to post copies which do
not include the administrative functions in the student
terminal areas.
One component of the system not included in this version of
the user manual is system initialization; these
details have not been finalized.
To prevent discrepancies, information on this will be postponed
for a future release of the administrative section.
We look forward to your comments on this manual and to
demonstrating our product.
Sincerely,
Eductional Systems Products, Inc.
General University
Student Registration System
User Manual
Contents
Introduction
This manual describes the use of General University's
on-line Student Registration System.
Students can use the system to:
- select courses
- modify their timetables
- view the courses offered
- print their timetables
Administrators can use these functions for a selected student and also:
- update student records
- change system dates
- print class lists
The manual has three sections.
Novice computer users may wish to begin with
"How to Interact With The System".
Procedures for using the functions available to
students are listed
in the second section. The final section describes operations accessible only to
administrative users.
How To Interact With The System
Mouse
 On the table beside each terminal is a moveable device called a mouse.
Moving the mouse on its pad moves an arrow (cursor) on the
display screen. Screen objects this arrow points to may be activated
by pressing and releasing (clicking) the
left button on the mouse.
Screen Buttons
 The registration screen contains text in rectangular gray boxes called
buttons. If the mouse cursor is positioned on a button and the left mouse
button is pressed, the system will do what the text on the
screen button suggests.
Making a Selection From A List
When the system displays a list of choices, move the mouse cursor to the item
you wish. To indicate you have chosen this item, press and
release the left mouse button twice ( a double click .)
A single click highlights an item but does not indicate
selection of it.
Inactive "Grayed" Text
Buttons and list items may at times be unavailable as choices, but
remain visible. The text for inactive objects will be gray ("grayed-out")
and cannot be selected using the mouse.
Drop Down Lists
 Lists may be too large to fit on the screen at all times. Drop down lists
have a down arrow on the right. Click on this arrow and a box appears containing
the list.
List Boxes
 Lists of courses, departments and course sections, as well as a student timetable
are displayed in boxes on the screen. Items in these boxes can be selected with the
mouse. It the selection is made from a drop down list, the list reverts to a single
button displaying the current selection.
 Lists may be larger than their screen box. To the right of each list box
is a rectangular grey area with triangles at top and bottom. Click
on a triangle to move the list in that direction.
If You Need Help
 At the bottom the student registration screen displays a single
line of "context sensitive help". As the mouse cursor passes over a screen
element, its function is displayed in this help line.
 Need more Information ? Click on this button.
When You Want to Stop Something You Have Started
 If you change your mind when making a change,
selecting "QUIT" will stop what you have begun.
Beginning a Session
What You Need To Use the System
After registering a General University, you received confimation
my mail. This included your identification number, and a
password. Do not let others know your password.
The system allows you to change your password to something you can
easily remember. If you forget, contact the Registrar's Office to
get a new password.
The Welcome Screen
 This screen tells you that the General University
on-line student registration system is ready to use, and is
displayed when you finish a session.
To begin a session click on the Login button.
The online calendar option is part of the enhanced
system and will not be implemented initially.
Logging In

This screen has two boxes where you must
type your identification number and password. Initially
the cursor will be in the "User ID" box.
- Type in your identification number, then use the mouse to move
to the "Password" box or press the "Tab" key.
- Enter your password. Asterisks will appear on the screen in place
of the characters typed.
- Select one of the buttons at the bottom on this screen
( "Clear", "OK" and "Quit" ) or use the tab key to select
one and the return key to start the action.
The "Clear" button will clear BOTH the "User ID" and "Password"
fields if you wish to correct your input.
The "OK" button is used to proceed after both fields are entered. Pressing
return after entering a password has the same function as "OK".
The "Quit" button returns the system to the welcome screen.
Using the Student Registration System
The Display Screen
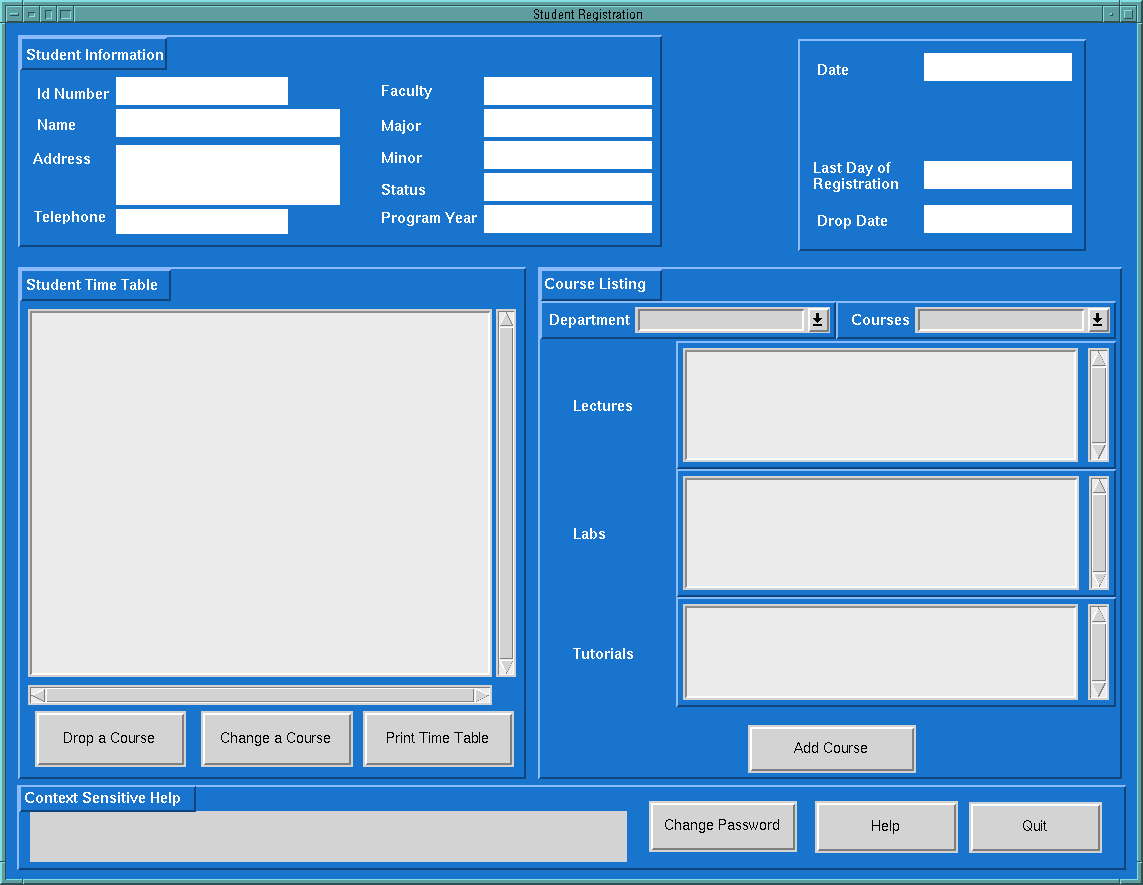
The student registration display shows your personal information at the
top left, and important dates at the top right. You cannot change these.
At the left is your timetable in a list box. On the right is the course
information area.
Changing Your Password
 To change your password click on the "Change Password"
button on the main menu. The Change Password
window appears in the center of the screen.
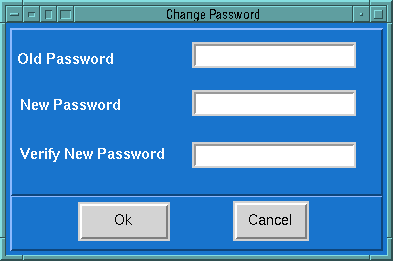
Move between the fields using the mouse or
use the tab key to move and the return key for the action.
- Type your old password.
- Type the new password.
- Retype the new password to verify it.
- Click on "OK" for the system to test the changed password
or on "Cancel" to abort the request.
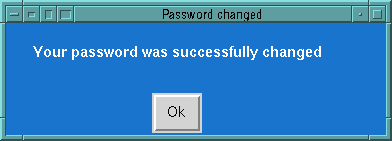
This window is displayed on the screen to confirm that
your password has been changed.
Click on "OK" to exit this window and the Change Password window.
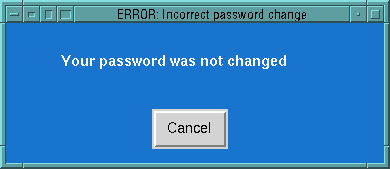
However, the password change may fail because the old password
did not match the password on file or your new password
did not verify. You are informed by an error window and
must click "Cancel" to make this box disappear and take
you back at the "Change Password" window where you can try again.
Listing Courses
This function allows
you to see the courses offerred by Gen U and it also tells you which
you are permitted to register in. This function is accessed
through the "Course Listing" window.
You must proceed, in order, through the steps of choosing a department,
a course, and a lecture section. If labs
or tutorial sections are not required for a course, then the "Labs" and
"Tutorials" window will display "No labs for this course" or
"No tutorials for this course".
1. Choose a Department
Click once on the "Department" pull down list. Now the desired
department can be selected by clicking on the item of interest. The listing
will be too long to fit in the window, but you may scroll the list up and down. Once
a department is chosen, the menu will disappear and the selected
department will be displayed in the box.
2. Choose a Course
Once again click on the arrow located on the "Course" pull down list.
Select a course from the list.
Once a course is selected, the course listing disappears and the selected
course is displayed inside the course box.
Once a department and course is chosen, the "Lectures" window will
immediately display the lecture sections available for the chosen
course.
3. Choose a lecture section
Scroll through the list and select a lecture section.
The lecture section you select will be
highlighted.
Lecture sections not available to you
are grayed out and the reason is indicated beside the section number.
You cannot select a greyed out item.
- "Full" means that the section has reached its maximum capacity
- "Conflict" means that the section conflicts with your
current time table.
4. View laboratory and tutorial sections
After a lecture is selected, the "Labs" and "Tutorials" windows
will display all the lab and tutorial sections available to that lecture
section. At this point, all course information is visible,
but sections which are not available will be grayed out.
To view lab and tutorial sections for a different lecture section,
then simply select a new lecture section.
5. Leaving the Course Listing
You do not have to do anything to leave this function, but the
current information displayed in the "Course Listing" function will
remain in case you want to refer to it.
What can be done with the course listing?
If you selected all the components for a course, you can add
these to your time table. See the procedure for
"Adding a Course".
Adding a Course to Your Timetable
To add a course to your timetable, select the
course, then click on the "Add Course" button
at the bottom right of the main menu.
You must select one of each component of a course
(lecture, lab and tutorial) before you can add it to your timetable.
If the course does not require you to enroll in a lecture,
lab, or tutorial section, no information will appear in that box
and that component does not need to be selected.
Use the following steps:
- Click on the "Department" pull down list
(On the right side of main menu.)
- Scroll up or down as required to highlight the department
offering the course you wish to add.
- Move to the "Courses" pull down list.
Scroll up or down to find the course you wish
to select.
The lectures, tutorials, and labs boxes will now show the
sections of each, their times and status.
If a lecture is full it will be grayed out,
and you will not be able to select it.
- Select a lecture section by clicking on it in the Lecture list box.
You can scroll through the lectures using the scroll bar.
- If the course you have want has a lab component,
scroll through the list and select a lab by clicking on it.
If a lab is available, you will
not be able to select it.
- If the course you want has a tutorial component,
that information will appear in the tutorial information box.
Scroll through the list and select a tutorial by clicking on it.
If a tutorial is unavailable, you will
not be able to select it.
If one of the components of the course you wish to add is
full, try another section. Otherwise "QUIT" or return to step 1.

-
Once you have selected all course sections,
the "Add Course" will become active (no longer gray).
Click on this button to process your course registration.
If the course has been added to your timetable, a message will inform you.
Click on the "OK" button, and the message will disappear. Your
timetable display will be updated with the new course.
If the course has become unavailable, (another student may take
the last place while you are viewing), a message will indicate
failure. Click "OK". The course listings will be updated with the changed status
of the course. You may reselect a section or quit.
Dropping a Course From Your Timetable
- Move the cursor to the course that you wish to drop
in the timetable.
- Click on the course.
The course that you have chosen to drop is now
highlighted; if this is the correct course continue on if not
go back to step 1.
- Click on "Drop Course".

- Before processing your selection, the system
will prompt for confirmation.
Click on "YES" or "NO" to confirm or cancel the drop request.
If you confirm, the timetable display will be updated.
Changing Sections of Courses You are Enrolled In
You can also modify your registration in a course if you wish to
change to a different lecture or lab or tutorial.
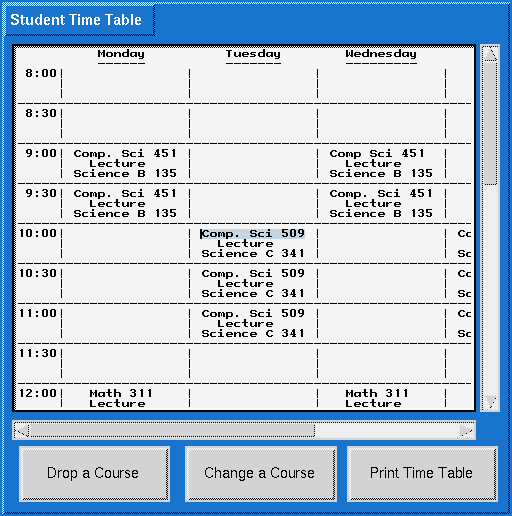
To change a course do the following:
- Select a course to modify from the timetable.
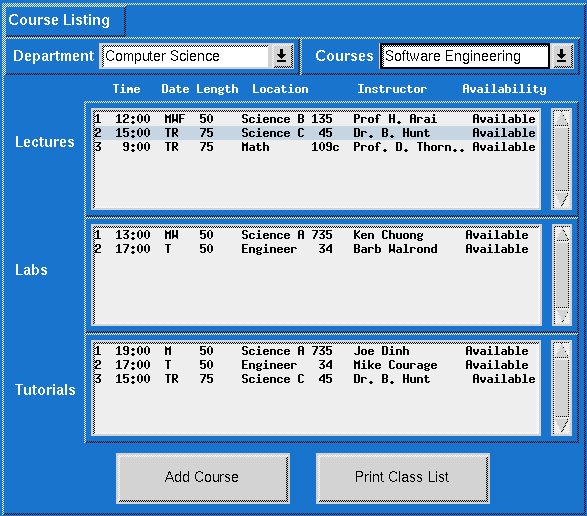
- Click on "Change a Course" button. The course listing (located
below the course listings box) will display all of the selected
lectures, labs and tutorials along with their times and
associated information.
Your current sections will be highlighted. see below
- Select lecture and/or lab and/or tutorial sections you want to
change to. It is not possible for on the student's system to
select a section that is grayed out because that section is either
full or is in conflict with the current timetable. The
administrator's system, however, will allow the user to select a
section regardless of FULL status.
- Click on "Change A Course" button.
- A dialog box will appear. Click on
 if you want to make the change.
 if you do not want the change.
After the "Yes" is clicked, if the request is successful, the system will
automatically update the new sections on the timetable and display a success
message in the status line at bottom of screen. A course conflict is not
possible because the system will not allow a student to choose a course that
that is in conflict with their present schedule.
A selection may be
unsuccessful if the course happens to become full in the time it takes for the
student to view and then select a new section. The system will then display a
dialog box with the following error message: - "Modification unsuccessful.
Lecture section is full."
("Lecture" may be replaced by "Lab" or "Tutorial").
Printing Your Timetable
 Click on the 'Print Time Table' button located directly beneath
the Student Time Table.
If the print request is successfully queued, click "OK"
on the confirmation box.
If the printing cannot be performed, an error message will appear.
Click on "OK" to make the error box disappear. Retry later.
Using the Administrative Functions
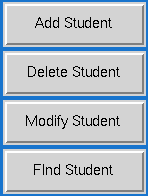 For administrative users
these buttons are added to the top of the main menu screen.
Administrators can use all student functions, but must first specify a
student using the "Find Student" function.
Adding a New Student
Click on "Quit" to exit this function without adding
a student to the database.

- Click on the 'Add Student' button located to the right of the Student
Information area.
- Enter in the new student's data in the appropriate fields.
- Click on "OK" to add the student to the database.
- A new window will appear with the student's password and
identification number, make a note of this information and then click
on "OK" to make this box disappear.
Description of Input Fields
- Name - Enter a name in the format last name, first name and initial
up to 30 characters. You must enter data in this field or you
will receive the 'Not enough information entered' message.
- Address - Optional civic address composed of house or
apartment number, street, city, province and postal code.
Up to 50 characters in length.
- Phone - Optional 14 character phone number including area code.
e.g. (403) 220 - 7000.
- Faculty - Optional 10 character faculty name.
- Major - Optional 10 character major field of study.
- Minor - Optional 10 character minor field of study.
- Status - Enter F - full time , P - part time , A - administrator, or
I - inactive.
- Program Year - an integer greater than zero.
- ID Number - This field is cannot be edited.
If you receive 'Not enough information entered' message:
- Click on "OK" in the error box to make it disappear.
- Enter the missing data in the student information area.
- Click on "OK" when corrections have been made.
If a student has been successfully added to the database but one or more
of the fields is incorrect it can be corrected by following these steps.
- Click on 'Modify Student' located below the 'Add Student' button to
the right of the Student Information area.
- Edit the erroneous fields.
- Click "OK" to accept the changes.
Finding a Student in the System
Click on "Quit" to exit this function without searching for a
a student in the database.
- Click on the 'Find Student' button located to the right of the Student
Information area.
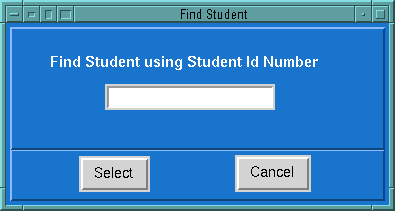
- Enter in the student's 6 digit identification number at the
prompt in the Find Student Window.
- Click on 'Select' to accept or 'Cancel' to abort the action.
If you receive the 'Student not on file' message:
- Click on "OK" to make the error box disappear.
- Check that you have the correct identification number.
- Reenter the identification number at the prompt.
- Click 'Select' to accept.
If you receive the 'Invalid identification number' message:
- Click on "OK" to make the error box disappear.
- Check that you have the identification number in the correct format.
- Enter the corrected identification number at the prompt.
- Click 'Select' to accept.
Modifying Information About a Student
Click on "Quit" to exit this function without modifying a
a student in the database.
Please see "Adding a Student" for a description of
the input fields.
- Click on the 'Modify Student' button to the right of the Student
Information area.
- If you do not have a student record on screen you will be prompted
to enter a 6 digit identification number, else skip to step 4.
- Click on 'Select' to retrieve the student's record.
- Enter new information in the Student Information area fields.
- Click "OK" to accept the changes.
If you receive the 'Not enough information entered' message:
- Click on "OK" to make the error box disappear.
- Check that you have entered a student name.
- Enter the missing data in the Student Information fields.
- Click "OK" when done.
If you receive the 'Student not on file' message:
- Click on "OK" to make the error box disappear.
- Check that you have the correct identification number.
- Reenter the identification number at the prompt.
- Click "OK" to accept.
- Make modifications to the student record.
- Click on "OK" to accept these changes.
If you receive the 'Invalid identification number' message:
- Click on "OK" to make the error box disappear.
- Check that you have the identification number in the correct format.
- Enter the corrected identification number at the prompt.
- Click "OK" to accept.
- Modify the student fields.
- Click on "OK" to accept these modifications.
Deleting a Student
Click on "Quit" to exit this function without deleting a
a student in the database.
- Click on the 'Delete Student' button to the right of the Student
Information area.
- If the student's record is on screen goto step 5.
- If the student's record is not on screen you will be prompted
for a student identification number. Enter the a 6 digit number.
- Click on 'Select' to accept. The student record will then appear
on screen.
- The 'Are you sure?' dialog box will prompt you for a 'Yes' or 'No'
to delete this student.
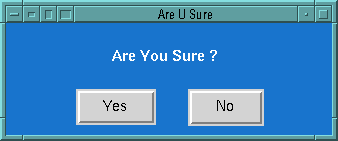
- Click on "Yes" to delete the student or "No" to abort the action.
- You will then receive a 'Student successfully deleted' message. Click
OK to acknowledge.
If you receive the 'Student not on file' message:
- Click on "OK" to make the error box disappear.
- Check that you have the correct identification number. Reenter
the identification number at the prompt.
- Click "OK" to accept.
Modifying Add and Drop Dates
In the upper right corner of the screen, there is a data box containing the
"Date", "Last day of Registration", and "Drop Date".
Dates are displayed in
long form (ie. January 29, 1996).
To change dates do the following:
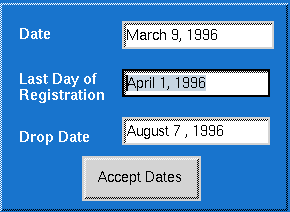
- Click on the date you want to modify.
- Type in the new date.
- Click on the "Accept Dates" button.
The system will check this information against the current date,
and each other ( eg. the Add date cannot be past the Drop date).
Erroneous dates will cause an error box
to appear. Click on "OK" to acknowledge the error
then retry.
If the date is valid a confirmation box and the new date
is displayed. Click "OK" to clear the confirmation.
Printing a Class List

Class lists can be printed for single sections of course components
using the following sequence:
- Select from the Department list box.
- Select from the Course list box.
Decide which course component (lecture,lab or tutorial)
you wish to print
- Select the class section from the lecture,lab or tutorial list box.
- Click on the "Print Class List" button
If the print request is successfully queued, click "OK"
on the confirmation box.
If the printing cannot be performed, an error message will appear.
Click on "OK" to make the error box disappear. Retry later.

 On the table beside each terminal is a moveable device called a mouse.
Moving the mouse on its pad moves an arrow (cursor) on the
display screen. Screen objects this arrow points to may be activated
by pressing and releasing (clicking) the
left button on the mouse.
 The registration screen contains text in rectangular gray boxes called
buttons. If the mouse cursor is positioned on a button and the left mouse
button is pressed, the system will do what the text on the
screen button suggests.
 Lists may be too large to fit on the screen at all times. Drop down lists
have a down arrow on the right. Click on this arrow and a box appears containing
the list.
 Lists of courses, departments and course sections, as well as a student timetable
are displayed in boxes on the screen. Items in these boxes can be selected with the
mouse. It the selection is made from a drop down list, the list reverts to a single
button displaying the current selection.
 Lists may be larger than their screen box. To the right of each list box
is a rectangular grey area with triangles at top and bottom. Click
on a triangle to move the list in that direction.
 At the bottom the student registration screen displays a single
line of "context sensitive help". As the mouse cursor passes over a screen
element, its function is displayed in this help line.
 Need more Information ? Click on this button.
 If you change your mind when making a change,
selecting "QUIT" will stop what you have begun.
 This screen tells you that the General University
on-line student registration system is ready to use, and is
displayed when you finish a session.
To begin a session click on the Login button.
The online calendar option is part of the enhanced
system and will not be implemented initially.


 To change your password click on the "Change Password"
button on the main menu. The Change Password
window appears in the center of the screen.


 if you want to make the change.
  if you do not want the change.
 Click on the 'Print Time Table' button located directly beneath
the Student Time Table.
  For administrative users
these buttons are added to the top of the main menu screen.
Administrators can use all student functions, but must first specify a
student using the "Find Student" function.


