ATICS User Manual

User Manual

The user manual is task oriented, providing a set of steps to follow for the most common tasks users perform. As such, the user manual is not a complete, in-depth description of ATICS.

The user manual is divided into three sections: table of contents, task descriptions (walk-throughs), and an index. The table of contents and index provide links to the walk-throughs. The table of contents also points to a longer introduction.

Table of Contents


  1. Introduction
  2. Initialization
  3. Booking Agent
  4. System Administration
  5. Future Enhancements
  6. Bugs
  7. Index


Introduction

Welcome the the Air Traffic Itinerary / Control System (ATICS) user manual. This user manual describes the most common tasks users perform with ATICS. The manual also includes an initialization section.

The table of contents lists the tasks described in the manual and provides links to them. The index also provides links to the tasks, based on commonly used terms.

The tasks are described with simple step by step instructions. At key points in the tasks, users will see the

Error!

picture. This picture identifies descriptions of potential errors and how to avoid them. The tasks also contain examples with sample input.

ATICS follows the Microsoft Windows 3.1 user interface conventions. For an introduction to Microsoft Windows 3.1, please see the Windows 3.1 manual or a book describing Windows 3.1. The user manual assumes that users are already familiar with Windows 3.1.


Initialization

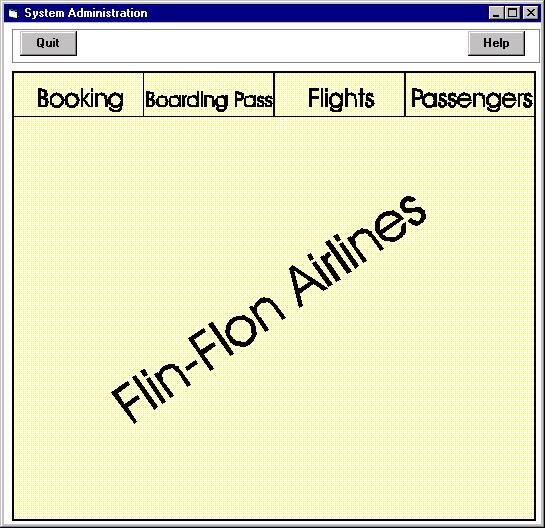
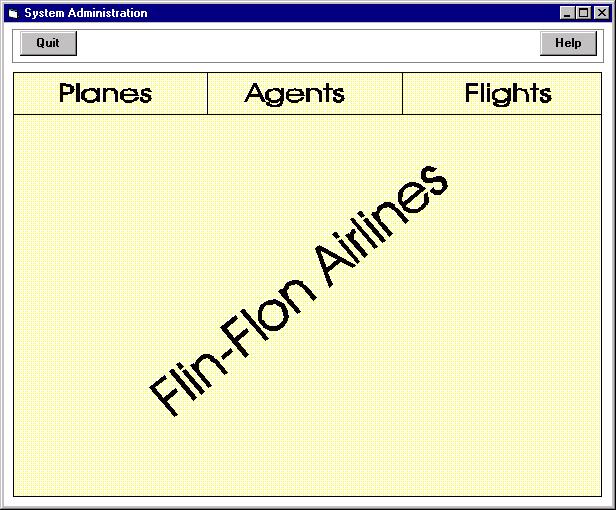
The ATIC system must be initialized before being used. The 3 tasks required to initialize the system are: add booking agents, add plane types, and add flights. All three tasks are accomplished through the System Administration program.

The booking agents can now login to the Booking Agent program to book passengers on the newly added flights.


Booking Agent User Manual


Logging In

Image of login screen

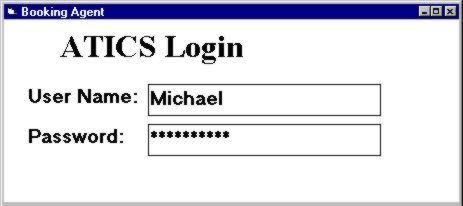
The steps for logging into the booking agent system are:

  1. enter user login name
  2. enter user password
Error! If a non-existent login name or incorrect password is entered, the user will not gain access to the system. The system will then re-initiate the login procedure at which point the user should ensure that the proper login name and password are being used.

Image of booking agent screen


Booking Screen:


Booking Screen

Single Passenger/Flight Booking:


Selecting a Flight:


  1. Select a departure city by scrolling through the selection in the "Dep:" box.
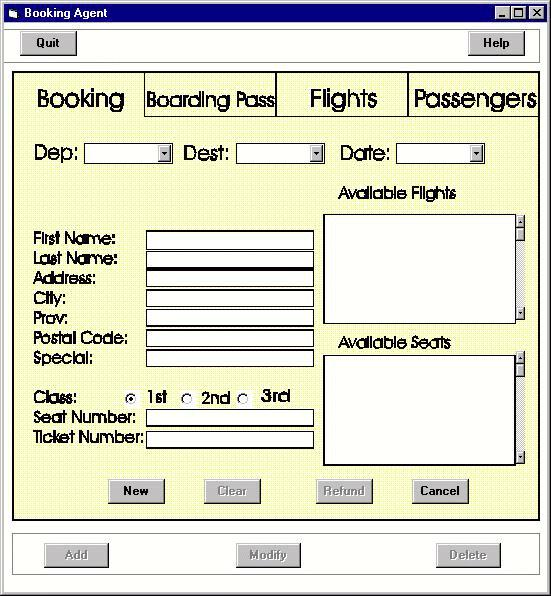
    Sample Input: Flin Flon
  2. Select a destination city by scrolling through the selection in the "Dest:" box.
    Sample Input: Winnipeg
  3. Enter the proper travel date into the Date box
    Sample Input: Feb 12 for Febuary 12th
  4. Choose from the "Available Flights" list box the flight that is suitable.
    Error!The Flight Number, Departure time, Arrival time, and the 1st,2nd and 3rd classfares all appear in the "Available Flights" list box.
    Sample flight info in the box: FF1001 12:00 13:30 300 200 100

Choosing a Seat:


  1. Choose a class that is suitable for the passenger by clicking on a seat in the " Available Seats" list box. Once a seat is clicked the Class will be indicated in the "Class" display on the screen.
    Sample Input: Seat 1A
  2. From the list displayed choose the seat type preference. Seats on the outer edges of the display are window seats, the ones in the centre are centre seats.
  3. When you have chosen an appropriate seat type and class you may now begin asking the passenger for personal information.


Personal Passenger Information:


  1. Click the mouse on the "First Name" box and type in the correct first name. If you make a mistake use the delete key and your mouse to correct it. (ie Smith)
  2. Click on the "Last Name" box and type in that information.
    Sample Input: John
  3. Fill in the Address, City,Province, Postal Code, and Phone Number in the correct corresponding boxes. Remember to use your mouse and delete key to correct entry errors.
      Sample Input:
    • Address: #5 Rachel Ave
    • City: Markham
    • Prov: ON
    • Postal Code: M5J 2L1
    • Phone: 905-555-1131
  4. Fill in the "Special" box with any extra needs the passenger may need on his/her flight.
    Error!This may be special meals, juvenile supervision, etc


Storing the flight information:


  1. Once all Personal Passenger information has been entered and the seat assigned click on the "New " Key to store the reservation.
  2. A Ticket Number will appear at this point. Make sure to give the number to the passenger. (Each flight reservation has its own distinct number ie 123456)
  3. If the passenger wishes to book another flight , perhaps the return trip, follow the Multiple Booking Instructions that follow.


Multiple Booking:


  1. Follow the instructions for the "Single Passenger/Flight Booking" section above for the passenger's first flight.
  2. If the passenger wishes to book another flight leave the current passenger's file up.
  3. Change the Departure, Destination , Date ,Flight and Seat Selection for the additional flight , following the same instructions as above for these windows.
  4. Change the "Special" section if need be or keep it the same.
  5. Press the "Add" key again, and refer the flight ticket number to the customer.


Multi-Passenger Booking:


  1. Complete the first passenger's file(s) using the "Single Passenger/Flight Booking" section or the "Multiple Booking" section making sure that there is an adjacent seat on the flight(s) you book them on.
  2. While the first passenger's flight is still up and after it has been saved, change the personal passenger information to suit the accompanying passenger's information.
    Sample Input: From John to Jane Smith
  3. Click on the seat next to the first passenger to select it.
    Sample Input: ie 1B
  4. Save the information using the "New" key and refer the ":Ticket Number"
    Sample Input: 123457
  5. If this is a "Multiple Booking" reservation choose the same flight and an adjacent seat for the accompaning passenger on the other flights.


Modifying a Booking:


  1. From the "Passengers" screen bring up the passenger's flight scheduling by their name or ticket number.
  2. Choose a flight to modify by clicking on it.
  3. Click the "Modify" key .
  4. You will be transfered back to the Booking screen, where you may change the passenger's personal information, flight , or seat assignment. (Flight and Seat assignment are changed by clicking on a different seat or flight in the appropriate list box)
    Sample Input: From #5 to #6 Rachel Cres.
  5. Press the modify key to save the changes.


Difficulties:


Most errors encountered in this screen will be data input errors or the wrong key stroke. These can easily be corrected by using the mouse and delete keys to make the appropiate changes. If the File has already been saved, the Agent will have to enter the Modify function from the Passengers Screen, make the changes and press the Modify button.


General Information Query

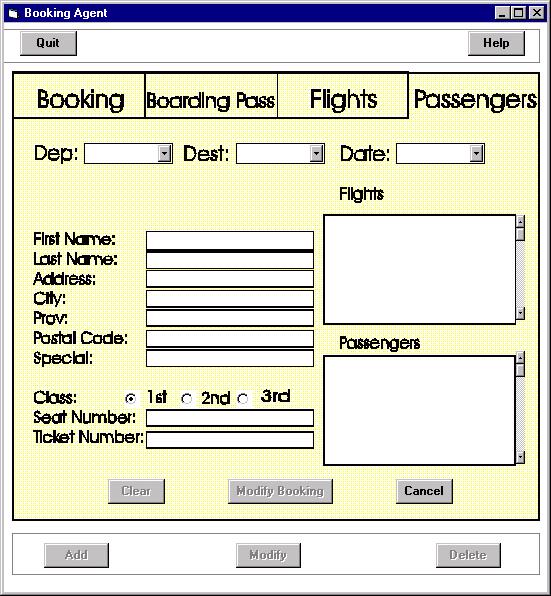
There are two information query available for the user to choose from. The user can query either flight information or passenger information.

The user can select the "Flight" or the "Passenger" tab on the top of the menu in order to perform the query flight or query passenger information task.

Query Flight Information

The user can enter this query mode by selecting the "Flight" tab near the top of the screen by a mouse. Then, the query flight information screen will be presented.


Query Flight Screen

Search by flight number

The steps for searching a flight are:
  1. click on the "Flight Number" entry box
  2. enter a flight number
    Sample Input: ca1234
    Error! Make sure to enter 2 characters and a 4 digit numbers.
  3. press "enter" when done
Output:
The following flight information will be displayed on the left of the screen:
  1. departure point
  2. destination
  3. date
  4. make
  5. capacity
  6. available seats for each of the three classes
The upper list box on the right hand side of the screen will be presented with:
  1. the flight number
  2. departure time
The lower list box on the right hand side of the screen will be presented with a list of:
  1. the passengers' name
  2. the passengers'ticket numbers

Searching flights leaving a specific departure point (on certain date)


The steps are:
  1. select one departure point from the "Dep" list.
    Sample Input: Toronto
  2. enter the desire date to search from (optional).
    Sample Input: Mar 11
    the default is the current date
    Error! Make sure the date is in the format of "MMM DD".
Output:
The upper list box on the right hand side of the screen will be presented with:
  1. a list of the flight numbers associated with
  2. a list of the flight's arrival time and
  3. a list of the flight's departure time
Error! Note that the flights all leave from one specific departure point to any departure points (on the same date).


Searching flights going to a specific destination (on certain date)


The steps are:
  1. select one destination from the "Dest" list.
    Sample Input: Calgary
  2. enter the desire date to search from (optional).
    Sample Input: Mar 11
    the default is the current date
Error! Make sure the date is in the format of "MMM DD".
Output:
The upper list box on the right hand side of the screen will be presented with:
  1. a list of the flight numbers associated with
  2. a list of the flight's arrival time and
  3. a list of the flight's departure time
Error! Note that the flights all go to one specific departure point from any departure points (on the same date).


Searching flights from a departure point to a destination (on a certain date)


The steps are:
  1. select one departure point from the "Dep" list.
    e.g Flin Flon
  2. select one destination from the "Dest" list.
    e.g Toronto
  3. enter the desire date to search from (optional).
    Sample Input: Mar 11
    the default is the current date
Error! Make sure the date is in the format of "MMM DD".

Output:
The upper list box on the right hand side of the screen will be presented with:
  1. a list of the flight numbers associated with
  2. a list of the flight's arrival time and
  3. a list of the flight's departure time
Error! Note that the flights all leave from one specific departure point to one departure point (on the same date).


Query Passenger Information

The user can enter this query mode by selecting the "Passenger" tab near the top of the screen by a mouse. Then, the query passenger information screen will be presented.

Query Passenger Screen

Search ticket number


The steps are:
  1. click on the "Ticket Number" entry box.
  2. enter a ticket number.
    Sample Input: 123456
Error! Make sure the ticket number should be exactly six digit long.

Output:
The following will be displayed on the top of the screen:
  1. departure point
  2. destination
  3. date of departure
The following will be presented on the left hand side of the screen:
  1. first name of customer
  2. last name of customer
  3. address
  4. city
  5. province
  6. phone
  7. special requirement
  8. class
  9. seat preference
  10. seat number
  11. ticket number
The upper list box on the right hand side of the screen will be presented with:
  1. first name of customer
  2. last name of customer
The lower list box on the right hand side of the screen will be presented with:
  1. a list of flight numbers associated with
  2. the flight's departure time and
  3. the flight's arrival time

Search by passenger's first name

  1. click on the "First Name" entry box
  2. enter a first name
    Sample Input: John
    Error! Make sure the name should not exceed the maximum of 15 characters.
  3. press enter when done

Searching by passenger's last name

  1. click on the "Last Name" entry box
  2. enter a last name
    Sample Input: Smith
    Error! Make sure the name should not exceed the maximum of 15 characters.
  3. press enter when done

Search by passenger's first name and last name

  1. click on the "First Name" entry box
  2. enter a first name
    Sample Input: John
    Error! Make sure the name should not exceed the maximum of 15 characters.
  3. press enter when done
  4. click on the "Last Name" entry box
  5. enter a last name
    Sample Input: Smith
    Error! Make sure the name should not exceed the maximum of 15 characters.
  6. press enter when done

Output:

The system will perform dynamic search on the inputs. Thererfore, the upper list box will display all the names that match each character the user input. (i.e. if `An' is entered, the output will be: 'Andy', 'Anna', 'Annie'...)


The upper list box on the right hand side of the screen will be presented with:
  1. a list of names that match the user input.

The user may obtain information on a specific passenger by selecting one of the name of the passengers from this list. The user may do so by highlighting the name by a mouse.

Then, the output as described in the previous section will be presented for one passenger.

If the passenger's both first and last name were entered, then, the information of that specific passenger will be presented.


To modify information on one specific customer


The steps are:
  1. Search for the specific customer's record by the method described above.
  2. Click on the "Modify" button.
  3. The system will then automatically convert to the "Booking" screen and the user can modify the record as required.


Issue Boarding Passes:

This function is used to generate boarding passes prior to the time of departure. When passengers check in at the airport, and after confirmation of seat reservations, boarding passes will be issued.

Boarding Pass Screen

To Issue a Boarding Pass:

  1. Retrieve List of Passengers on departing plane
    • Select Flight tab
    • Proceed to Query Flights screen
    • Search according to flight number
      Sample Input: aa1234
    • A sorted list of passenger names will appear in a list box
  2. Select Boarding button to proceed to Boarding Passes window
  3. *Select passengers name from list
    Sample Input: Smith, John
  4. Confirm passenger's personal info. with info. on screen
  5. Select Issue Pass button to print Boarding Pass

* If there are identical names, the agent can look at the ticket number corresponding to the matched names and since the ticket number is unique, if it matches, the agent can be sure that he checks in the right person.

Error!

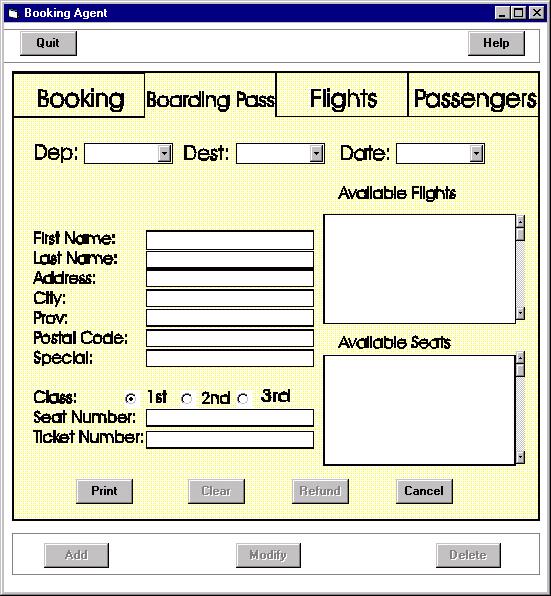
If the agent presses the button "Issue Pass" before he or she assigns a seat to one of the 15% over-booked passengers, the computer will pop up an error message saying, "Please assign a seat first." The agent will need to press the button "OK" at the bottom of the error message to let the computer know that the message has been read. The computer will then remove the error message and let the user back to the "Boarding Pass" screen with the previous passenger information displayed.

Note: While in the "Boarding Pass" screen, the agent can view all the passenger information fields but is unable to modify any of them EXCEPT the seat number and the seat preference. This is done to prevent the agent from assigning a first class seat that has not been confirmed taken to someone who pay for a second class fare. If the agent were allowed to modify the class field then that would definitely change the price of the plane ticket.


Issue Refund:

A passenger who cannot get a boarding pass because the plane is full, and hence, cannot board the plane, that passenger will be refunded 10% of the ticket price and will be booked on one of the next flights to their destination.

To issue a 15% refund to passenger:

  1. Retrieve List of Passengers on departing plane
    • Select Flight tab
    • Proceed to Query Flights screen
    • Search according to flight number
      Sample Input: aa1234
  2. A sorted list of passenger names will appear
  3. Select Boarding button to proceed to Boarding Passes window
  4. *Select passengers name from list
    Sample Input: Smith, John
  5. Confirm passenger's personal info. with info. on screen
  6. Select Refund button to refund 15% of the ticket price to passenger
  7. The booking agent is lead to the Booking screen to re-book the passenger on the next available flight
  8. Confirming with passenger for the next convenient flight Booking Agent will double click that flight
    Sample Input: bb1234
  9. Next, select the seating arrangements from the scroll-able grid
    Sample Input: AG
  10. Finally, select the Add button to re-book passenger

* If there are identical names, the agent can look at the ticket number corresponding to the matched names and since the ticket number is unique, if it matches, the agent can be sure that he checks in the right person.

Note: The agent can change any information on the screen EXCEPT the class field because if this class field changes, the price of the ticket will be changed as well. Also, since this is a re-booking procedure, the passenger has already paid for the ticket and already received a refund of 10%.


System Administration User Manual


Logging In

Image of login screen

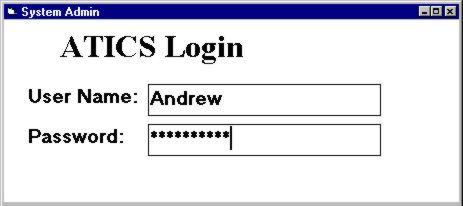
The steps for logging into the system administration system are:

  1. enter user login name
  2. enter user password
Error! If a non-existent login name or incorrect password is entered, the user will not gain access to the system. The system will then re-initiate the login procedure at which point the user should ensure that the proper login name and password are being used.

Image of system administration screen


Planes

Choose the planes tab from the initial system administration screen to access the aircraft database options.

Add a Plane

Image of add screen

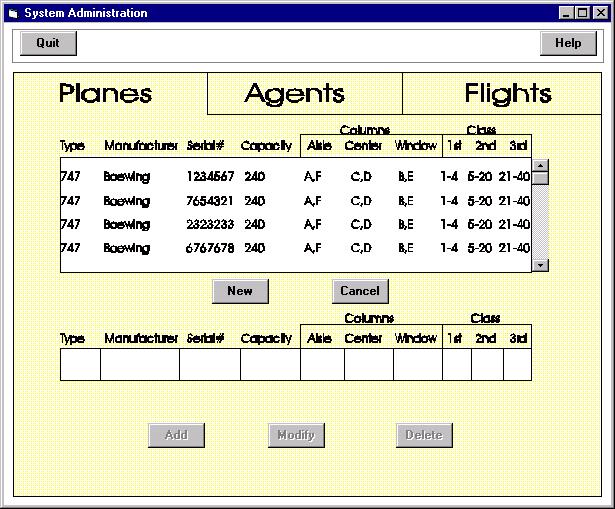
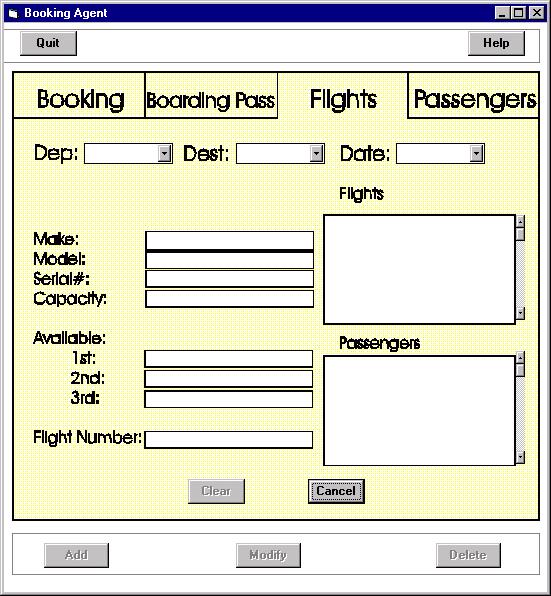
The steps for adding a plane are:

  1. press the new button
  2. go to the new flight information screen that appears at the bottom
  3. enter the aircraft type
    Sample Input: 747
  4. enter the manufacturer
    Sample Input: Boeing
  5. enter the serial number
    Sample Input: 1234567
    Error!Make sure the number is unique.
  6. enter the seating capacity
    Sample Input: 240
  7. enter the seating information
    • enter the columns
      • enter the window columns
        Sample Input: B,E
        Error!Make sure there are exactly two window columns.
      • enter the aisle columns
        Sample Input: A,F
        Error!Make sure there are an odd number of aisle columns.
      • enter the centre columns
        Sample Input: C,D
      Error!Make sure no column is in more than one category.
    • enter the rows
      • enter the first class rows
        Sample Input: 1-4
      • enter the second class rows
        Sample Input: 5-20
      • enter the third class rows
        Sample Input: 21-40
      Error!Make sure no row is in the range of more than one category.
  8. press the add plane button
  9. select yes from the confirmation prompt if all the information entered is correct
    Error!If you select no, the changes will be discarded and the screen will return to its original state.

    Modify a Plane

    Image of modify screen

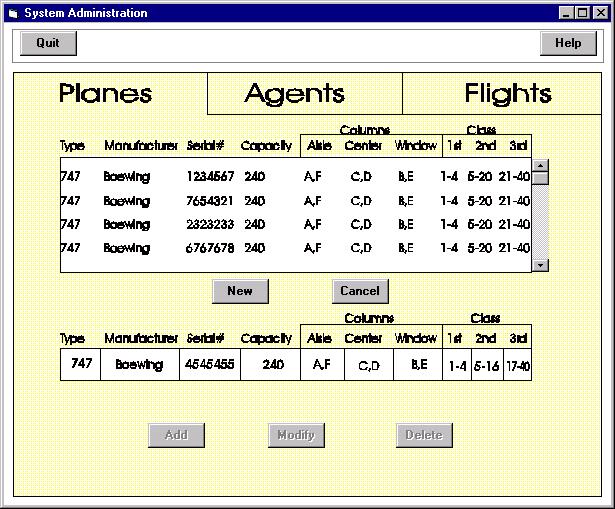
    The steps for modifying a plane are:

    1. select the plane that you wish to modify
    2. go to the plane information screen that appears at the bottom
    3. modify one or more fields
      Error!Watch out for errors as described in the Add plane option.
    4. press the modify plane button
    5. select yes from the confirmation prompt if all the information entered is correct
      Error!If you select no, the changes will be discarded and the screen will return to its original state.

      Delete a Plane

      The steps for deleting a plane are:
      1. select the plane that you wish to delete
      2. examine the plane information screen that appears at the bottom
      3. press the delete plane button
      4. select yes from the confirmation prompt
        Error!If you select no, the flight will not be deleted and the screen will return to its original state.

        Flights

        Choose the flights tab from the initial system administration screen to access the flights database options.

        Add a Flight

        Image of add screen

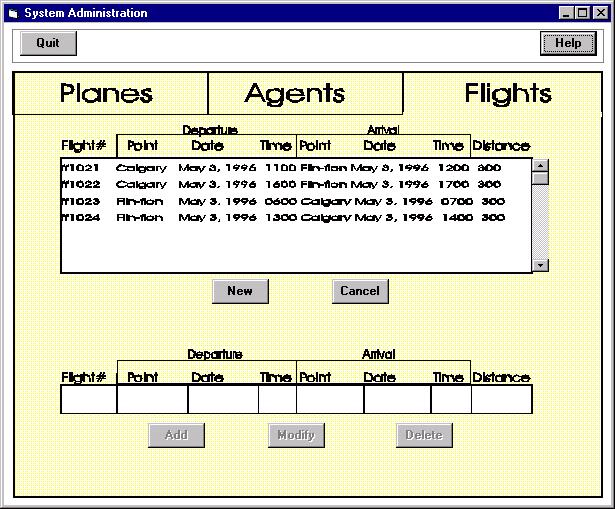
        The steps for adding a flight are:

        1. press the new button
        2. go to the new flight information screen that appears at the bottom
        3. the system will assign a flight number
        4. enter the departure information
          • enter the city
            Sample Input: Calgary
          • enter the date
            • enter the month
              Sample Input: May
            • enter the day
              Sample Input: 3
            • enter the year
              Sample Input: 1996
            Error!Make sure the date is on or after the current date and in the correct format.
          • enter the time
            Sample Input: 1100
            Error!Make sure the time is on or after the current time if the date entered is the current day and in a valid 24 hour clock format.
        5. enter the arrival information
          • enter the city
            Sample Input: Flin-Flon
          • enter the date
            • enter the month
              Sample Input: May
            • enter the day
              Sample Input: 3
            • enter the year
              Sample Input: 1996
            Error!Make sure the date is on or after the current date and in the correct format.
          • enter the time
            Sample Input: 1200
            Error!Make sure the time is on or after the current time if the date entered is the current day and in a valid 24 hour clock format. Also make sure the arrival date and time are after the departure time.
        6. enter the distance
          Sample Input: 300
          Error!Make sure that the distance is a positive value.
        7. enter the serial number of the plane assigned to the flight
          Sample Input: 1234567
          Error!Make sure the plane has no conflicting flight.
        8. enter ticket prices
          • enter the first class ticket price
            Sample Input: 300
          • enter the second class ticket price
            Sample Input: 200
          • enter the third class ticket price
            Sample Input: 100
          Error!The ticket prices should all be positive, and first class should be more expensive than second class, which should be more expensive than third class.
        9. press the add flight button
        10. select yes from the confirmation prompt if all the information entered is correct
          Error!If you select no, the changes will be discarded and the screen will return to its original state.

          Modify a Flight

          Image of modify screen

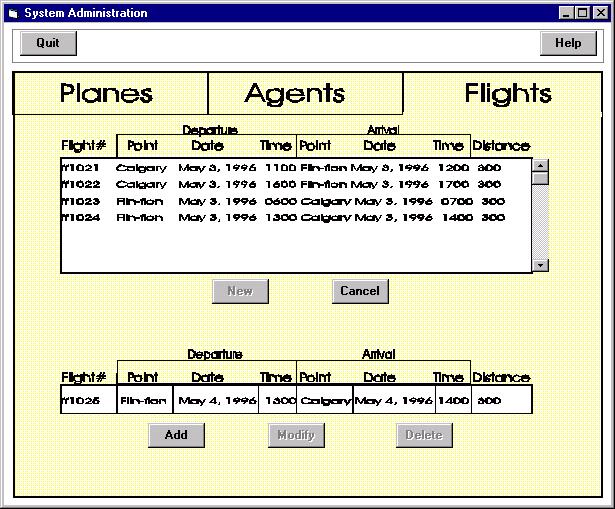
          The steps for modifying a flight are:

          1. select the flight or enter the flight number of the flight you wish to modify
          2. go to the flight information screen that appears at the bottom
          3. modify one or more fields
            Error!Watch out for errors as described in the Add flight option.
          4. press the modify flight button
          5. select yes from the confirmation prompt if all the information entered is correct
            Error!If you select no, the changes will be discarded and the screen will return to its original state.

            Delete a Flight

            The steps for deleting a flight are:
            1. select the flight or enter the flight number of the flight you wish to delete
            2. examine the flight information screen that appears at the bottom
            3. press the delete flight button
            4. if you wish to rebook the passengers from the deleted flight onto the next available flight to the same destination, select yes from the Rebook Passengers Prompt
              Error!If you select no, the passengers will lose their booking.
            5. select yes from the confirmation prompt if you still wish to delete the flight
              Error!If you select no, the flight will not be deleted and the screen will return to its original state.

              Booking Agents

              Choose the Agent tab from the initial system administration screen to access the booking agent database options.

              Add a Booking Agent

              Image of modify screen

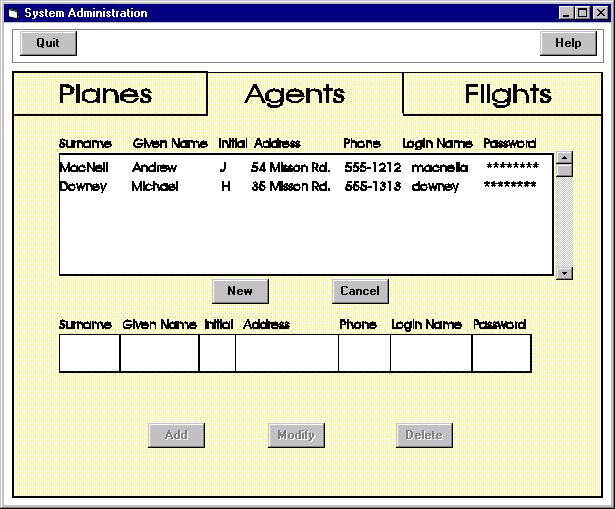
              The steps for adding a booking agent are:

              1. press the new button
              2. go to the new booking agent information screen that appears at the bottom
              3. enter booking agent's surname (last name)
                Sample Input: MacNeil
              4. enter booking agent's first name
                Sample Input: Andrew
              5. enter booking agent's middle initial
                Sample Input: J
              6. enter booking agent's address
                Sample Input: 54 Misson Rd.
              7. enter booking agent's phone number
                Sample Input: 555-1212
                Error!Make sure the phone number is in the correct format. It should have an optional three digit area code in parentheses, followed by three digits, a dash, and four more digits.
              8. enter a login name for the booking agent
                Sample Input: macneila
                Error!Make sure login name is unique.
              9. enter a password for the booking agent
                Error!This field must be filled in.
              10. press the add booking agent button
              11. select yes from the confirmation prompt if all the information entered is correct
                Error!If you select no, the changes will be discarded and the screen will return to its original state.

                Modify a Booking Agent

                Image of add screen

                The steps for modifying a booking agent are:

                1. select the booking agent you wish to modify
                2. go to the booking agent information screen that appears at the bottom
                3. modify one or more fields
                  Error!Watch out for errors as described in the Add booking agent option.
                4. press the modify booking agent button
                5. select yes from the confirmation prompt if all the information entered is correct
                  Error!If you select no, the changes will be discarded and the screen will return to its original state.

                  Delete a Booking Agent

                  The steps for deleting a booking agent are:
                  1. select the booking agent you wish to delete
                  2. examine the booking agent information screen that appears at the bottom
                  3. press the delete booking agent button
                  4. select yes from the confirmation prompt if you still wish to delete the booking agent
                    Error!If you select no, the booking agent will not be deleted and the screen will return to its original state.


                    Future Enhancements

                    This section describes future enhancements to ATICS so that it will satisfy all the functionality described in the Functional Specification and Management Plan and the Detailed Design Document.

                    These enhancements will be corrected as soon as possible. ATICS was released 'as is' so the customer can have a working system.

                    The major enhancements are:

                    • refunds: no interface to accounting dept
                    • no cheque printing
                    • security should be improved
                    • no fancy graphics for plane seating

                    ATICS also requires some enhancements with respect to a fully developed commercial application. This functionality was NOT specified in the previous documents.

                    • concurrent access not tested
                    • nationally distributed not tested
                    • no backup plans specified
                    • no regularly scheduled flights
                    • eg: daily, weekly

                    These enhancements are listed to demonstrate the difference between ATICS the university project from ATICS a commercial application.


                    Bugs

                    We are not aware of any major bugs in ATICS at this time, though we are on a continuous search for problems. We will advise our customers when bugs are discovered, and endeavour to fix them as soon as possible.


                    Index


                    Adding
                    booking agents
                    bookings
                    flights
                    passenger
                    planes

                    Bugs

                    Deficiencies

                    Deleting
                    booking agents
                    flights
                    planes

                    Initializing

                    Introduction

                    Logging in
                    Modifying
                    booking agents
                    bookings
                    flights
                    passengers
                    planes