Again, ISIS has done a super job on explaining
how to use the system, from point to poin. Toward 2000 is grateful for
that.
Regarding the schedules and reports in general,
it would be very nice if ISIS could include the sample screenshots of the
reports. The other thing that is not mentioned is that whether or not a
"print" button is needed if our staff would like to print out
the reports.
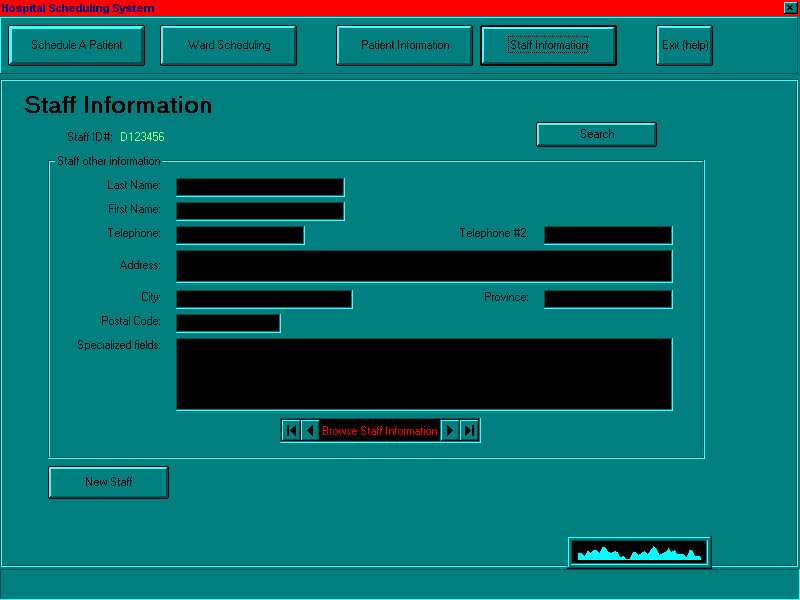
There are no Daily Schedule Report, Weekly
Schedule Report, Monthly Schedule Report and Yearly Schedule Reports buttons
that apprear in the forms indicated.
Search for a Person
This section explains how to use the search routine used to look up
staff and patients for additions, updates, or deletions. It assumes you
have already brought up the search dialog box by clicking on the search
button for the type of person you want to look for.
Step by step
- By ID:
- Type the person's ID number in the ID field at the top of the dialog
box.
- Click on Go to Record.
- You are returned to the previous screen with the selected person's
information displayed.
- General search:
- Enter the information you wish to use to find the person in the fields
presented in the lower portion of the dialog box. This may include Last
Name, First Name, Address, and Telephone number. You may fill in one field,
several fields, or all of them.
- Click on Search.
- You are returned to the previous screen. The information displayed
is that of the first person found matching the information you entered.
- Use the screen's Browse records buttons to find the person you
were looking for. Press the left-arrow button to look at the previous record
(one with a lower ID) and the right arrow button to look at the next record.

Add a Nurse
This function will add a nurse to the system, making the nurse available
for scheduling.
Step by step
- At the main screen, click on Staff Information. This will bring
you to the screen seen above.
- Type in the nurse's names, phone number, address, and other pertinent
information.
- Press Tab to move to the next field, Shift-Tab
to move to the previous field, or click the mouse in the field you want
to edit.
- When all the new nurse's information is entered, click on Save.
An ID will be created for the nurse, who will be added to the database.
- The new nurse's information remains on the screen.
Remove a Nurse
This function will remove a nurse's information from the system. The
nurse will no longer be available in the system.
Step by step
- At the main screen, click on Staff Information. This will bring
you to the screen seen above.
- Click on Search. This will bring up the search dialog box.
- Follow the search routine to find the nurse whom
you wish to remove from the system.
- Click on Delete Nurse.
- The nurse is removed from the system and the next nurse's information
is displayed.
Modify Nurse Info
This function will change the information for a nurse already in the
system.
Step by step
- At the main screen, click on Staff Information. This will bring
you to the screen seen above.
- Click on Search. This will bring up the search dialog box.
- Follow the search routine to find the nurse whose
information you wish to change.
- Change the appropriate information.
- To do so, click in the field you want to change.
- Hold down the left mouse button while dragging over the text you wish
to replace.
- Release the mouse button and type the new information.
- Press Tab to move to the next field, Shift-Tab
to move to the previous field, or click the mouse in the field you want
to edit.
- When you've made all your changes, click on Save. The nurse's
information will be updated.
Display Nurse Info
This function will display all information about a nurse you select.
Step by step
- At the main screen, click on Staff Information. This will bring
you to the screen seen above.
- Click on Search. This will bring up the search dialog box.
- Follow the search routine to find the nurse whose
information you wish to display.
- The nurse's information is displayed.
Nurse Daily Schedule Report
This function will display a list of nurses working on a selected day.
The default is today.
Step by step
- At the main screen, click on Staff Information. This will bring
you to the screen seen above.
- Click on Daily Schedule Report.
- A dialog box appears, with the current date in the Date field.
If you wish to report on a different date, enter that date in the Date
field.
- The report is printed.
Generate Nurse Weekly Schedule Report
This function will produce the nurse weekly schedule report. The default
is the current week.
Step by step
- At the main screen, click on Staff Information. This will bring
you to the screen seen above.
- Click on Weekly Schedule Report.
- A dialog box appears, with the current week number in the Date field.
If you wish to report on a different week number, enter the week number
in the Date field.
- The report is printed.
Generate Nurse Monthly Schedule Report
This function will produce the nurse monthly schedule report. The default
is the current month.
Step by step
- At the main screen, click on Staff Information. This will bring
you to the screen seen above.
- Click on Monthly Schedule Report.
- A dialog box appears, with the current month(number) in the Date
field. If you wish to report on a different month, enter the month
in the Date field.
- The report is printed.
Generate Individual Nurse Schedule Report
This function will produce the daily schedule report for the selected
nurse. The default is the current day.
Step by step
- At the main screen, click on Staff Information. This will bring
you to the screen seen above.
- Click on Search. This will bring up the search dialog box.
- Follow the search routine to find the nurse whose
information you wish to report on.
- Click on Individucal Schedule Report.
- A dialog box appears, with the current day in the Date field.
If you wish to report on a different day, enter the date in the Date
field.
- The report is printed.
Generate Nurse List Report
This function will produce the nurse list report for a ward.
Step by step
- At the main screen, click on Staff Information. This will bring
you to the screen seen above.
- Click on Staff List Report.
- A dialog box appears, an empty Ward field will be displayed,
enter the Ward number.
- The report is printed.
Generate Nurse On-Call list Report
This function will produce the nurse On-Call list report.
Step by step
- At the main screen, click on Staff Information. This will bring
you to the screen seen above.
- Click on On-Call list Report.
- The report is printed.
Generate Nurse Yearly Schedule Report
This function will produce the nurse yearly schedule report. The default
is the current year.
Step by step
- At the main screen, click on Staff Information. This will bring
you to the screen seen above.
- Click on Yearly Schedule Report.
- A dialog box appears, with the current year in the Date field.
If you wish to report on a different year, enter the year in the Date
field.
- The report is printed.

Probably due to time pressure, ISIS has
not been able to include the screenshots that are mentioned in the section.
These screenshots will certainly help the staff a lot. Given the creditibility
and dedication of ISIS, Toward 2000 firmly believes that this will be corrected
in the final version of the user manual though.
Add a Doctor
This function will add a doctor to the system, making the doctor available
for scheduling.
Step by step
- At the main screen, click on Staff Information. This will bring
you to the screen seen above.
- Type in the doctor's names, phone number, address, and other pertinent
information.
- Press Tab to move to the next field, Shift-Tab
to move to the previous field, or click the mouse in the field you want
to edit.
- When all the new doctor's information is entered, click on Save.
An ID will be created for the doctor, who will be added to the database.
- The new doctor's information remains on the screen.
Delete Doctor Info
This function will remove a doctor's information from the system. The
doctor will no longer be available in the system.
Step by step
- At the main screen, click on Staff Information. This will bring
you to the screen seen above.
- Click on Search. This will bring up the search dialog box.
- Follow the search routine to find the doctor
whom you wish to remove from the system.
- Click on Delete Doctor.
- The doctor is removed from the system and the next doctor's information
is displayed.
Modify A Doctor
This function will change the information for a doctor already in the
system.
Step by step
- At the main screen, click on Staff Information. This will bring
you to the screen seen above.
- Click on Search. This will bring up the search dialog box.
- Follow the search routine to find the doctor
whose information you wish to change.
- Change the appropriate information.
- To do so, click in the field you want to change.
- Hold down the left mouse button while dragging over the text you wish
to replace.
- Release the mouse button and type the new information.
- Press Tab to move to the next field, Shift-Tab
to move to the previous field, or click the mouse in the field you want
to edit.
- When you've made all your changes, click on Save. The doctor's
information will be updated.
Display Doctor Information
This function will display all information about a doctor you select.
Step by step
- At the main screen, click on Staff Information. This will bring
you to the screen seen above.
- Click on Search. This will bring up the search dialog box.
- Follow the search routine to find the doctor
whose information you wish to display.
- The doctor's information is displayed.
Doctor Listing
This function will display a list of doctors either for a specific ward
or the entire hospital.
Step by step
- At the main screen, click on Staff Information. This will bring
you to the screen seen above.
- Click on Doctor Listing.
- A dialog box appears, with the Ward field empty. If you wish
to list doctors from a specific ward, enter the ward number in the Ward
field.
- The report is printed.
Generate Individual Doctor Schedule Report
This function will produce the daily schedule report for the selected
doctor. The default is the current day.
Step by step
- At the main screen, click on Staff Information. This will bring
you to the screen seen above.
- Click on Search. This will bring up the search dialog box.
- Follow the search routine to find the doctor
whose information you wish to report on.
- Click on Individual Schedule Report.
- A dialog box appears, with the current day in the Date field.
If you wish to report on a different day, enter the date in the Date
field.
- The report is printed.
Generate Doctor Weekly Schedule Report
This function will produce the doctor weekly schedule report. The default
is the current week.
Step by step
- At the main screen, click on Staff Information. This will bring
you to the screen seen above.
- Click on Search. This will bring up the search dialog box.
- Follow the search routine to find the doctor
whose information you wish to report on.
- Click on Weekly Schedule Report.
- A dialog box appears, with the current week number in the Date field.
If you wish to report on a different week number, enter the week number
in the Date field.
- The report is printed.
Generate Doctor Monthly Schedule Report
This function will produce the doctor monthly schedule report. The default
is the current month.
Step by step
- At the main screen, click on Staff Information. This will bring
you to the screen seen above.
- Click on Search. This will bring up the search dialog box.
- Follow the search routine to find the doctor
whose information you wish to report on.
- Click on Monthly Schedule Report.
- A dialog box appears, with the current month(number) in the Date
field. If you wish to report on a different month, enter the month
in the Date field.
- The report is printed.
Generate Doctor's Patient List Report
This function will produce the doctor's patient list report for a ward.
Step by step
- At the main screen, click on Staff Information. This will bring
you to the screen seen above.
- Click on Search. This will bring up the search dialog box.
- Follow the search routine to find the doctor
whose information you wish to report on.
- Click on Patient List Report.
- The report is printed.
Generate Doctor Yearly Schedule Report
This function will produce the doctor yearly schedule report. The default
is the current year.
Step by step
- At the main screen, click on Staff Information. This will bring
you to the screen seen above.
- Click on Search. This will bring up the search dialog box.
- Follow the search routine to find the doctor
whose information you wish to report on.
- Click on Yearly Schedule Report.
- A dialog box appears, with the current year in the Date field.
If you wish to report on a different year, enter the year in the Date
field.
- The report is printed.
Table of Contents