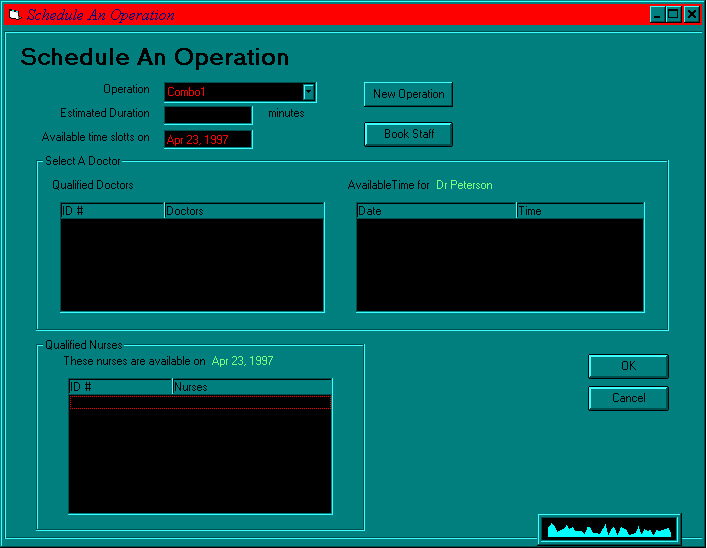

Schedule an Operation
Use this function to schedule a patient to an operation. A recovery
room will also be assigned by default.
Step by step
- At the main screen, click on Schedule O.R.. This will bring
you to the screen seen above.
- Select the desired type of operation from the Operation box.
A default Estimated Duration time will appear -- click on this if
you wish to change it.
- Click on Available time slots to change the starting date for
the search (the current day is the default).
- Click on Book Staff to find available doctors and nurses for
the operation.
- Click on a doctor in the Qualified Doctors window to select
a doctor for the operation.
- Click on an operation date and time in the Available Time for...
window to select an operation date and time the doctor is available at.
- Click on a nurse in the Qualified Nurses window to select a
nurse for the operation and repeat as necessary.
- If you wish to make any corrections, click on the field you wish to
correct and re-enter the information. If you wish to exit the function
at any time, click Cancel. Click OK when you are done.
- A message should appear indicating that the operation has been scheduled
successfully.
The document has been great, however, it
has not mentioned if there is a default assignment - and hence no need
to perform all the steps to choose a doctor.
Modify Schedule for Operation
Use this function to modify a schedule for an operation. Any changes
to the date or time will cause all staff to be removed from the operation.
Step by step
- At the main screen, click on Change O.R. Schedule. This will
bring you to the screen seen above.
- Select the items that you wish to change by clicking on them.
- If you wish to make any corrections, click on the field you wish to
correct and re-enter the information. If you wish to exit the function
at any time, click Cancel. Click OK when you are done.
- A message should appear indicating that the operation schedule has
been changed successfully.
The document has not included the screenshot
for this section, addition in later revision would be very helpful.
Cancel a Scheduled Operation
Use this function to cancel a scheduled operation.
Step by step
- At the main screen, click on Remove Appointment. This will bring
you to the screen seen above.
- Select the operation that you wish to remove.
- If you wish to exit the function at any time, click Cancel. Click
OK when you are done.
- A message should appear indicating that the operation has been cancelled
successfully.
The document has not included the screenshot
for this section, addition in later revision would be very helpful.
Assign Doctor to an Operation
This function will assign a qualified doctor to an operation and makes
sure the rest of the doctor's schedule does not conflict with this operation.
Step by Step
- At the main menu, click on Schedule a Patient.
- A new screen will pop up. This is the main screen for Schedule a
Patient. If you are scheduling a patient for a new operation click
on Schedule O.R.. If you are modifying existing operation information
for a particular patient, click on Change O.R. Schedule.
- A new screen will pop up. There will be a list of qualified doctors
displayed on this screen. Select the doctor for this operation by clicking
on the space where the name and ID are located. The chosen doctor's name
and ID will be highlighted.
- Automatically, a list of operation dates and times are displayed on
the screen. These are the dates and times when the specified doctor is
available. Again, select the time you want by clicking on that space. The
time will also be highlighted.
- If you wish to make any corrections, click on the item in the list
to make the changes. The new information will be highlighted. If you wish
to exit the function at any time, click Cancel and no changes will
be made. Otherwise, click OK when you are done.
Remove Doctor from Operation
This function removes the specified doctor from a scheduled operation.
Step by Step
- At the main menu, click on Schedule a Patient.
- A new screen will pop up. This is the main screen for Schedule a
Patient. If you are removing a doctor from an operation click on Change
O.R. Schedule.
- A new screen will pop up. There will be a list of qualified doctors
displayed on this screen. Re-select the doctor by clicking on the space
where the name and ID are located. The chosen doctor's name and ID will
be highlighted. The previous doctor will no longer be assigned for this
operation but a new one is.
- Automatically, a new list of operation dates and times are displayed
on the screen. These are the dates and times when the new doctor is available.
Again, select the time you want by clicking on that space. The time will
be highlighted.
- If you wish to exit the function at any time, click Cancel and
no changes will be made. Otherwise, click OK when you are done.
Assign Nurse to Operation
This function will assign a qualified nurse to an operation and makes
sure the rest of the nurse's schedule does not conflict with this operation.
Step by Step
- At the main screen, click on Schedule a Patient.
- A new screen will pop up. This is the main screen for Schedule a
Patient. If you are scheduling a patient for a new operation click
on Schedule O.R.. If you are modifying existing operation information
for a particular patient, click on Change O.R. Schedule.
- A new screen will pop up. First of all, you must select a doctor for
this operation, and then select the time when the doctor is available before
you can select a nurse for this operation. Follow the steps described in
'Assign Doctor to an Operation' for more information.
- When the above is completed, a list of qualified nurses that are available
at the chosen time and day are displayed. Again, you must select the nurse
you want by clicking on that space where the nurse name and ID are located.
The nurse name and ID will become highlighted.
- If you wish to make any corrections, click on the item in the list
to make the changes. The new information will be highlighted. If you wish
to exit the function at any time, click Cancel and no changes will
be made. Otherwise, click OK when you are done.
Remove Nurse from Operation
This function removes the specified nurse from a scheduled operation.
Step by Step
- At the main menu, click on Schedule a Patient.
- A new screen will pop up. This is the main screen for Schedule a
Patient. If you are removing a nurse from an operation click on Change
O.R. Schedule.
- A new screen will pop up. First of all, you must re-select a doctor
for this operation, and then re-select the time when the doctor is available
before you can re-select a nurse for this operation. Follow the steps described
in 'Remove Doctor from Operation' for more information.
- When the above is completed, a list of qualified nurses that are available
at the chosen time and day are displayed. Again, you must re-select the
nurse you want by clicking on that space where the nurse name and ID are
located. The nurse name and ID will become highlighted. The previous nurse
will no longer be assigned for this operation but a new one is.
- If you wish to exit the function at any time, click Cancel and
no changes will be made. Otherwise, click OK when you are done.