The explanation is very clear and detailed.
This is quite exceptional given the time constraint that ISIS has faced.
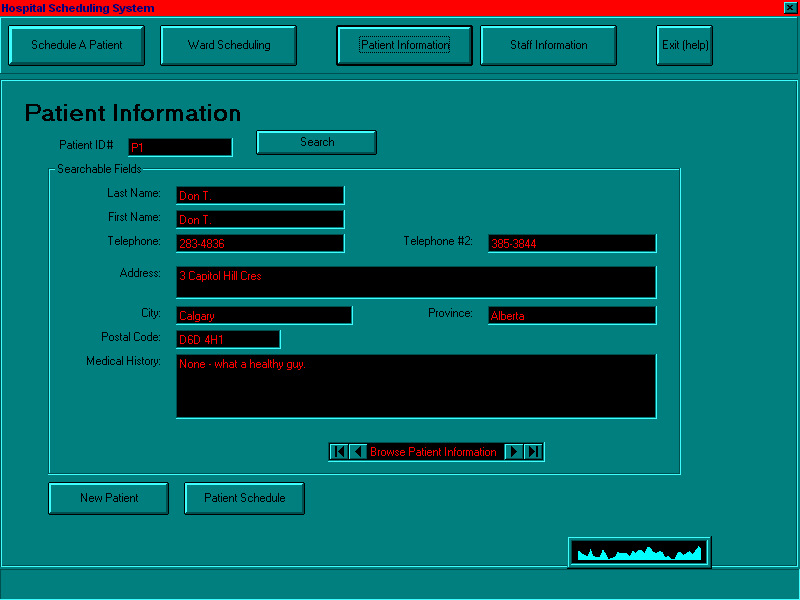
Add a Patient
This function will add a patient to the Hospital Scheduling System.
It creates a unique identification number for the patient and adds the
new patient into the system.
Step by step
- At the main screen, click on Patient Information. This will
bring you to the screen seen above.
- Enter the patient's vital statistics into the form to begin the addition
of the new patient. This will include the patient's first and last names,
address, telephone number(s), and any relevant medical history.
- For each field that is to be entered, once the entry has been completed
press either the Tab or Return/Enter keys to go to the next
field below. For example, after last name has been entered press Tab
or Return/Enter and the cursor will then appear in the next field
below, which would be the first name. This process will continue down the
patient form until all necessary information on the patient has been provided.
- If you wish to make any corrections, click on the field you wish to
correct and re-enter the information. If you wish to exit the function
at any time, click Cancel. Click OK when you are done.
- Once all of patient's information has been entered, click on the Save
button to process the new patient entry. At this point the system will
assign a unique i.d. number to the patient.
- After the system has completed the task of entering the new patient
and assigning them a new i.d. number, a message will appear indicating
that the addition of the patient was successful. The system will then wait
for the user to make a new selection, either on the main menu bar located
at the top of the Patient Information screen, or by clicking on
the New button to enter another patient.
Modify a Patient
This function will modify a patient to the Hospital Scheduling System.
It allows for the modification of any information stored in the system
for a specified patient. The user will need to enter in either a patient's
i.d. number or their name(s) and their phone number (optional) to allow
the system to search for a patient. The found patient's information will
then be displayed and from there modifications to the patient can be made.
Step by step
- At the main screen, click on Patient Information. This will
bring you to the screen seen above.
- Enter fields to search for a patient, which may include a patient's
id number, if known, or else a patient can found by searching on their
full name and a phone number, which is optional.
- Click on the Search button.
- If the desired patient is not found or incorrect data is entered into
the search fields, then check and if needed re-enter any of the search
fields mentioned above and re-click on the Search button.
- Once the search is done, the patient's information will appear and
modifications can be made simply by clicking on the field you wish to correct
and re-entering the information. If you wish to exit the function at any
time, click Cancel.
- Once you are done click OK and the patient's information will
be updated in the system.
- After the system acknowledges that the modification has been completed
it will then wait for the user to make a new selection, either on the main
menu bar located at the top of the Patient Information screen or
entering new search fields to modify another patient.
Regarding the "Search" functionality,
the manual has not mentioned what will happen if there are multiple instances
of patients with the same name(s). How could the staff walk through three
"John Smith" - for instance - has not been addressed.
Display Patient Information
This function will display a patient's information on the screen. To
find a patient in the system the user must provide searchable fields, such
as a patient i.d. number or their full name and phone number, which is
optional.
Step by step
- At the main screen, click on Patient Information. This will
bring you to the screen seen above.
- Enter fields to search for a patient, which may include a patient's
i.d. number, if known, or else a patient can found by searching on their
full name and a phone number, which is optional.
- Click on the Search button.
- If the desired patient is not found or incorrect data is entered into
the search fields, then check field entries and if needed re-enter any
of the search fields mentioned above and re-click on the Search button.
- Once the search is done, the patient's information will appear.
- Should the patient still not be found determine if the patient is a
new patient and then enter in all that patient's data so that they are
in the records (Refer to Add a Patient).
- If you search for a patient using their full name and phone number
there is the possibility of having more than one patient with that same
information. In this case, there will be a button at the bottom of the
screen that will go to the next found patient or to the previous patient,
thereby giving you the ability to cycle through the generated list of found
patients matching the search criteria (by pressing the left arrow button
you will go to the previous found patient and the right button will go
to the next patient found).
- The system will then wait for the next selection to be made, either
on the main menu bar or on the Patient Information screen by entering
new search fields to display another patient.
Display Patient Schedule
This function will display a patient's appointments and any operations
that they may be scheduled for.
Step by step
- At the main screen, click on Patient Scheduling. This will bring
you to the patient scheduling screen.
- Enter fields to search for a patient, which may include a patient's
i.d. number, if known, or else a patient can be found by searching on their
full name and phone number (optional).
- Click on the Search button.
- If the desired patient is not found or incorrect data is entered into
the search fields, then check field entries and if needed re-enter any
of the search fields mentioned above and re-click on the Search button.
- Once the search is done, the patient's scheduling information will
appear in the box at the bottom of the screen labelled Patient Schedule.
This will include each of the patient's scheduled operations and appointments
with an individual listing of the date, time, duration, the description
of the operation/appointment type and the location of the operation/appointment
specified by ward, room and bed for each.
- Should the patient still not be found determine if the patient is a
new patient and then enter in all that patient's data so that they are
in the records (Refer to Add a Patient).
- If you search for a patient using their full name and phone number
there is the possibility of having more than one patient with that same
information. In this case, there will be a button at the bottom of the
screen that will go to the next found patient or to the previous patient,
thereby giving you the ability to cycle through the generated list of found
patients matching the search criteria (by pressing the left arrow button
you will go to the previous found patient and the right button will go
to the next patient found).
- The system will then wait for the next selection to be made, either
on the main menu bar or on the Patient Scheduling screen by entering
new search fileds to display or add to another patient's schedule.
Patient Listing
This function will produce a listing of patient locations either by
ward if designated or by the entire hospital if no ward has been designated.
Step by step
- At the main screen, click on Ward Information. This will bring
you to the ward information screen.
- Click on the down arrow button located to the right of the Ward
field. This will provide a list of the wards in the hospital from which
to choose. Select the desired ward by clicking on it.
- Once the search has been completed, either a listing of the patient
locations within each of the rooms in a designated ward will be generated
(if a ward was specified for the seach), or a listing of patient locations
for each ward in ascending order for the entire hospital will be provided.
This patient listing information will be displayed in the box to the left
of the Ward Information screen, within the box labelled Room/Bed
Information.
- The system will then wait for the next selection to be made, either
by entering a new ward search field to view further ward information, or
by clicking on the Close button which will return you to the previous
screen on which a main selection bar is provided. New selections can then
be made from this main menu bar located at the top of the screen.
Check-In Patient
This function will automatically assign to an admitted patient a bed,
room and ward.
Step by step
- At the main screen, click on Patient Scheduling. This will bring
you to the patient scheduling screen.
- Enter the patient i.d. number, if known, or else enter the patient's
full name and phone number (which is optional).
- Click on the Check-In button.
- If the desired patient is not found or incorrect data is entered into
the search fields, then check field entries and if needed re-enter any
of the search fields mentioned above and re-click on the Check-In button.
- Once the search is done, each of the patient information fields will
be filled in unless this has already been done, and a small dialogue box
will appear in the centre of the screen giving the ward, room and bed assigned
to the patient.
- Should the patient still not be found determine if the patient is a
new patient and then enter in all that patient's data so that they are
in the records (Refer to Add a Patient).
- If you search for a patient using their full name and phone number
there is the possibility of having more than one patient with that same
information. In this case, there will be a button at the bottom of the
screen that will go to the next found patient or to the previous patient,
thereby giving you the ability to cycle through the generated list of found
patients matching the search criteria (by pressing the left arrow button
you will go to the previous found patient and the right button will go
to the next patient found).
- Click on the O.K. button to accept the location assigned to
the patient.
- This will then return you to the patient scheduling screen from which
either new selections can be made via the main menu bar located at the
top of the screen, or other patients can be added, modified, checked-in
or checked out from the current patient scheduling screen.
Check-Out Patient
This function will discharge a patient from the hospital by removing
the patient from their known location by ward, room and bed.
Step by step
- At the main screen, click on Patient Schedule. This will bring
you to the patient scheduling screen.
- Enter the patient i.d. number, if known, or else enter the patient's
full name and phone number (optional).
- Click on the Check-Out button.
- If the desired patient is not found or incorrect data is entered into
the search fields, then check field entries and if needed re-enter any
of the search fields mentioned above and re-click on the Check-Out button.
- Once the search is done, each of the patient information fields will
be filled in unless this has not been done, and a small dialogue box will
appear in the centre of the screen giving the ward, room and bed previously
assigned to the patient.
- Should the patient still not be found determine if the patient is a
new patient and then enter in all that patient's data so that they are
in the records (Refer to Add a Patient).
- If you search for a patient using their full name and phone number
there is the possibility of having more than one patient with that same
information. In this case, there will be a button at the bottom of the
screen that will go to the next found patient or to the previous patient,
thereby giving you the ability to cycle through the generated list of found
patients matching the search criteria (by pressing the left arrow button
you will go to the previous found patient and the right button will go
to the next patient found).
- Enter your staff i.d. number to validate the patient discharge.
- If the staff i.d. number was reported as invalid or unfound, then check
the entry and if needed re-enter the staff i.d. number and re-click on
the Check-Out button.
- Click on the O.K. button to remove the location assigned to
the patient.
- This will then return you to the patient scheduling screen from which
either new selections can be made via the main menu bar located at the
top of the screen, or other patients can be added, modified, checked-in
or checked out from the current patient scheduling screen.
Table of Contents