This section is greatly done. Toward 2000
would like to thank ISIS for your great work!!!
Add a Bed
This function will add a bed to a specified ward and room. This makes
the bed available for use by the system.
Step by step
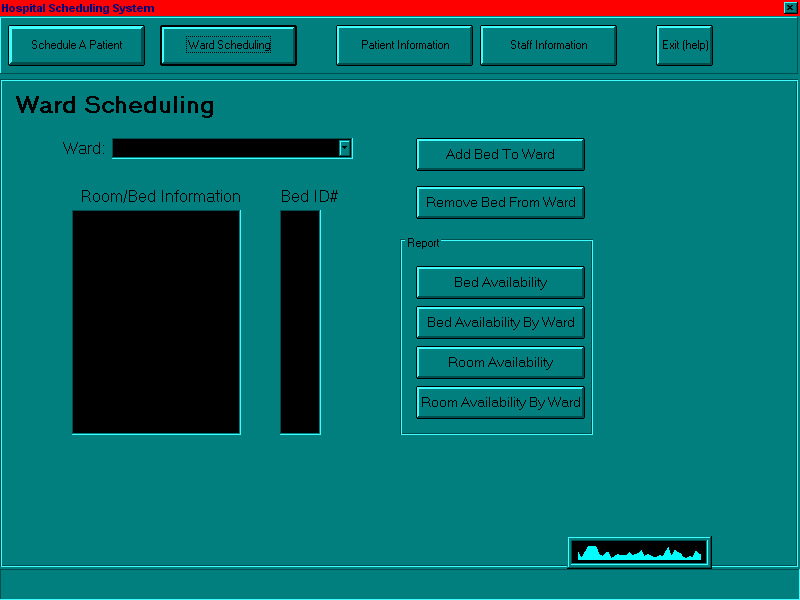
- At the main screen, click on Ward Scheduling. This will bring
you to the screen seen above.
- Select the desired ward that you wish to add a bed to from the pull-down
menu.
- Click on Add Bed to Ward. A new window will pop up.
- Choose a room number from the Room # pull-down menu.
- Press Tab to go to the New Bed field. Choose a bed I.D.
for the new bed by entering either A,B,C, or D.
- If you wish to make any corrections, click on the field you wish to
correct and re-enter the information. If you wish to exit the function
at any time, click Cancel. Click OK when you are done.
- A message should appear indicating that the bed has been added successfully.
Remove a Bed
This function will remove a bed from a specified ward and room. The
bed will no longer be available for use by the system after this function
is completed.
Step by step
- At the main screen, click on Ward Scheduling. This will bring
you to the screen seen above.
- Select the desired ward that you wish to remove a bed from by using
the pull-down menu.
- Click on Remove Bed from Ward. A new window will pop up.
- Choose a room number from the Room # pull-down menu.
- Press Tab to go to the Remove Bed field. Choose a bed
I.D. for bed you wish to remove by entering either A,B,C, or D.
- If you wish to make any corrections, click on the field you wish to
correct and re-enter the information. If you wish to exit the function
at any time, click Cancel. Click OK when you are done.
- A message should appear indicating that the bed has been removed successfully.
Note to Paula: The Modify Bed Info function
was accidentally removed from our screen shots. Please note that it will
be in the final implementation.
Modify Bed Info
This function will change the information for a bed. This can be used
when you relocate beds to different wards or rooms.
Step by step
- At the main screen, click on Ward Scheduling. This will bring
you to the screen seen above.
- Select the ward that you the bed is currently located in by using the
pull-down menu.
- Select the room that the bed is currently located in from the Room/Bed
Information window. The various Bed I.D.'s in the room should appear in
the Bed I.D.# window.
- Select the specific bed you wish to modify information for in the Bed
I.D.# window.
- Click on Modify Bed Info. A new window will appear with all
three fields.
- Modify whichever fields need to be modified.
- If you wish to exit the function at any time, click Cancel.
Click OK when you are done.
- A message should appear indicating that the bed info has been modified.
Display Bed Info
This function can display information for all beds in a ward, all beds
in a room, or a specific bed, depending on the information you give. There
are 3 options:
- If you only specify a ward, it will list bed info for all beds located
in the ward.
- If you specify the ward and a room number, then it will display info
for all beds located in a specific room.
- If you specify ward, room number, and bed I.D., then only the info
for that specific bed will be displayed.
Step by step
- At the main screen, click on Ward Scheduling. This will bring
you to the screen seen above.
- Enter in the fields which you wish to specify. You must specify at
least the ward. The room number and bed I.D. are optional (see above).
- If you wish to exit the function at any time, click Cancel.
Click OK when you are done.
- A window should appear with the appropriate list of bed information.
Report: Bed Availability (by ward)
This function will generate a report which lists beds still available
in a certain ward specified by the user. This also includes a total of
the number of beds still available in the ward.
Step by Step
- From the main menu, select Ward Scheduling.
- From the Ward Information screen, select a ward by clicking on the
drop down arrow of the Ward field.
- Select Bed Availability by Ward. This will print the report
and return you to the main menu.
Report: Bed Availability (entire hospital)
This function will generate a report which lists available beds for
the enire hospital separated by wards. This also includes a total of the
number of beds still available broken down by ward and the entire hospital.
Step by Step
- From the main menu, select Ward Scheduling.
- From the Ward Information screen, select Bed Availability.This
will print the report and return you to the main menu.
Report: Room Type Availability (ward)
This function will generate a report which lists all rooms of certain
type specified by the user that still have available beds and the specific
beds which are available.
Step by Step
- From the main menu, select Ward Scheduling.
- From the Ward Information screen, select a ward by clicking on the
drop down arrow of the Ward field.
- Select Room Availability by Ward.
- You will be prompted to enter the Room Type. Click on the Room Type
field, enter the room type (single, double, quad), and select OK
to print the report or Cancel to cancel the report generation.
Report: Room Type Availability (entire hospital)
This function will generate a report which lists the bed IDs of all
available beds in rooms of a certain type specified by the user.
Step by Step
- From the main menu, select Ward Scheduling.
- From the Ward Information screen, select Room Availability.
- You will be prompted to enter the room type. Click on the Room Type
field, enter the room type (single, double, quad), and select OK to
print the report or Cancel to cancel the report generation.
Table of Contents