User
Manual Department of Computer
Science Page maintainer: Terrence
Asgar-Deen |
The Sales Routing System is a powerful software program developed specifically for the needs of Peachy Business Forms to control their daily sales routes. Easy to use commands and an intuitive interface allow staff members to immediately use the system as part of their day to day activities. Functions include the management of customers, products, purchase orders and sales territories (routes).
The Sales Routing System includes the following features and capabilities:
Security
Ease of Use
Overview
The Sales Routing System is based around the concept of a central window. Using this central window provides a constant frame of reference for the remainder of the system.
This window is a standard Windows 95 application window. The window has the standard title bar, with the control box, minimize, maximize and close buttons. The border is resizable, and the contents of the window resize gracefully when the window itself is resized. Within the window there are several components that have become standard in Windows 95 applications. The menu bar, toolbar and status bar are all described below.
The main area of the application window is referred to as the "work area" in which the major functionality is displayed. The work area will display one of the following four areas of the system:
Navigation between these areas can be accomplished in one of three ways, depending on which the end-user is most comfortable with:
Each of the four product areas are described in detail later in this guide as they pertain to the end user (Salesperson) and administrator functions.
Overview
When any user/administrator wishes to access the system, the first step is to log into the system using the Login Dialog. When the system is started, the user will be presented with a dialog box consisting of two parts: the Username and the Password.
How to Log into the System:
Overview
A user may wish to change his/her password for any number of reasons. Passwords should always be kept secret.
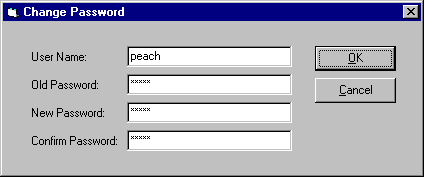
How to Change your Password:
Note: For security reasons, none of the passwords will actually appear on the screen when they are entered. Instead, they will appear as a series of asterisks. ENSURE PASSWORDS ARE ENTERED CORRECTLY.
Overview
The main function of the Sales Routing System is to allow salespeople to efficiently manage their sales routes. The Daily Route List for a user may be viewed by the user at any time. After a user logs into the system, the View Daily Route screen will appear. The View Daily Route screen can also be accessed through the menu bar.
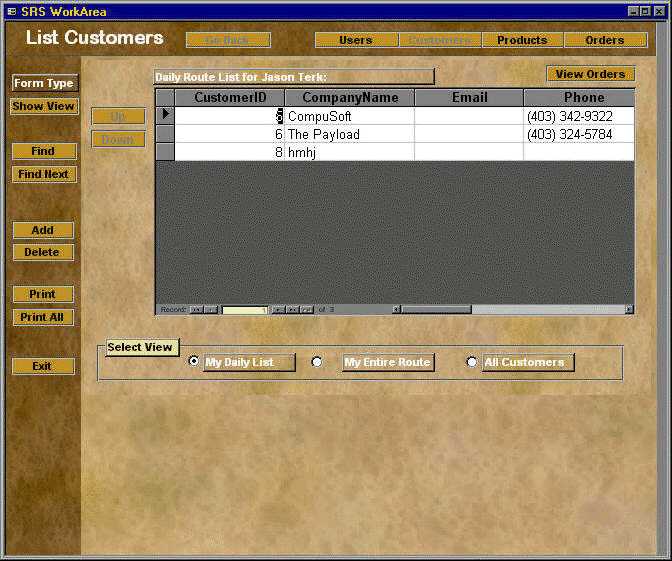
How to view your Daily Route List:
Overview
To make users better able to manage their sales routes, the Sales Routing System allows individual salespeople to modify the order of their Daily Routes.
How to change the order of your Daily Route List:
Overview
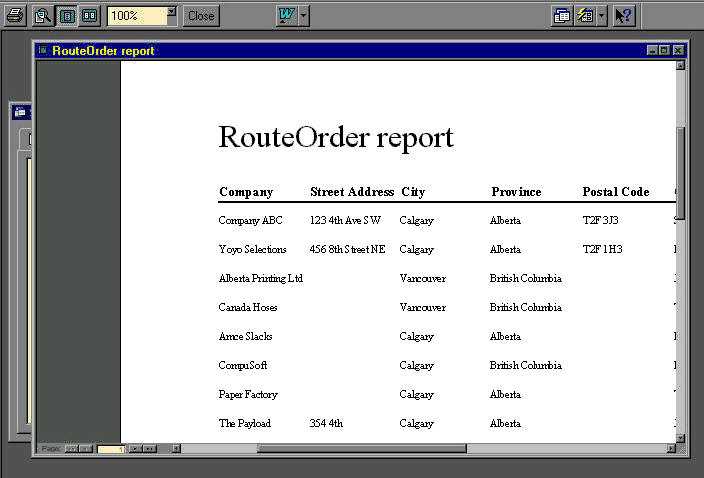
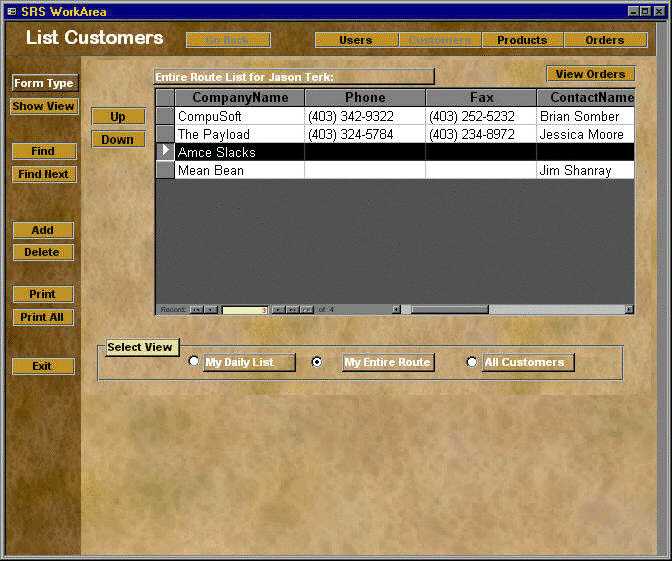
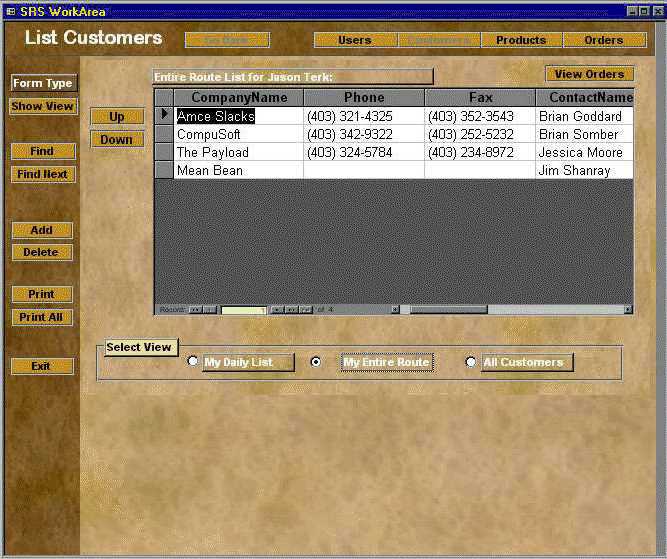
A user may need to view his/her entire customer list, instead of just the Daily Route List for any particular day.
How to view all of your Customers:
Overview
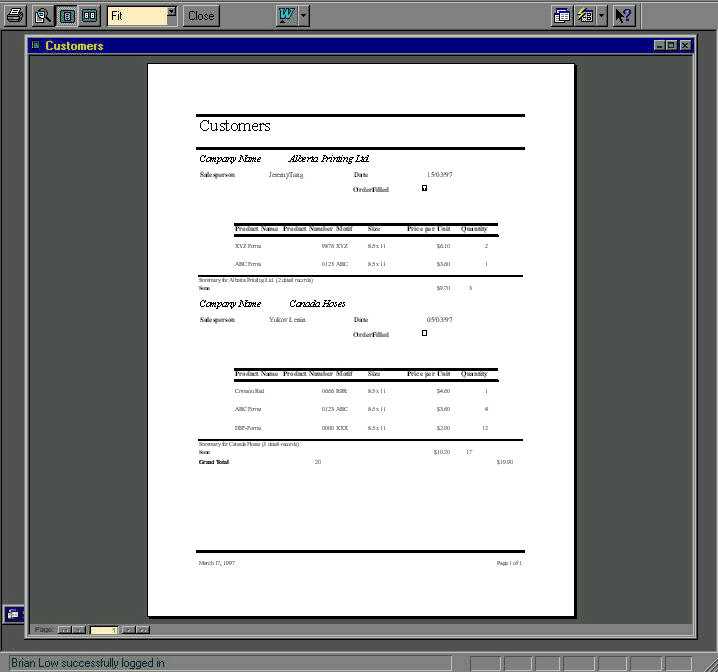
A user may need to view the ordering information pertaining to a particular customer, either on his/her Daily Route or on their entire route.
How to view a Customer's Orders:
Overview
A user may view the detailed information for one of his/her customers. This information includes the company name, street address, city, province, postal code, electronic mail address, fax number, telephone number, and contact information for the customer's representative.
Image is currently unavailable.
How to view Detailed Customer Information:
Overview
The user can view the entire list of products that the company has to offer.
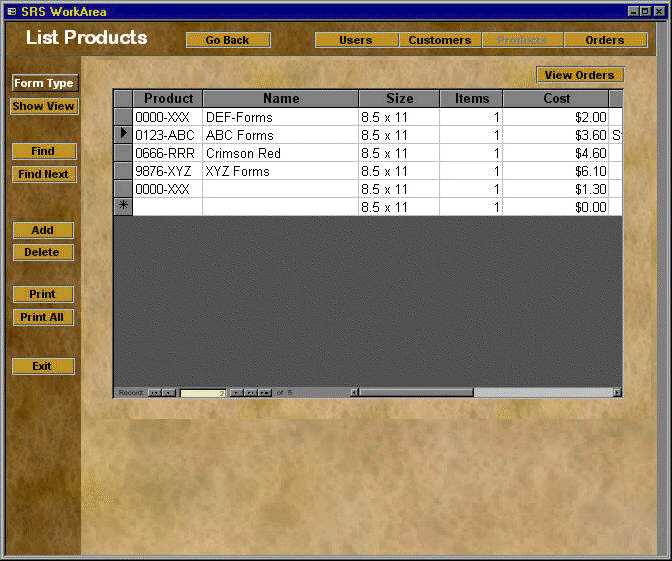
How to View the Product List:
Overview
The user may view the detailed information for a particular product in the company's lineup. This includes product ID, motif number, name, number of items in stock, size, unit cost, and additional comments.
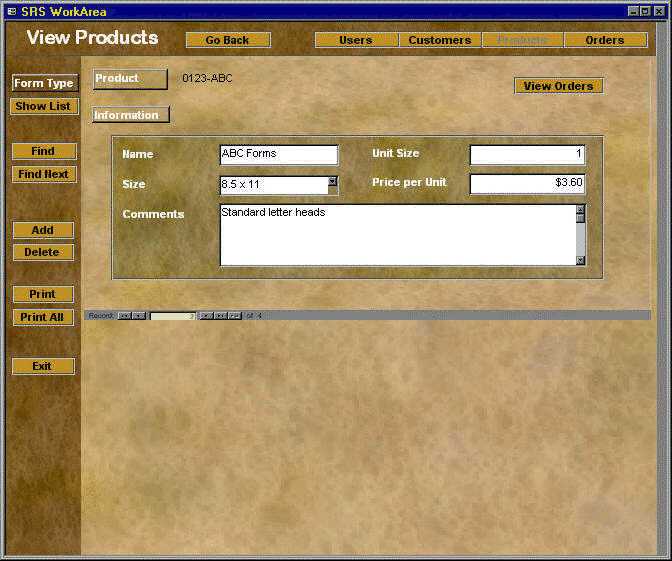
How to view Detailed Product Information:
Overview
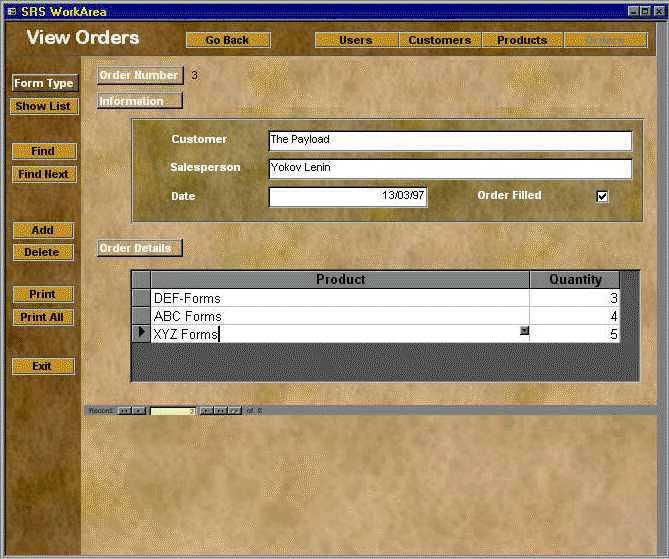
The user may view a list of all orders placed by his/her customers.
How to view Purchase Orders:
Overview
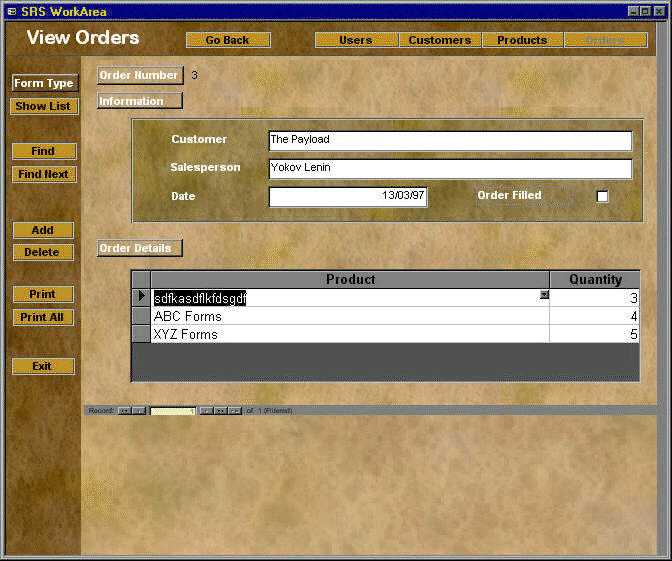
The user may view the detailed information pertaining to a customer's purchase order. This information includes the order number, the salesperson who handled the order, the customer who placed the order, the product ordered, and the quantity ordered.
Image is currently unavailable.
How to view Detailed Order Information:
Overview
The user, upon receiving an order from a customer, may place the order into the database.
How to place a Purchase Order:
Overview
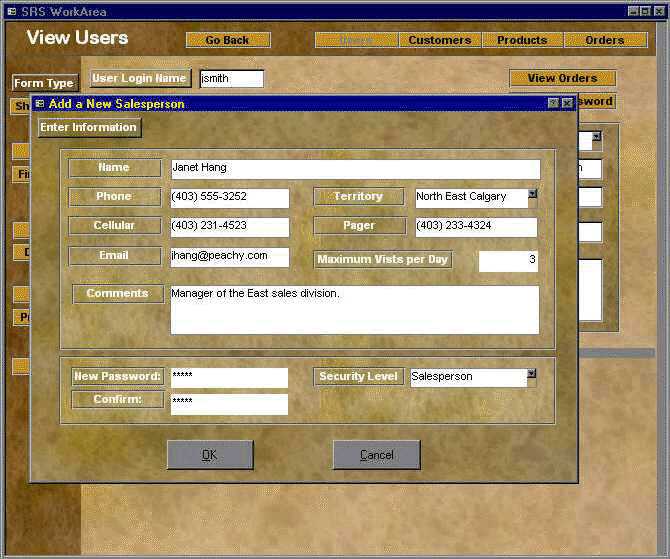
When the administrator wishes to add a new user to the Sales Routing System database, a window appears in the work-area on the screen. This window allows the administrator to enter the name, phone number, cellular number, e-mail address, pager number, maximum visits per day, and any pertinent comment about this new user by using the keyboard. Additionally, the administrator can choose the territory and security level for this new user through a pull-down menu.
How to Add a New User:
Overview
When the administrator wishes to delete an existing user in the Sales Routing System database, the administrator must access the User Work Area to display a list of users and from this list, a specific user may be deleted.
How to Delete an Existing User:
Overview
When the administrator wishes to view a list of the users in the Sales Routing System database, the administrator must first access the User Work Area and from this screen, a list of all the users of the system may be displayed.
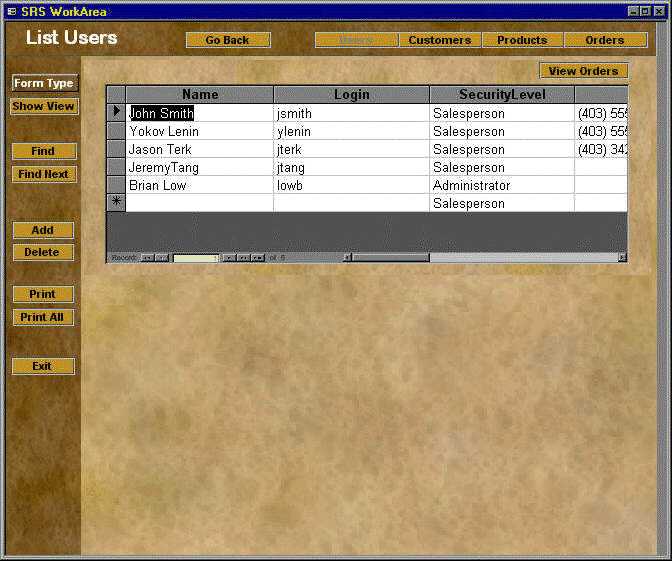
How to View the List of Users:
Overview
When the administrator wishes to view the detailed information about an existing user in the Sales Routing System database, a specific user must be selected from the User Work Area.
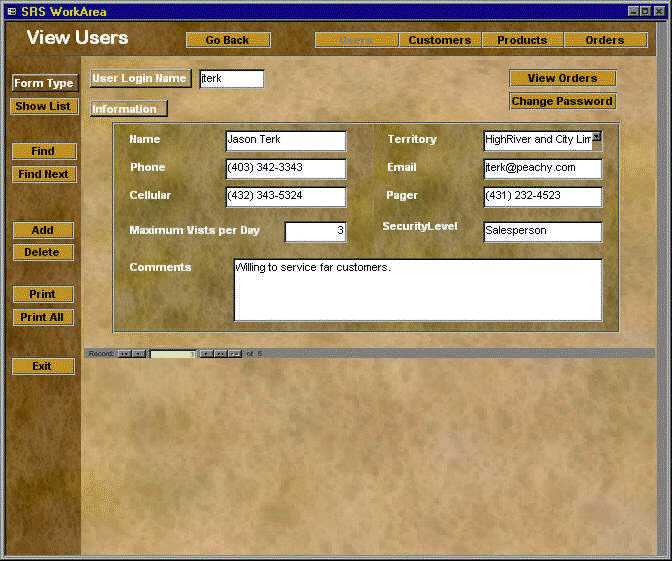
How to View Detailed Information about a User:
Overview
When the administrator wishes to change the information about an existing user in the Sales Routing System database, a window appears in the work-area on the screen. This window allows the administrator to change various attributes including the name, phone number, cellular number, territory, e-mail address, pager number, security level, maximum visits per day, and comments about this user.
How to Modify the Information about an Existing User:
Overview
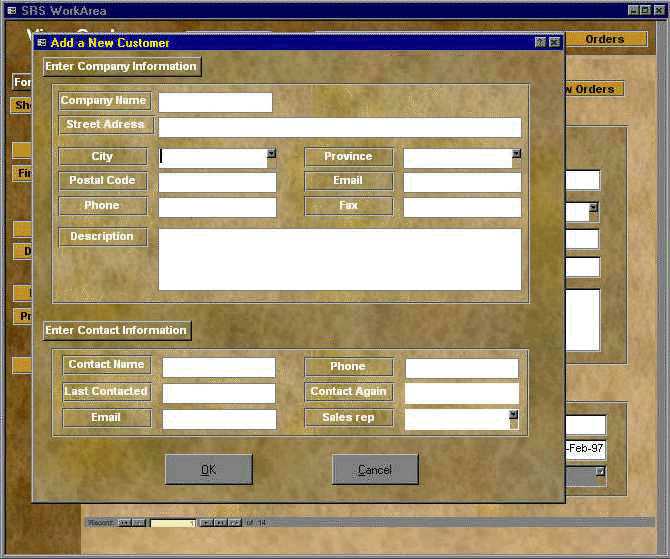
When the administrator wishes to add a new customer to the Sales Routing System database, a window appears in the work-area on the screen. This window allows the administrator to enter the company name, street address, postal code, phone number, e-mail address, fax number, comments about the company, contact's name, contact's phone number, contact's e-mail address, date of last contact, and the date of next contact by using the keyboard. Additionally, the administrator can choose enter the city and province that this company is located through a pull-down menu.
How to Add a New Customer:
Overview
When the administrator wishes to delete an existing customer in the Sales Routing System database, the Route List screen must be accessed first. >From this screen, a list of customers can be displayed from which the administrator may delete a particular customer.
How to Delete an Existing Customer:
Overview
When the administrator wishes to change the information about an existing customer in the Sales Routing System database, a window appears in the work-area on the screen. This window allows the administrator to change various attributes including the company name, city, province, postal code, phone number, e-mail address, fax number, comments about the company, contact's name, contact's phone number, contact's e-mail address, date of last contact, and the date of next contact for this customer.
How to Modify the Information about an Existing Customer:
Overview
When the administrator wishes to view all of the customers in the Sales Routing System database, the Route List screen must be accessed first and from this screen, a list can be displayed.
How to View the Entire Customer List:
Overview
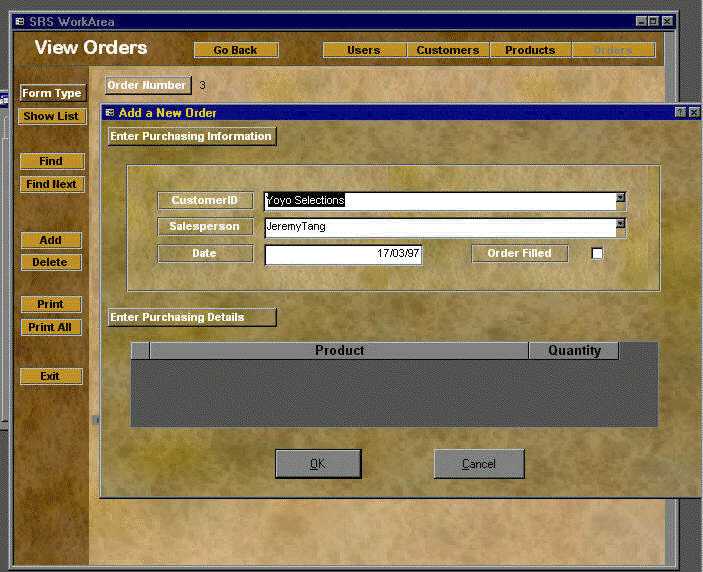
When the administrator wishes to add an order to the Sales Routing System database, the user must select the function Add a New Order from the modules work area. The user must specify all the information in the Add a New Order screen. The order numbered is automatically, so there is no need to enter in the order number.

How to Add a New Order:
Overview
When the administrator wishes to add a new product to the Sales Routing System database, the user must select the function Add a New Product from the modules work area. The user must specify all the information in the Add a New Product screen. The order numbered is automatically, so there is no need to enter in the order number.
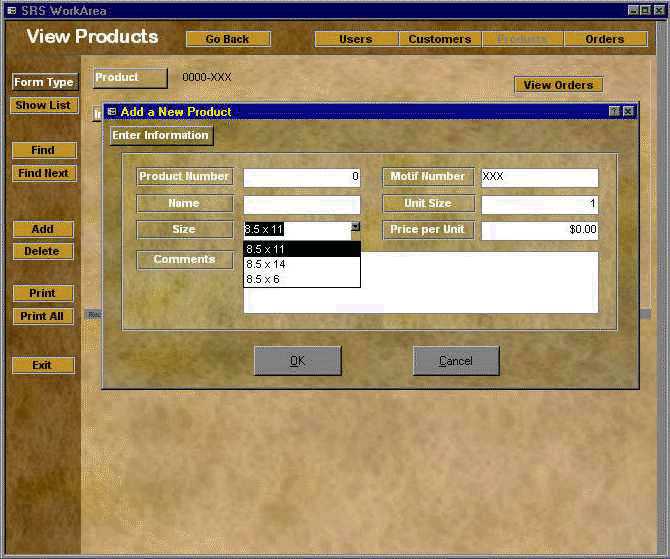
How to Add a New Product:
Overview
When a user wishes to delete a product from the database.
How to delete a Product:
Overview
If the administrator wishes to change information about a particular product, it can be done by highlighting the product that needs to be changed in the view orders screen. While highlighted the user must click on the "details" button. When the screen appears the user can change any of the fields they wish to change. They may add more information in the comments area without deleting any of the previous information.
How change Product Information:
Overview
When the administrator wishes to delete an order from the Sales Routing System database, button will appear on the top right hand corner of the screen indicating View Orders. The user must click on this button to access the orders. To delete the order "something" must be selected. When this screen appears the administrator must delete the order.
How to Delete an Order:
Overview
When the administrator wishes to view the orders from the Sales Routing System database, the button which appears on the top right hand corner of the screen indicating "View Orders" must be clicked once. The administrator can either view all the orders on the system, or choose to view only a particular salespersons orders.
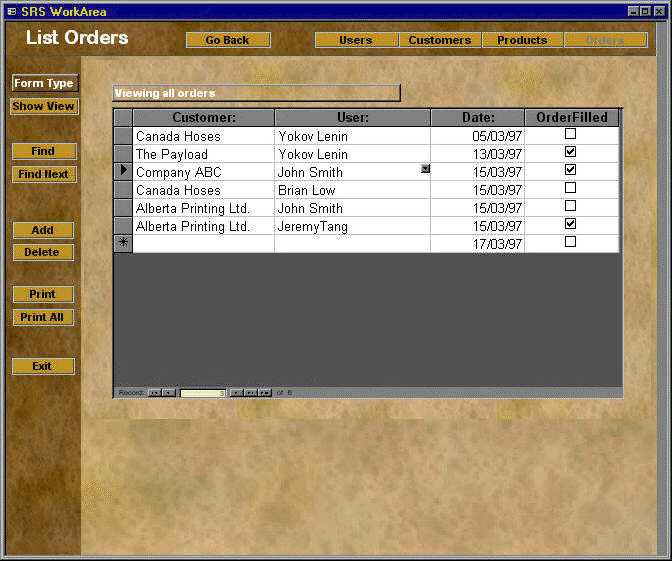
How to View the Orders:
Additional assistance can be obtained by calling the dHACs support line at 1-800-SRS-HELP (1-800-777-4357). Our staff will be pleased to help with any questions related to the system operation.
The following error messages may appear from time to time during operation of the system:
| Error Message | An incorrect login name and password has been entered. Please check the login name and password. |
|---|---|
| Solution | Make sure that the login name and password are correct. Passwords are case-sensitive, login names are not. |
| Error Message | The confirmation password you typed in does not match your new password. |
|---|---|
| Solution | Try retying your new password and the confirmation password. |
| Error Message | The old password you typed in was incorrect. |
|---|---|
| Solution | Try retyping your old password. Passwords are case-sensitive. |
| Error Message | Sorry, you cannot use find now, since there are either no records, or no searchable data. Try to select a particular field. |
|---|---|
| Solution | Try to select a particular field. |
| Error Message | You have not used the Find command yet, so Sales Routing System does not know what to find again. |
|---|---|
| Solution | Use the Find command first, then the Find Next command will be available. |
| Error Message | Unable to find the User ID or Login name. Please check the User ID or Login name entered. |
|---|---|
| Solution | Enter a valid User ID or Login name. |
| Error Message | You did not specify a password. |
|---|---|
| Solution | Enter a new password for the new user in the Password field. |
| Error Message | Your confirmed password does not match your password. |
|---|---|
| Solution | Retype the new user's password in the Password field and the Confirm password field. Passwords are case-sensitive. |
| Error Message | Canadian postal codes must be exactly six characters long, in format A9A-9A9, where A is any letter, and 9 is any digit. |
|---|---|
| Solution | Make sure the postal code is correct. |
| Error Message | The phone number must be a full 10 digit phone number including area code. |
|---|---|
| Solution | Make sure the phone number is correct, and includes an area code. |
| Error Message | The fax number must be a full 10 digit fax number including area code. |
|---|---|
| Solution | Make sure the fax number is correct, and includes an area code. |
| Error Message | The Product's size must be 8.5 x 11, 8.5 x 14, 8.5 x 6. |
|---|---|
| Solution | Make sure the product size matches one of the predefined sizes. |
| Error Message | The Unit Size must be less than 1000000. |
|---|---|
| Solution | Ensure the unit size is less than 1000000. |
| Error Message | The Price per Unit must be at least $0.00. |
|---|---|
| Solution | Make sure the price per unit is greater than or equal to $0.00. |
| Error Message | The Product Number must be exactly 4 digits long. |
|---|---|
| Solution | Make sure the product number is 4 digits, and only consists of numbers. |
| Error Message | The Motif Number must be exactly 3 characters. |
|---|---|
| Solution | Make sure the motif number is 3 characters. |
| Error Message | Must be Administrator or Salesperson. |
|---|---|
| Solution | Ensure the user's security level must be either Administrator or Salesperson. |