In general,you can use your mouse to select or activate a function.
To select a function, you "single click" on the icon. To activate a
function, you "double click" on the icon. You also have the
option of using the keyboard to perform the above functions. By depressing the
"alt" key with a letter, corresponding to the functions, you can activate the
specified function. When input of information is necessary, you again have
the option of using the keyboard .
Leave shortcuts aside for now, and come back to them later. When you come
back to them later, be a little more specific. Refer to the summary for further
suggestions in this regard.
This manual is divided into a number of short sections entitled "How to..." that give step by step instructions for working with TimeTracker. The easiest way to use this manual is to find the operation you want to perform in the Table of Contents and click on it. The instructions will be displayed. If you need to perform other steps before this there are cross references to other "How to" discussions. You can also read through the manual and follow the running example if you want an overview of all system functions.
In this document we will occasionally use special symbols to draw your attention something for example:
When you arrive at the computer terminal, you may either click on the Time
Tracker System Icon
or simply type "timetr" at the run prompt to
start the Time Tracker System.
After the system loads up, a Login box will be displayed.
For example: Type "simpsonm".
(Make sure your account has been set up by your administrator)
After you get your initial password, you may need to change your password to
something else. The TimeTracker system allows you to change your password
anytime you want. By selecting Change Password from the File pull down menu and the top
of the TimeTracker main screen.
Before you use your daytimer you must be logged in. If you need help logging in go to
When you are in your daytimer, you may wish to look at your hours of the schedule that are not
displayed. Normally the daytimer screen will show times from 6:00am through to 6:30pm.
(Picture on right)
When you are in your daytimer, you may wish to look at your days of the schedule that are not
displayed. Normally the daytimer screen will show Monday through Friday.
When you are in your daytimer, you may wish to look at your schedule for a different week.
Normally the daytimer screen will show the current week.
When you are in your daytimer, you may wish to change to a different month icon.
Normally the daytimer screen will show the current month.
When you are in your daytimer, you may wish to look at information regarding a meeting
that you are attending.
Before you use the Messages system you must be logged in. If you need help logging in go to
In this section you will learn how to tell if you have received system messages and how to use Time Tracker's Messages system to manage your messages.
The Messages Window
Before you use the Meeting Scheduler system you must be logged in. If you need help logging in go to
The meeting scheduler system allows you to schedule meetings for employees of your organization.
This feature allows you to change information about a meeting that does not affect its scheduling. To change Time, Date or Duration of a meeting, cancel the meeting and reschedule.
If you want to modify information about a meeting you have scheduled, select the
meeting then typeover the information that you want to change.
. Any incorrect input can be changed by pressing the backspace key. You will also notice that any changes will
enable the "Accept Changes" button.
If you want to cancel a meeting you scheduled, simply select the
meeting then cancel it from the Scheduled Meetings list.
If you want to edit the attendee list, you can do this from the
"Meeting Scheduler" screen by clicking on the "Edit Attendee List"
button.
To edit Attendees list please refer to
How to edit the attendee list for a meeting
To edit Attendees list please refer to
How to edit the attendee list for a meeting
Before you can set your availibility you must be logged in. If you need help logging in go to
To allow scheduling of meetings and appointments, you must specify when you
are available at work. From the daytimer window, you can enter the Availability
Screen to set the hours and days during which you are available.
Availability Screen
Availability Screen with pull down menu open
Before you can set up an alias you must be logged in. If you need help logging in go to
To begin setting up your aliases, select the Alias button from the main menu.
When the system is loaded, the alias screen will be displayed on the screen.
All employees in the database are listed in the left box under the "Available
Employees" list and all aliases that the user has created are listed in the
"Available Aliases" near the top (provided they click the down arrow).
The members of the highlighted group alias are displayed on the right side
in the "Alias list" box.
For example: Type "Banana Group" in the "Alias Name" box.
When new employees enter your organization, they will need to have a user
(login) name and password given to them so that they are represented in the
system. As well, when employees leave the company their accounts should be
deleted from the system. These tasks may be done from within TimeTracker using
the special 'System' account.How to use this manual
In this manual we are assuming you have used Windows in the past and are comfortable with mouse use
and the basic elements of a Windows interface such as scroll bars, pull-down menus and buttons. If you are not sure about these things consult the documentation that came with your version of Windows.
This might be an appropriate place to mention where to get other help from.
Indicates a tip on how to use the system more effectively
Using TimeTracker
Section 1 -- Getting Started
How to login:
This is unclear; What is the run prompt? Is this Windows or DOS? (Will typing 'timetr' in DOS bring up Windows?)
Login BoxSTEPS:
Any incorrect input can be changed by pressing the backspace key.
Is the Delete key okay to use, as well? i.e. Is the delete key mapped
differently from the backspace? How do you switch from Employee Indentification
to Password? (i.e. Do you push enter, or use the tab key?)
Any incorrect input can be changed by pressing the backspace key. Your password will not be
displayed, rather it will replace your characters with stars '*'. This is so no one can see
your password on the screen.
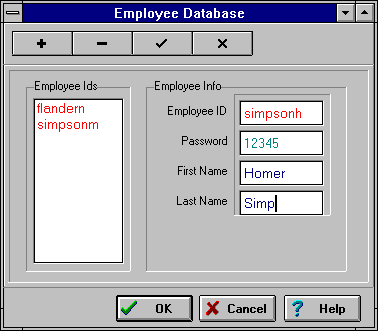
Click the "OK" button to proceed or the "Cancel" button to cancel the
login and exit the program.
If the employee's identification is invalid, an error message will
show up and then the login menu will appear on the screen shortly
afterwards. You have to repeat the login procedures again.
If the password is invalid, an error message will show up and then
the login menu will appear on the screen shortly afterwards. You have
to repeat the login procedures again.
How many tries before they cancel? (Locked out)
How do you get help after you fail to log in?
What do you do if problems persist with logging in?
How to change your password:
Change Password WindowSTEPS:
Any incorrect input can be changed by pressing the backspace key.
What are the rules for passwords? (Can you use your old password? Are there special requirements?)
Have *something* to state that there are restrictions. You don't need all of the restrictions listed here, but at least mention what messages the system might provide concerning this matter.
Any incorrect input can be changed by pressing the backspace key.
How do you get from field to field? What order do the tabs operate in? i.e. When you tab from one field which field does it take you to next?
You may wish to use the field's name here, for clarification.
Click the "OK" button to proceed or the "Cancel" button to cancel the
setup.
You may click the "CANCEL" button to cancel the whole action at any
time.
Section 2 -- Using Your Daytimer
The TimeTracker Main Screen
We experienced some confusion about the Tools section in the image.
How to change the hours displayed
We are assuming that this a minimalist manual. We presume that there may be a larger manual to refer to details that seem to be missing.
There is more about this in the Summary
STEPS:
How to change the days displayed
STEPS:
How many days do these buttons move things? Inclusion of this information will make it easier for us to know whether or not we have done the right thing. There was some confusion about this.
How to change the week displayed
STEPS:
How to change the month displayed
STEPS:
How to get more information about a meeting on your calendar
STEPS:
Section 3 : The Time Tracker Message System
What is a system message?
When Time Tracker undertakes actions that may affect your schedule it generates a system message to inform you. The five different system messages are:
Excellent idea, smashing! We like the five different messages, and the provision of them.
In all of the above cases enough information will be provided that you can find the meeting on your daytimer.
How to tell if you have received new messages?
If the mail box icon looks like this you have NEW mail.
How to ACCESS your Messages
Click on the MESSAGE button or the mailbox to call up the MESSAGES window.
How to DELETE Messages
STEPS:
From the list of messages, the selected message will be darkened.
How to EXIT the Messages screen
STEPS:
Section 4 -- Using the Meeting Scheduler
How to access the Meeting Scheduler:
STEPS:
The Meeting Scheduler window will now appear, you can return to the main screen by clicking on the "OK" button.
To get information on the meetings, you can select the
desired meeting from the Scheduled Meetings list by clicking on it. All of the information
about the meeting will be displayed in the appropriate boxes on the Meeting Scheduler window.
The Meeting Scheduler WindowHow to modify a meeting you have already scheduled
STEPS:
You can do this by moving the mouse cursor over the meeting
you wish to modify and clicking the left mouse button once to select it.
Now that you have selected the meeting you wish to modify, you
can start changing the information in the "Topic",
"Agenda", "Location", and "Attendees" boxes. You can do this byselecting the box with
the mouse and typing in the new information. To modify Attendees list please refer to
How to edit the attendee list for a meeting
We might want to see how to schedule before seeing how to change your schedule.
The Meeting Scheduler Window (Note change in location)
When you have completed modifying the meeting information, click the "Accept Changes"
button to save the changes. If you do not click this button the changes will not be permanent
A dialog box will appear requesting confirmation that you
really want to make those changes. You can click on the "OK" button
to process changes, or the "Undo" button if you do not want the changes to be permanent.
What happens when you hit undo?
How to cancel a meeting you have scheduled
STEPS:
A dialog box will appear requesting confirmation that you
really want to cancel the meeting.
If you click on the "OK" button, then a message will indicate
that the meeting you just selected was cancelled. TimeTracker will notify all
attendees.
If you click on the "Undo" button, then a message will
indicate that no cancellation was made.
How to edit the attendee list
STEPS:
After you clicked on the "Edit Attendee List" button, the Add
Attendees screen will appear. You can add an employee or a block of
employees to be the attendees of your meeting now.
Add Attendees Screen
You can do this by moving the mouse cursor over the employee
you wish to invite and clicking the left mouse button once to select
it from the "Available Employees" box. Now you click on the single right arrow button to
put his/her name in the "Attendees" box. The employee's name
will now appear on the Attendees box.
You can do this by clicking on the double right arrow button, this will move all
the employees in the Available Employees list to the Attendee list.
The employees' names will now appear on the Attendees box.
You can do this by moving the mouse cursor over the employee
you wish to invite and clicking the left mouse button once to select
it from the "Available Employees" list. Now you click on the single left arrow button to
put his/her name in the "Attendees" list. The employee's name will
now appear on the Available Employees list.
Probably want to use 'uninvite' instead of invite in this area.
You can do this by clicking on thesingle left arrow button , this will move all the employees in the Attendees list to the Available Employees list.
This should probably read double, not single.
Alias of a meeting group are enclosed in ["alias name"], which
will be shown in the Available Employees list after the names of all
the employees. To add an alias to the Attendee list, click on the
alias group, then click on the single right arrow button. This will move all the
employees in that alias group into the Attendees list and their name
will appear on the Attendee list instead.
Are individual employees listed on the right side? What about employees that are already included because of an alias? (Visual question - we're trying to make sure that we really understand what is being described here.)
Alias of a meeting group are enclosed in ["alias name"], which
will be shown in the Attendee list after the names of all other
attendees. To delete an alias from the Attendee list, click on the alias
group, then click on the single left arrow button. This will move all the employees in that alias group into the Attendee list and their name will appear on the Available Employee list instead.
Is it a name or an alias that you would see?
If you click on the "OK" button, then a message will indicate
that the employee/s you just selected is/are being added or deleted in
the list. TimeTracker will proceed to notify all the attendees
affected by the changes automatically.
If you click on the "Cancel" button, then a message will
indicate that no additions or deletions is made and the Attendee list
remains unchanged.
How to Schedule a New Meeting:
Time Tracker allows you to schedule employee meetings in two different ways:
User scheduled where you pick the specific time for the meeting and the computer schedules it
Computer scheduled where you specify a range of times and dates and the computer finds the best time
, that is, where the most people can attend.
Schedule a new meeting by selecting add meeting from listI. User Scheduled Meetings:
The computer will
schedule a new meeting for the exact date and time that
you specify.STEPS:
The Manual Scheduler Screen
Type of Meeting: This option allows you to schedule a
meeting which is One Time Only (meeting occurs only
once), Weekly (meeting occurs once a week), or
Monthly (meeting occurs once a month).
Date: Select the Month, Day and Year which indicate the
desired date of the new meeting.
Time: This is the start time of the new meeting.
Duration: This indicates how long the new meeting
will take.
Cancel: Returns you back to the Meeting
Scheduler screen without scheduling a new
meeting.
OK: The Time Tracker system will attempt to schedule
a meeting corresponding to your specifications. At this
point, the Confirmation screen will appear.
Cancel: Returns you back to the Manual
Scheduler screen without scheduling the
meeting.
Commit: Schedules the new meeting and informs those
employees who are required to attend.
TIPS:
If you have a specific meeting time in mind, use the User
Scheduled scheduling option.
An effective way to use the Manual Scheduler is to specify
meeting particulars and then examine the Confirmation screen.
It is here that you can determine if it is worth actually scheduling
the meeting or not. If you would like to see how a different time
would work for example, simply go back to the Manual Scheduler
screen (via the Cancel button) and try again. This very
useful when you have specific meeting details (e.g., time, date,
etc.) in mind and wish to manually determine the best meeting for
everyone involved.
Given a specified date and time range, the computer will schedule a new meeting for the time when the most employees can attend.
II. Computer Scheduled Meetings: STEPS:
The Computer Scheduler Screen
Range of Acceptable Dates: The new meeting will be
scheduled sometime after the From date and before
the To date.
Range of Acceptable Times: The new meeting will be
scheduled sometime after the From time and before
the To time.
Duration: This indicates how long the new meeting
will take.
Cancel: Returns you back to the Meeting
Scheduler screen without scheduling a new
meeting.
OK: The Time Tracker system will attempt to schedule
a meeting corresponding to your specifications. At this
point, the Confirmation screen will appear.
Cancel: Returns you back to the Automatic
Scheduler screen without scheduling the
meeting.
Commit: Schedules the new meeting and informs those
employees who are required to attend.
TIPS:
If you are flexible as to the exact time of
a meeting, use the Computer Scheduled scheduling option
since this method
will result in the highest possible employee attendance
without you having to manually examine possible solutions.
Section 5 -- Setting Your Availability
How to Set Up Your Availability:
STEPS:
The Availability Screen will appear, which lists the seven days of the week in a column with boxes entitled
"Available From" and "Available To:".
A pull down menu will appear beside the box listing all the half hour intervals in a day
This time will now appear in the "Available From:" box
A pull down menu will appear beside the box listing all the half hour intervals in a day
This time will now appear in the "Available To:" box
TIPS:
You can move among the text boxes without moving
the mouse by pressing the 'Tab' and 'shift-Tab' keys on the
keyboard.
Section 6 -- Setting up an alias
How to set up an alias:
The Alias WindowSTEPS:
The arrow buttons between the two lists are used to move items between
the "Available Employees" and the "Alias list". By highlighting the
members in the "Available Employees" box and clicking the single arrow
that points towards the "Alias list", the system will add the
highlighted members to the new group alias.
The system also has the option of adding all individuals from the
"Available Employees" list by clicking on the double arrow icon pointing
towards the "Alias list" box.
If the member(s) you wish to move to the "Alias list" was not moved you
may have not highlighted the member(s) from the "Available Employees"
box.
Highlight the member(s) from the "Alias list" and click the single arrow
key that points to the "Available employees" list will remove the
highlighted member(s). The double arrow icon will remove all members
from the "Alias list"
If the member(s) you wish to remove from the "Alias list" was not
removed you may have not highlighted the member(s) from the "Alias
list".
Click the "OK" button to leave this screen or click the "Cancel" button
to cancel the current operation.
The Alias Window with pull down menu openTIPS:
Double clicking any user in either box will transfer that user to the other box.
To add all employees from the "Available Employees" list you may want to
use the double arrow icon that points toward the "Alias list" box and
as well to delete all members from the "Alias list" you may use the
double arrow icon that points toward "Available Employees" box.
Appendix A -- Creating and Maintaining Employee Accounts