
The Virtual Realty Database System TM
Version 1.0
Created exclusively for PowerMax Realty by

Monday February 12, 1996
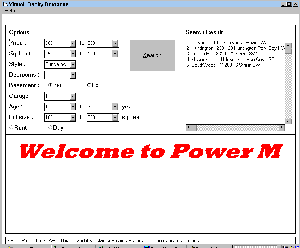
Fig 1. Main Screen
Finally, realtors can enter new listings into the database, modify their own listings, view all their own listings, and make offers on listings.

Fig 2. Login Screen
2.1.1.1 `Login' allows users to log in to the system.
2.1.2 Sample Call:
2.1.2.1 Jill, a realtor, wants to login to the system. She is presented with the login window. She enters her `Login Name', her `Password', and presses `OK'. The login window is replaced by the main window, with the system in realtor mode.
2.1.3 Inputs:
2.1.3.1 The user must enter a `Login Name' and a `Password'. If the `Login Name' is `guest' the system will be in `Buyer Mode'. Otherwise the system will be in either `Realtor Mode' or `Administrator Mode', depending on the user's type.
2.1.4 Outputs:
2.1.4.1 If either the `User Name' or `Password' is invalid, a popup screen informs the user. The user may press `OK' and try again. If the `User Name' and `Password' are valid, the main window appears. If the user is a realtor, the `Realtor' pulldown menu is present. If the user is an administrator, the `Realtor" and `Administrator' pulldown menus are present.
2.1.5 Subroutines Called:
2.1.5.1 This function will call a subroutine to verify the `User Name' and `Password'. start the system, placing the user in the appropriate mode.
2.1.6 Preconditions/Assumptions:
2.1.6.1 There are no preconditions or assumptions.
2.1.7 Algorithm:
2.1.8.1 After this function is finished, the system is in one of the three modes `Buyer' `Realtor', or `Administrator', with the main window displayed.
2.1.9 Error Handling:
2.1.9.1 In case either the `User Name' or `Password' is invalid, the user is informed via a popup window and can try again by choosing `OK'.
2.1.10 Called By:
2.1.10.1This function is called by choosing `OK' in the `User Login' window.
2.1.11 Limitations:
2.1.11.1 It is not intended that anyone except a realtor or administrator should know the guest password, and therefore general users should not be able to log in themselves.
2.2.1.1 Our system will have three different modes of access:
2.2.1.3 Regardless of the user's access level, there is dynamic help available at all times. Whenever the pointer moves over a region of the screen associated with some function of the program, a description of its functionality is displayed in the help area set aside at the bottom of the screen. Sample screens and flowcharts illustrate the layout and functionality of each task involved in a search.
2.2.2.1.1 The system is designed to provide the user with all of the tools needed for a comprehensive search on a single screen.
2.2.2.2 Sample Call:
2.2.2.2.1 The user is presented with search options that can be set to query the PowerMax Realty Database for houses on the basis of :

Fig 3. Buyer Search Screen
2.2.2.3 Input:
2.2.2.3.1 Each of the search options have designated default settings. The buyer can change these settings by manipulating the controls in the options box at the top left of the screen. Pull-down menus allow for a choice of the ranges of price, square footage, style, number of bedrooms, basement, garage, age, and lot size. `Rent' and `Buy' are chosen as search parameters by selecting radio buttons. The four quadrants of the city (NE, SE, NW, SW) are each represented by a check box. The scope of the search can be widened or narrowed by selecting any, or all, of these buttons. A user can enter a house reference number in the field provided, and if he should do so, all of the other options fields become unavailable, because at that point, they are superfluous. 2.2.2.3.2 Clicking on the `Search' button, which is located prominently in the Search Options pane, initiates the search.
2.2.2.3.3 Clicking on the `Previous Search' button performs a new search based on search options of the previous search. 2.2.2.4 Output:
The results of the search are listed in the scroll box on the upper right of the screen. The listings are displayed in alphabetical order according to the region or community within each of the chosen quadrants. The search options which are manipulated by pull-down menus and check boxes are left visible to the user while viewing search results. A new search is not initiated until the `Search' button is again pressed.
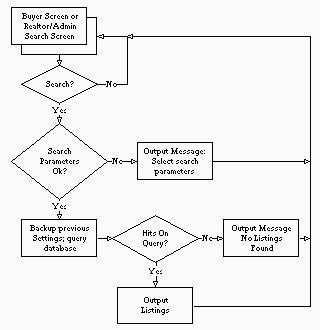
Fig. 4 - Flowchart outlining Basic Search function
2.2.2.5.1 By default, it is assumed that if a user does not specify a value or range for a search option, then all listings will be accepted -- e.g. if no choice is made for the price fields, then properties of all values will be displayed after a search. 2.2.2.6 Post Condition:
2.2.2.6.1 All listings meeting the given criteria are listed in the search result pane. 2.2.2.7 Error Handling:
2.2.2.7.1 If no listings are found that satisfy the current search conditions, a pop-up box displays a "Sorry, No Listings Found" message.
2.2.2.8 Limitations:
2.2.2.8.1 Dynamic searching is unavailable. The user must hit the `Search' or `Previous Search' button each time he or she wishes to make a new search. Sample Dialogue:
2.2.3.1.1 When a buyer is interested in a listing that was found during a query, double-clicking on it within the listbox brings up detailed information about that particular listing and a picture of the property, displayed at the bottom of the screen. The details of the listing, such as the asking price/rent, size of the lot/property, the parameters involved in the search, as well as other amenities that were not specified in the search are also displayed.
2.2.3.2 Sample Call:
2.2.3.2.1 Mr. Yamaguchi, the big boss, is searching for a property for one of his customers. The customer desires a bungalow for purchase between 190000 and 260000 dollars, 3 bedrooms and an attached two-car garage, but is uninterested in the age of the house or the area of the city. Mr. Yamaguchi smiles to himself at the commission he expects and enters the fields into the Search Options pane of the window. Only two properties meet the customer's specifications, however, so Mr. Yamaguchi has some hard selling to do.
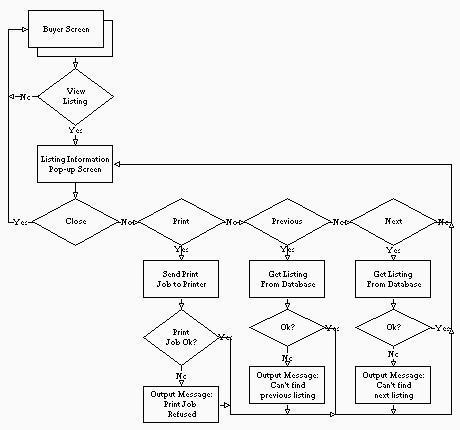
Fig. 5 - Flowchart outlining View/Print function
2.2.3.3.1 Options for the search are entered by means of selecting choices from the pull-down lists in the Search Options pane, with the exception of the reference number, which must be entered from a keyboard. Once the search options are specified, the `Search' button must be pressed.
2.2.3.3.2 If a user double-clicks on one of the listings in the `Search Results' list box, that listing will be displayed at the bottom of the program window.
2.2.3.3.3 The `Print' button is used to generate a hard copy of the window as it is currently displayed on the screen.
2.2.3.3.4 The `Previous Search' button recalls the last set of options entered by the user and makes a search on them immediately.
2.2.3.3.5 If the user is a realtor or an administrator, he or she may click on the picture of the listing to display the private information for that listing to which he has access, e.g. the offers made or the lister's comments. If the user then clicks on the private information, the picture is redisplayed.
2.2.3.4 Output:
2.2.3.4.1 If there were no properties which match a set of search options, a pop-up box is displayed for the user stating that fact.
2.2.3.4.2 If there were properties that matched the options, then they are listed in the `Search Results' list box.
2.2.3.4.3 If the user double-clicked on a listing in the `Search Results' list box, then that listing's information is displayed in the lower left of the window and a picture of the listing is displayed in the lower right.
2.2.3.4.4 If the user pressed the `Print' button, then a paper copy of the window is produced on the printer.
2.2.3.5 Preconditions/Assumptions:
2.2.3.5.1 The information that appears for a listing is modified for different access levels. Regular users, in buyer mode, are presented with general information about the listing that basically correspond with the search options. Realtor level access, and higher, have additional information displayed with each listing. This is private information, such as offers made, listing realtor comments, and owner information.
2.2.3.6 Post Condition:
2.2.3.6.1 After a search is made, users may display information on the results of the search or make a new search. Realtors and administrators can view more information than general users.
2.2.3.7 Error Handling:
2.2.3.7.1 If a search returned no successful matches, a dialog box is displayed.
2.2.3.8 Limitations:
2.2.3.8.1 Cannot view more than one listing at the same time. A set of listings cannot be selected for a batch printing job. Each individual listing must currently be in the View/Print window in order to produce a hardcopy.
2.2.4.1 Purpose:
2.2.4.1.1 The user invokes the Clear Options function in order to begin a completely new search.
2.2.4.2 Sample Call:
2.2.4.2.1 The user clicks on `Clear'. The search options return to default settings.
2.2.4.3 Input:
2.2.4.3.1 The search parameters can be reset to default settings with a click of the `Clear Listing Options' button in the upper left View/Print screen. A pop-up dialogue box will appear to inform the user that all current serch settings and results will be cleared. When the user clicks 'OK' in the dialogue box, the screen will return to the initial 'Welcome to PowerMax Realty' state. At this point all settings will be reset to their defaults.
Fig. 6 - 'Clear Search Options' Function Flowchart
2.2.4.4.1 This is essentially a reset for the system. When the 'Clear Listing Options' button is clicked, it does not matter whether or not any information has been set or any results displayed as the outcome will be the same for both situations. If no current search information is resident, it sets everything to default, otherwise it prompts the user for verification, with a dialogue box, before taking action. If the system has been idle for a certain period of time, a time-out mechanism initiates the 'Clear Listing Options' function, adding a time-out to the verification dialogue box as well (in case the user had intentionally left the screen untouched while still using the information).
2.2.4.5 Post Condition:
2.2.4.5.1 The resulting state of the system is always the initial start state, with the 'Welcome to PowerMax' Screen in the bottom window, and all of the search options set to default values.
2.2.4.6 Error Handling:
2.2.4.6.1 As most other functions are deactivated when in View/Print mode, only one situation, accidentally clicking on the button, can be considered error. As described previously, a pop-up dialogue box, with the message 'Clear all search settings and begin new search?', handles the situation of accidental initiation of the function.
2.2.4.7 Limitations: 2.2.4.7.1 The user is unable to access the results or search option settings from previous searches once the 'Clear Listing Options' function has been carried out. When changing a minor search option after having recieved results from a search, all of the search options must be manually reset as a new search would set everything to their default settings.
Sample Dialogue:
2.3.1.1 `Make Offer' allows the listing realtor of a property to enter an offer for that property.
2.3.2 Sample Call:
2.3.2.1 Jack, a realtor, is going to make an offer the house with property reference number 1234 for one of his clients. To be able to make the offer, Jack logs on and enters his password. He then chooses `Search by Reference' from the Realtor pulldown menu and enters the reference number 1234, causing information on that property to be shown. He can then choose `Make Offer' from the Realtor pulldown menu to enter the offer.

Fig. 7 - 'Make Offer' Function Screen Snapshot
2.3.3.1 Once the listing realtor selects `Make Offer' from the pulldown menu, a popup screen appears. The listing realtor can then enter the offer for listing and press the `OK' button to store the it in the database, or press the `Cancel' button exit without entering an offer. An offer must be a positive integer number of dollars.
2.3.4 Outputs:
2.3.4.1 After clicking `OK' a box will appear indicating whether the offer was successfully entered. If the `Cancel' button is chosen, the `Make Offer' popup screen disappears. In either case, the main window is re-enabled.
2.3.5 Subroutines Called:
2.3.5.1 This function will call a subroutine to generate the popup screen. When the user presses `OK', a subroutine is called to validate the offer. A final subroutine is then called to enter the offer into the database.
2.3.6 Preconditions/Assumptions:
2.3.6.1 There are no preconditions or assumptions.
2.3.7 Algorithm:
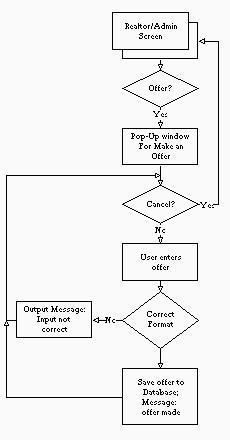
Fig. 8 - 'Make and Offer' Function Flowchart
2.3.8.1 After this function is finished, the offer is stored in the database and can be used for future reference. This offer will appear in the listing onformation popup screen for the listing.
2.3.9 Error Handling:
2.3.9.1 In case the offer is not a positive integer the listing realtor will be informed via a popup window and can try again by choosing `OK'.
2.3.10 Called By:
2.3.10.1 This function is selected from the pull down menu "Realtor" on the main search screen. It is only accessible to the lising realtor for the current listing.
2.3.11 Limitations:
2.3.11.1 There are no limitations to a realtor's action on this function.
2.4.1.1 The `View/Modify Listing' selection will allow a realtor or administrator to change any of the data pertaining to a listing:
2.4.2.1 Jack, a realtor, would like to change the price for one of his listings from $110,000 to $140,000. When he selects `View/Modify Listing' from the `Realtor' pull-down screen, the `View/Modify Listing' screen appears with the picture of the property and all the field data visible. The listing displayed corresponds to the reference number from the Realtor/Administrator screen. He moves the mouse cursor to the PRICE field, deletes the previous $110,000 price, and types in "140000". Jack selects the `Save' function to save the changed listing to the database. Finally, he selects `OK' and returns to the Realtor/Administrator screen.
2.4.3 Inputs:
2.4.3.1 When the user selects `View/Modify Listing' from the pull-down menu, a pop-screen appears. This has text boxes with the previous listing data. The user can change any data in the text boxes and save them (and exit) by pressing the `OK' button. To not save any changes made or to just exit, the user can press `Cancel'.
2.4.3.2 Valid entries for each field are as follows:
2.4.4.1 After clicking `OK' a box will appear on the screen indicating whether the save to the database was successful. In case `Cancel' was selected, the `View/Modify Listing' pop-up screen just disappears. In both cases, the Realtor/Administrator Search screen becomes fully visible again.
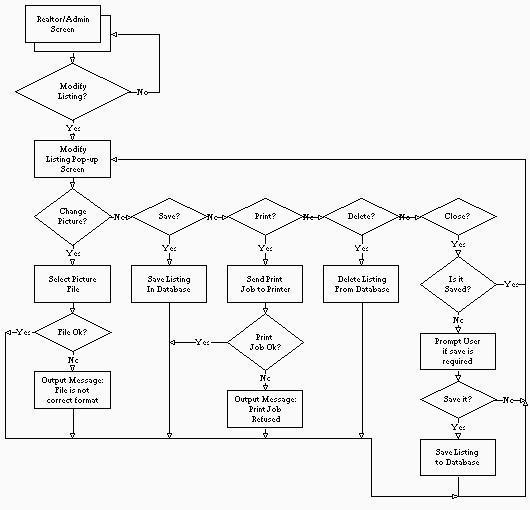
Fig. 9 - 'View/Modify Listing' Function Flowchart
2.4.5.1 This function will call a subroutine to generate the pop-up screen. When the user presses `OK', a subroutine to check the validity of all entries must be made. Then to save the changed listing to the database, another subroutine must be called.
2.4.6 Preconditions/Assumptions:
2.4.6.1 No real assumptions are being made. No assumptions are made about the validity of any entries.
2.4.7 Algorithm:
2.4.8.1 After this function is finished, a modified listing is saved to the database (replacing the old one) and the user returns to the previous Realtor/Admin screen.
2.4.9 Error Handling:
2.4.9.1 In case any entries are invalid, the user will be informed via a pop-up window that (for example) in the price field, there are invalid characters. In case a save is not possible to the database, a pop-up window will inform the user that a save to the database is not possible at this time.
2.4.10 Called By:
2.4.10.1 This function is selected from the pull-down menu `Realtor' on the main Realtor/Administrator search screen.
2.4.11 Limitations:
2.4.11.1 It would be a nice feature to limit the characters that can be entered for each field. For example, when selecting a price for a listing, only numbers are allowed to be entered.
2.5.1.1 `Insert New Listing' allows a realtor to enter a new listing into the database, with the resulting listing belonging to the realtor.
2.5.2 Sample Call:
2.5.2.1 Jill, a realtor, would like to insert a new listing into the database. When she selects `Insert New Listing' from the `Realtor' pulldown menu a popup screen appears. She first associates a previously scanned photograph of the property with the listing. She continues to fill in the price, square footage, etc. After she has filled in all the information she selects `OK' to save the listing in the database.

Fig. 10 - 'Insert a New Listing' Function Screen Snapshot
2.5.3 Inputs:
2.5.3.1 Once the listing realtor selects `Insert New Listing' from the pulldown menu, a popup screen appears. This is the same as the one that appears when a realtor chooses the `Modify Listing' option. The realtor can then enter all the information for listing and press the `OK' button to store the it in the database, or press the `Cancel' button exit without entering an offer.
2.5.3.2 Valid entries for the fields are as follows:
2.5.4.1 After clicking `OK' a box will appear indicating whether the listing was sucessfully added to the database. If the `Cancel' button is chosen, the Insert New Listing popup screen disappears. In either case, the Realtor/Administrator screen becomes fully visable again.
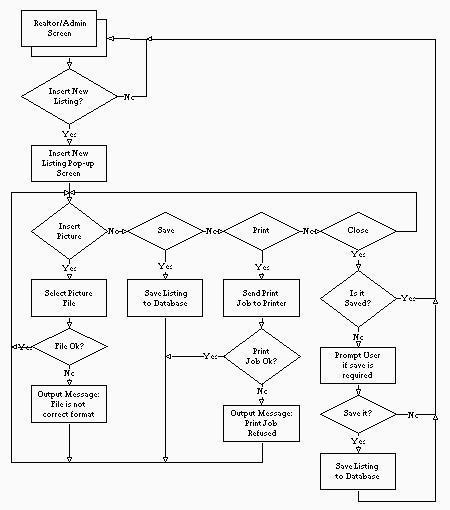
Fig. 11 - 'Insert a Listing' Function Flowchart
2.5.5.1 This function will call a subroutine to generate the popup screen. When the user presses `OK', a subroutine is called to to validate all entries. A final subroutine is then called to enter the new listing into the database.
2.5.6 Preconditions/Assumptions:
2.5.6.1 It is assumed that the listing is new, i.e., there is not a listing for the same property in the database.
2.5.7 Algorithm:
2.5.8.1 After this function is finished, the listing is assigned a unique reference number and saved to the database. The listing belongs to the current realtor. The realtor then returns to the previous Realtor/Admin screen.
2.5.9 Error Handling:
2.5.9.1 In case any entries are invalid, the user will be informed via a popup window that (for example) in the price field, there are invalid characters. In case a save is not possible to the database, a popup window will inform the user that a save to the database is not possible at this time.
2.5.10 Called By:
2.5.10.1 This function is selected from the pull down menu "Realtor" on the main search screen.
2.5.11 Limitations:
2.5.11.1 As in `Modify Listing', it would be a nice feature to limit the characters that can be entered for each field.
2.6.1 Purpose:
2.6.1.1 `Delete Listing' allows the listing realtor of a property or the administrator to remove that property from the active search list. If a listing is deleted it is no longer visible during a search.
2.6.2 Sample Call:
2.6.2.1 Jack, a realtor, has sold a house with property reference number 1234 for one of his clients. To be able to delete the listing, Jack logs on and enters his password. He then chooses `Search by Reference' from the Realtor pulldown menu and enters the reference number 1234, causing information on that property to be shown. He can then choose `Delete Listing' from the Realtor pulldown menu to delete the listing.
2.6.3 Inputs:
2.6.3.1 Once the listing realtor selects `Delete Listing' from the pulldown menu, a popup screen appears. The listing realtor can then press the `OK' button to delete it, or press the `Cancel' button exit without deleting the listing.
2.6.4 Outputs:
2.6.4.1 After clicking `OK' a popup window will appear requesting the realtor for confirmation. If the `Cancel' button is chosen, the `Delete Listing' popup screen disappears. In either case, the main window is re-enabled.
2.6.5 Subroutines Called:
2.6.5.1 This function will call a subroutine to generate the popup screen. When the user presses `OK', a subroutine is called to to generate the confirmation popup window. A final subroutine is then called to delete the listing.
2.6.6 Preconditions/Assumptions:
2.6.6.1 There are no preconditions or assumptions.
2.6.7 Algorithm:
2.6.8.1 After this function is finished, the listing is no longer available from the search screen.
2.6.9 Error Handling:
2.6.9.1 In case the listing cannot be deleted the realtor will be informed via a popup window and can try again by choosing `OK'.
2.6.10 Called By:
2.6.10.1 This function is selected from the pull down menu `Realtor' on the main search screen. It is only accessible to the listing realtor (or administrator) for the current listing.
2.6.11 Limitations:
2.6.11.1 There are no limitations to a realtor's action on this function.
2.7.1.1 The `Modify Personal Info' menu selection allows a realtor to modify his or her personal information, including:
2.7.2.1 Jack has changed his pager and has a new Motorola(TM) mobile phone, so he is trying to update his personal information. He chooses `Modify Personal Info' from the `Realtor' pull-down menu and his personal information is then shown. He can update his pager number and enter the mobile phone number into the `CONTACT PHONE NUMBER' field. He can then save it and his personal infomation is updated.
2.7.3 Inputs:
2.7.3.1 Once the listing realtor selects `Modify Personal Info' from the pull-down menu, a pop-up screen appears, showing the realtor's personal information. The realtor can then change any personal information and press the `OK' button to save the changes, or press the `Cancel' button exit without making any changes.
2.7.3.2 Valid entries for the fields are as follows:
2.7.4.1 After clicking `OK' a box will appear indicating whether the changes were sucessfully added to the database. If the `Cancel' button is chosen, the `Modify Personal Info' pop-up screen disappears. In either case, the Realtor/Administrator screen becomes fully visible again.
2.7.5 Subroutines Called:
2.7.5.1 This function will call a subroutine to generate the popup screen. When the user presses `OK', a subroutine is called to to validate all entries. A final subroutine is then called to enter the new listing into the database.
2.7.6 Preconditions/Assumptions:
2.7.6.1 It is assumed that the listing is new, i.e., there is not a listing for the same property in the database.
2.7.7 Algorithm:
2.7.8.1 After this function is finished, a modified personal record is saved to the database and the realtor returns to the previous Realtor/Admin screen.
2.7.9 Error Handling:
2.7.9.1 In case any entries are invalid, the user will be informed via a pop-up window that (for example) in the phone number field, there are invalid characters. In case a save is not possible to the database, a pop-up window will inform the user that a save to the database is not possible at this time.
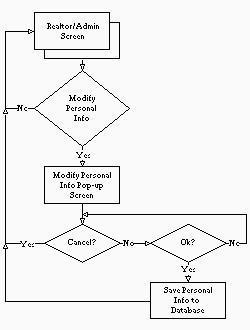
Fig. 12 - 'Modify Personal Information' Function Flowcharts
2.7.10.1 This function is selected from the pull-down menu `Realtor' on the main search screen.
2.7.11 Limitations:
2.7.11.1 As in `Modify Listing', it would be a nice feature to limit the characters that can be entered for each field.
2.8.1.1 `Reassign Listing' enables an administrator to take a listing from one realtor and give it to another realtor.
2.8.2 Sample Call:
2.8.2.1 The big boss at the PowerMax Realty office, the respected and feared Mr. Yamaguchi, has decided to terminate the employment of Ms. Sato, one of the realtors in the office. However, before he can call security to have her escorted to the door, he has to make sure she can't take any of the company's privileged information with her. Mr. Yamaguchi selects "Naomi Sato" from the `Original Realtor' list and "Ken Yamaguchi" from the `New Realtor' list, and since he is reassigning all of Ms. Sato's listings, he selects the `All Listings' radio button. Finally, he presses `OK' to confirm the operation and leans back in his chair, satisfied with a good beginning to another good day at PowerMax Realty.
2.8.3 Inputs:
2.8.3.1 After the `Reassign Listing' control has been invoked, a dialog box appears. The administrator must then select the realtor from whom listings are to be taken from the `Original Realtor' list control and the realtor to whom listings are to be given from the `New Realtor' list control. By selecting one of the two radio buttons, the administrator can choose either to reassign only one listing or to reassign all of an original realtor's listings. If the administrator chooses to reassign only one listing, he or she must also enter the reference number of that listing. Finally, the administrator must choose either `OK' to accept the transfer or `Cancel' to abort the operation.
2.8.4 Outputs:
2.8.4.1 After choosing `OK' a box will appear indicating whether the offer was successfully entered. If the `Cancel' button is chosen, the `Reassign Listing' pop-up screen disappears. After all is done, the main window is re-enabled.

Fig. 13 - 'Reassign Listing' Function Screen Snapchot
2.8.5.1 This function will call a subroutine to generate the pop-up dialog box. When the user presses `OK' on the dialog box, a subroutine will be necessary to check the reference number. A final subroutine is then called to switch the listing.
2.8.6 Preconditions/Assumptions:
2.8.6.1 There are no especial preconditions or assumptions.
2.8.7 Algorithm:
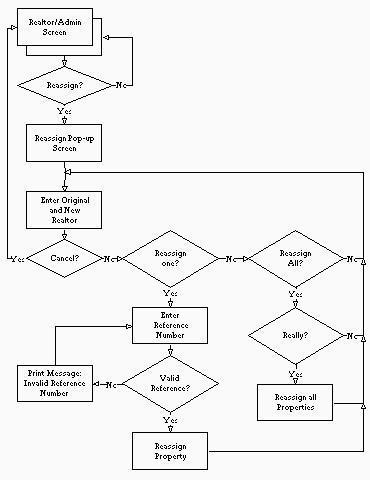
Fig. 14 - 'Reassign Listing' Function Flowcharts
2.8.8.1 If the user selected the `OK' button in the dialog box and all the inputs were valid, then the listing will have been reassigned to the new realtor.
2.8.8.2 If the user selected the `Cancel' button in the dialog box, the operation will have had no effect at all.
2.8.9 Error Handling:
2.8.9.1 The dialog box must check to see if a reference number exists and represents a listing that is actually assigned to the original realtor.
2.8.9.2 The dialog box must not present the name of the selected original realtor in the new realtor list, nor may it present the name of a selected new realtor in the original realtor list. If errors cannot occur, errors will not occur.
2.8.9.3 The dialog box will not present names of realtors who have no listings as original realtors.
2.8.9.4 The dialog box must only exit when `Cancel' is pressed or when `OK' is pressed and all the fields are valid.
2.8.10 Called By:
2.8.10.1 This function is selected from the pull-down menu called `Administrator' on the main window, so it is called by the event handler for the main window.
2.8.11 Limitations:
2.8.11.1 To reassign more than one of a realtor's listings but fewer than all of them, this function must be invoked once per reassignment.
2.9.1.1 `Modify Employee Info' changes the information that PowerMax Realty keeps about its employees.
2.9.2 Sample Call:
2.9.2.1 Ms. Goro, a realtor with PowerMax Realty, has just finished taking a degree in Computer Science in her spare time. Accordingly, the powers that be at PowerMax Realty have decided to give her Administrator access to their database. Mr. Yamaguchi, the big boss in Ms. Goro's office, calls up the `Modify Employee Info' dialog box and selects Ms. Goro's name in the `Name' control. All of Ms. Goro's current statistics are displayed in the various fields of the dialog box, but all Mr. Yamaguchi does is change the `Realtor' display in the `Access Level' control to `Administrator'. Now Ms. Goro can do anything Mr. Goro can do.

Fig. 15 - 'Modify Employee Information' Function Screen Snapshot
2.9.3.3 The administrator may type in the name of a PowerMax employee or alternately may select the name from the scrolling list.
2.9.3.4 The only other field that must be filled in is the `Access' field. All others are optional.
2.9.4 Outputs:
2.9.4.1 If at any time the administrator presses the `Cancel' button, the operation in progress is aborted and control reverts to the main window.
2.9.4.2 If the user presses the `OK' button without having entered all the input necessary, an informative message appears and the dialog remains. If the user presses the `OK' button when enough fields have been filled in, an informative message is shown and the desired operation is performed.
2.9.4.3 If the operation was successful, then the employee record referenced by the `Name' field is altered appropriately.
2.9.5 Subroutines Called:
2.9.5.1 This function requires subroutines to create a dialog box, to print useful feedback messages, and to read and write records in the employee database.
2.9.6 Preconditions/Assumptions:
2.9.6.1 To use this function, it will be necessary to have summoned the `Modify Employee Info' item from the `Administrator' menu and then to have selected the `Change Employee' radio button on that dialog box.
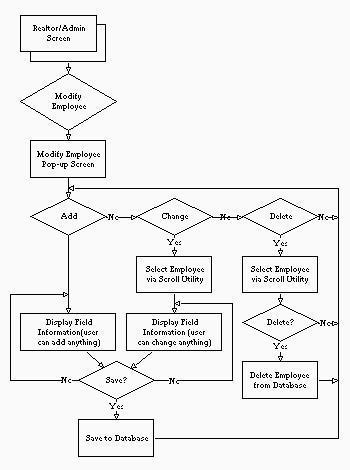
Fig. 16 - 'Modify Employee Information' Function Flowcharts
2.9.8.1 If the `Cancel' button was pressed, no changes are made.
2.9.8.2 If the `Ok' button was pressed successfully, the change is made to the record in the employee database.
2.9.9 Called By:
2.9.9.1 This function is called by the `Modify Employee Info' dialog box.
2.9.10 Error Handling:
2.9.10.1 If the user does not fill in enough fields for an operation to succeed and presses the `OK' button, then a short message indicating that a radio button must be selected or that both the `Name' and `Access' fields must be filled in.
2.9.10.2 If the user does change the employee database, a short message should be displayed in order to confirm to the user that the requested change was made.
2.9.11 Limitations:
2.9.11.1 There are no specific limitations to this function.
2.10.1.1 The purpose of this facility is to be able to add a new employee to the database of PowerMax Realty employees.
2.10.2 Sample Call:
2.10.2.1 Mr. Yamaguchi considers hiring a new realtor to
replace the departing Ms. Sato. He interviews several applicants and
finally settles on Mr. Taeda as his new realtor. Again he summons the
`Modify Employee Info' dialog box. This time, he selects the `Add
Employee' radio button, and all the other fields in the database await
his input. Into the `Name' edit list he types "Hiro Taeda", in the
`Access Level' list he chooses "Realtor", and into the `Email Address'
edit box he types "
2.10.3 Inputs:
2.10.3.1 The administrator must type in a new name into the
`Name' control; this name must be unique amongst all the names of the
employees of PowerMax Realty, as it serves as the userid for the
database.
2.10.3.2 The only other field that must be filled in is the
`Access' field. All others are optional.
2.10.4 Outputs:
2.9.4.1 If at any time the administrator presses the `Cancel'
button, the operation in progress is aborted and control reverts to
the main window.
2.10.4.2 If the user presses the `OK' button without having
entered all the input necessary, an informative message appears and
the dialog remains. If the user presses the `OK' button when enough
fields have been filled in, an informative message is shown and the
desired operation is performed.
2.10.4.3 If operation was successful, then a new employee
record is added to the employee database.
2.10.5 Subroutines Called:
2.10.5.1 This function requires subroutines to create a
dialog box, to print useful feedback messages, and to read and write
records in the employee database.
2.10.6 Preconditions/Assumptions:
2.11.6.1 To use this function, it will be necessary to have
summoned the `Modify Employee Info' item from the `Administrator' menu
and then to have selected the `Add Employee' radio button on that
dialog box.
2.10.7 Algorithm:
2.10.8.1 If the `Cancel' button was pressed, no changes are
made.
2.10.8.2 If the `OK' button was pressed successfully, the
employee selected is added the database.
2.10.9 Called By:
2.10.9.1 This function would be called by the `Modify
Employee Info' dialog box event handler.
2.10.10 Error Handling:
2.10.10.1 If the user does not fill in enough fields for an
operation to succeed and presses the `OK' button, then a short message
indicating that a radio button must be selected or that both the
`Name' and `Access' fields must be filled in.
2.10.10.2 If the user does change the employee database, a
short message should be displayed in order to confirm to the user that
the requested change was made.
2.10.11 Limitations:
2.10.11.1 There are no specific limitations to this function.
2.11.1.1 The purpose of this facility is to be able to delete an
employee to the database of PowerMax Realty employees.
2.11.2 Sample Call:
2.9.2.1 The redoubtable Mr. Yamaguchi is back. Now that he
has reassigned all of Ms. Sato's listings to other realtors, he can
fire her without worrying that she will take business away from
PowerMax. He dials up security to remove her bodily from the office
and turns to his computer to finish the job (so to speak). He pulls
down the `Administrator' menu and selects the `Modify Employee Info'
item. The first control is a set of radio buttons indicating the
purpose of the modification, and he chooses `Delete Employee'. He
scrolls through the list of names until he finds Ms. Sato's name and
selects it. Finally, he presses `OK' and after a reassuring message
that the system has in fact deleted the hapless realtor, Mr. Yamaguchi
is almost content. He changes the guest password and backs up the
database, and finally rests upon his laurels. After all that hard
work, a manager needs a big lunch.
2.11.3 Inputs:
2.11.3.1 The administrator may type in the name of a PowerMax
employee or alternately may select the name from the scrolling list.
2.11.4 Outputs:
2.11.4.1 If at any time the administrator presses the
`Cancel' button, the operation in progress is aborted and control
reverts to the main window.
2.11.4.2 If the user chose to `Delete Employee' and the
operation was successful, then the employee record referenced by the
`Name' field is removed from the employee database.
2.11.5 Subroutines Called:
2.11.5.1 This function requires subroutines to print useful
feedback messages and to read and delete records in the employee
database.
2.11.6 Preconditions/Assumptions:
2.11.6.1 To use this function, it will be necessary to have
summoned the `Modify Employee Info' item from the `Administrator' menu
and then to have selected the `Delete Employee' radio button on that
dialog box.
2.11.7 Algorithm:
2.11.8.1 If the `Cancel' button was pressed, no changes are
made.
2.11.8.2 If the `OK' button was pressed successfully, the
employee selected is removed from the database.
2.11.9Called By:
2.11.9.1 This function would be called by the `Modify
Employee Info' dialog box event handler.
2.11.10 Error Handling:
2.9.10.1 If the user does not fill in enough fields for an
operation to succeed and presses the `OK' button, then a short message
indicating that a radio button must be selected or that both the
`Name' and `Access' fields must be filled in.
2.9.10.2 If the user does change the employee database, a
short message should be displayed in order to confirm to the user that
the requested change was made.
2.11.11 Limitations:
2.11.11.1 There are no specific limitations to this function.
To provide the user with online help.
2.12.2 Sample Calls:
Help is both dynamic and called by clicking on the help button at the top of the screen.
The inadvertantly calls the dynamic help function each time the pointer is passed over an
active button or region.
2.12.3 Inputs:
2.12.3.1 Passing the pointer over active regions or buttons initiates the dynamic help function.
2.12.3.2Clicking on the Help button calls the window style help.
2.12.4 Outputs:
2.12.4.1 A text window constantly displays the dynamic help at the bottom of the
screen.
2.12.4.2 A Pop-up window witha table of contents and index searching appears when
'Help' is clicked.
2.12.5.1 Subroutines to activate the pop-up window and dynamic help display are
called.
2.12.6 Called By:
2.12.6.1Help can be called from any point int the system, in any level of
access, except when another pop-up window is active.
2.12.7 Preconditions:
2.12.7.1No other pop-up window can be active for the help to execute.
2.12.8 Algorithm:
2.12.8.1 User clicks on help. Help screen pops up
Fig. 19 - 'Help' Function Flowcharts
2.12.9.1 No set parameters for error handling
2.12.10 Limitations:
2.12.10 Inactive when another pop-up window is open.
2.13.1.1 The purpose of the `Exit' selection is to log off
the database and shut down the client window.
2.13.2 Sample Calls:
2.13.2.2 Mr. Yamaguchi, the PowerMax Realty boss, is going
home for the day. He moves his mouse pointer over the to `Realtor'
button on the main menu bar and selects `Exit' from the pull-down
menu. The system closes politely and now all he has to do is deal
with the vicissitudes of Windows.
2.13.2.3 After Mr. Yamaguchi has shut down his own machine,
he notices that one of the user terminals in the realty office is
still on. That terminal is running the Virtual Realty Database client
as a non-privileged user, so Mr. Yamaguchi can't exit the same way he
exited from the session in his office, but because he knows the
password for the user terminals, he can log off anyway. He walks over
to the terminal, double-clicks on the system menu icon on the window,
and types in the password at the dialog box. The client window closes
and now Mr. Yamaguchi has to deal with Windows again. He makes a
mental note to himself to fire somebody tomorrow.
2.13.2.1 Little Reiko-chan is four years old and loves
playing with the mouse hanging from the terminal in the office while
her parents discuss incomprehensible grownup matters with all the
other big people. She plays with the mouse for a while and the screen
does interesting things. Eventually, Reiko-chan is dragged away by
her parents who are going to visit a property with one of the real
estate agents, and all of the other people in the office breathe a
sigh of relief that not even an inquisitive four-year-old can put the
database into an unusable state.
2.13.3 Inputs:
2.13.3.1 To leave the database via the Exit option, a user
selects the `Realtor' button in the menu bar and then the `Exit'
button in the `Realtor' pull-down menu.
2.13.3.2 The system menu is available by clicking on the button in
the furthest upper left of the application window or by pressing the
key combination Alt+Space. Selecting `Close' from that menu will exit
the program. As an alternative to selecting the `Close' option
directly, a user may double-click on the system menu button, which
will select the `Close' operation automatically.
2.13.4 Outputs:
2.13.4.1 If the user is an administrator or a realtor, the
program simply exits without producing any other output at all.
2.13.4.2 Otherwise, this function generates a dialog box into
which the user is expected to type a password. If the password is
given correctly, the program exits as before. If the password is not
given correctly or if the logout procedure times out, the dialog box
disappears and control is given back to the main screen.
2.13.5 Subroutines Called:
2.13.5.1 This function calls subroutines to create a dialog
box, to log off the database, and to close the program window
gracefully.
2.13.6 Called By:
2.13.6.1 The exit procedure is called by the event handler
when the user selects `Close' from the `System' menu or `Exit' from
the `Realtor' menu.
2.13.7 Preconditions:
2.13.7.1 Only if the user is not a realtor or administrator
is he or she asked for a password to exit the program.
2.13.8 Algorithm:
2.13.9.1 If the user enters an incorrect password at the
dialog box, the dialog box closes and the program returns to the main
screen.
2.13.10 Limitations:
2.13.10.1 A malicious user may try an unlimited number of times to
guess the exit password.
3.1.1 There are a variety of features relating to the project. The system was
designed so that there were little movement between different screens. This
is done because it would be easier to remember information and less time
consuming. Each window has several functions that are easier to navigate
between major functions.
3.1.2 Database Security
3.1.2.1 Features built into the Microsoft Access database engine will be used to address
security issues. Those issues are:
3.1.2.3 To prevent a realtor (using some means outside the application) from seeing the offers
made on another realtor's listing, each realtor will be given his/her own offers table which
only (s)he and administrators can access.
3.1.2.4 Finally, to prevent someone from determining the contents of the database file by direct
inspection, it will be encrypted using Access's built in facilities for doing this.
3.1.3 System Access Groups
3.2.1 All data used by the real estate listing system will be managed by a
Microsoft Access relational database system. The database employed
will consist of 4 tables. The tables along with the pieces of information
they will hold are detailed below.
3.3.1 Each of the functions has been assigned a letter representing the lowest level of access required to use the function. Buyer is represented by (B), Realtor by (R), and Administrator by (A).
3.3.2 Backup/Restore Database (A)
3.3.2.1 This option is used at the end of the day where the administrator would back up the vital data in the database.
3.3.3 Delete Listing (R)
3.3.3.1 When a property has been sold or rented, or the owner chooses to remove the listing, the listing realtor or the administrator deletes the listing from the database.
3.3.4 Detailed Listing (B)
3.3.4.1 Details from the listing selected will be displayed beside a photo of the listing on the bottom half of the screen.
3.3.5 Exit (R)
3.3.5.1 The 'Exit' function is
available through the 'Realtor' drop-down menu, while in Realtor Mode
or Administrator Mode. To prevent the Buyer from accidentally closing
the program, while in Buyer Mode the 'Exit' function is accessed through
the system menu
button 'Close' option. When this is selected, the user is prompted to
enter the 'guest' password to exit the program. If an incorrect
password is entered, the program returns to the search screen, with
all options reset to default values.
3.3.6 Help (B)
3.3.6.1 There is a help button that brings up a help window regarding information related to the current screen. Context-sensitive help is also active on all screens.
3.3.7 Insert New Listing (R)
3.3.7.1 Allow a Realtor enter in information of a new property,
to be placed in the database.
3.3.8 Make an Offer (R)
3.3.8.1 Allows the user (Listing Realtor/Administrator) to enter a
reference number (of the listing in the found list) and make offers to a
selected listing.
3.3.9 Modify Employee Information (A)
3.3.9.1 Allow the Administrator to add, delete and modify employee
information. Also this level allows the
administrator to reassign realtors to a listing.
3.3.10 Modify Listing (R)
3.3.10.1 Allow the user (Listing Realtor/Administrator) change
the listing information and view the offers of that
listing, but for the Non-Listing Realtor, they would
just view the general information of that listing.
3.3.11 Modify Personal Information (R)
3.3.11.1 Allow a Realtor to modify their personal information without
having to go to the Administrator all the time to make minor changes.
3.3.12 Print Detailed Listing (B)
3.3.12.1 After selectiong a listing for detailed information, a user
can print out the details.
3.3.13 Re-Assign Listing (A)
3.3.13.1 The administrator can move the listing and make it belong to another realtor. This is used just in case the Realtor who owned that listing left the company or for any other reason.
3.3.14 Search (B)
3.3.14.1 This part is capable of searching through a database of
listings (properties) available on the market. The user can enter
search parameters (top left hand corner of screen) and after a search
has been initiated, matching listings would show up in a results box
(top right corner of the screen). The user can select any of the
available listings and the results would show up at the bottom of the search
screen giving details of the listing and a possible picture. The user is
able to printout out the listing if they choose.
4.1.2 After the presentation is done and all necessary
corrections to this document are made, one final design document will
be produced by Twelve Monkeys Software which will describe the system
in sufficient detail for it to be implemented and tested upon a real
computer. This final document will include such things as pseudo-code
for all the system's functionality, detailed descriptions of the
interfaces between the system's modules, and an outline for the
testing of the system once it has been coded up.
4.1.3. This final, detailed design document will be delivered
on Thursday, 22 February 1996 for evaluation by PowerMax Realty Inc.
4.2.2 The functions of the realtor and administrator, where
they differ from the functions of searching the database for listings,
have been moved off the screen altogether into pull-down menus on the
menu bar. These menus are not available to users who are not realtors
or administrators respectively, so the functions on them are kept
secure from general users and the program is made easier to use.
4.2.3 In the customer's preliminary specification, it was
desired that the system provide a map from which a user could select
regions of a city in which to search for listings. However, that
feature has been deleted altogether in this design document. The
representatives of PowerMax Realty seem to have changed their mind
about the feature's relative importance.
4.2.4 A feature requested in PowerMax Realty's initial
specification but which was overlooked in the preliminary design,
namely the ability to back up and restore the listing database, has
been included in this design. Since only the system administrator is
permitted to handle backups, access to the feature is available only
through the Administrator pull-down menu on the menu bar, which is
visible only to users who have Administrator access to the database.
4.2.5 The representative of PowerMax Realty requested a number
of other cosmetic changes to the interface, namely the relabelling of
interface controls, the inclusion of listing reference numbers and
listing-sold status the search results report, and the addition of a
mouse-sensitive status bar to the window. All these things have been
accomplished.
4.3.2 As implemented currently, the database is searched only
when all desired criteria are specified and the Search Database button
control is pressed. What might be done instead is have the search
results list changed every time any criterion is changed, thus making
it possible for users to perceive the effect of the altered variable
upon the set of acceptable results instantly. Unfortunately, it is
suspected that it would be very difficult to implement this concept.
There is not likely enough time to complete the project if this kind
of dynamic searching is made a feature of the system, but future
versions of the system might do well to include it.
5.1.3 This system also addresses the needs of PowerMax realtors and administrators.
Our company has provided various functions to help realtors, as listed below:
5.1.6 It is our hope that the interface that we provide PowerMax reality will be as
efficient, reliable and easy to use as possible.
5.2.2 To start up the system, a PowerMax realtor or administrator will log on and, depending on the ID used, the system will function in Buyer (or Customer) Mode, Realtor Mode or Administrator Mode. If upon logging on, a realtor or administrator decides
the terminal will be used for buyers only, the sign-on ID will be 'guest', with a password that is determined, and frequently reset, by the administrator.
The system will now only feature the buyers' screen and the general buyer searching
function. A realtor can also sign-on the system in Realtor Mode and thus have access
to the buyers' search screen and function as well as realtor functions as listed above.
Of course, only those deemed administrators are permitted to sign-on in administrator
mode and thus have access to all buyer, realtor and administrator functions.
5.2.3 Buyer Mode:
5.2.3.1 When the system is in Buyer Mode, users will be faced with only one screen
and be able to use one major function - that being the searching function.
Buyers will fill in the options section of the screen, and to begin a search they
will hit the search button. When the listing hits are filled in the top right
hand listing box, the buyer can double click on a listing and the listing information
and picture will appear. Only five additional choices are available to the buyer
at this point - they can press the 'Previous Listing' button, 'Next Listing' button,
'Print' button, 'Clear Listing Options' button or the 'Help' button.
5.2.4 Realtor Mode:
5.2.4.1 After the system is logged into Realtor Mode, the realtor is presented
with the buyer screen but with added features located in a pull down menu labeled
'Realtor' found in the top left hand corner of the screen. Thus, a realtor can
do a buyer type search and, in addition, choose any of these choices from the
'Realtor' pull-down menu:
5.2.5 Administrator Mode:
5.2.5.1 In Administrator Mode, all the features presented in Realtor Mode are
available, as well as another pull-down menu labeled 'Administrator' which offers
these choices:
6.1 Options:
6.2 Listing:
6.3 Access level:
6.4 Modify:
6.5 Administrator:
6.6 Pop-up Window:
6.7 Hits:
6.8 Context-Sensitive Help:
6.9 Greyed Out:
6.10 Reference #:
6.11 Offer:
2.10.8 Post Condition:2.11 Delete an Employee
2.11.1 Purpose:
2.11.8 Post Condition: 2.12 Help
2.12.1 Purpose: Fig. 18 - 'help' Function Screen Snapshot
User passes pointer over active field. Dynamic Help is displayed.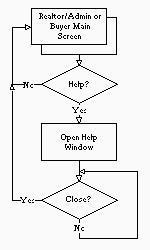
2.13 Exit the System
2.13.1 Purpose:
    if user selects either `System/Close' or `Realtor/Exit' then
	if user has less access privileges than a Realtor then
	    okToShutDown := dlgPasswordCheck(user)
	else
	    okToShutDown := true
	fi
	if okToShutDown then
            logoutFromDatabase
	    halt
	fi
    fi
2.13.9 Error Handling:
3.1 Features
3.1.2.2 All users of the system will be assigned to a group. Those groups will be - Buyer, Realtor (listing and other), and Administrator. Members of the groups are granted appropriate database access privileges.
When the application is started, the user will be required to log on by providing a user
ID and password. From this the program will be able to determine which group the user is
a member of and enable or disable the appropriate program functions. The functions not
available to a user will not even be visible. A buyer logged on as a guest would not
be aware that special realtor functions exist.
3.2 Database Design
3.2.2 For those who are interested, table keys are shown as well:
PK indicates a primary key.
FK indicates a foreign key and the table it references.
3.2.3 The members of a composite key are identified by a vertical series of
parenthesis.
      e.g Second Field    )FK SOME_TABLE
          Third Field     )
          Fourth Field
(Primary and foreign keys are used to help ensure the integrity of the
information in the database.)
Table: LISTING
Fields: Listing ID Number       PK
        Agent Login ID          FK AGENT_INFO
        Area                    )FK AREAS
        Type (Rental/Sale)
        Description
        Price
        Location
        Picture
        Square Feet
        Status (i.e. SOLD, NEW, HOLD)
        Style (i.e. BUNGALOW)
        Lot Size
        Age of House
        Bathrooms
        Number of Rooms
        Appliances
        Garage
        Finished Basement
        Seller Comments
        Seller Name
        Seller City
        Seller Street Address
        Seller Postal Code
        Seller Phone
Table: AGENT_INFO
Fields: Agent Login ID          PK
        Name
        Home Address
        Phone
        Pager
        Fax
        Email
Table: OFFERS
Fields: Offer ID Number         PK
        Listing ID Number       FK LISTINGS
        Agent Login ID          FK AGENT_INFO  (Agent making offer)
        Amount
        Comments

Table:  AREAS

Fields: Area            PK
3.3 Alphabetical Summary of Functions
4.0 Management Report
4.1 Duties and Due Dates
4.1.1 This document represents a design submission for the
Virtual Realty Database system as specified by PowerMax Realty, Inc.,
and prepared for them by Twelve Monkeys Software. It is to be
presented to PowerMax Realty on Tuesday, 13 February 1996 by David
Petiot on behalf of Twelve Monkeys Software, in order to acquaint
PowerMax with the overall design of the user interface and the
database. A question-and-answer session will held afterward during
which representatives of PowerMax may get clarifications or suggest
alternative courses of action. 4.2 Changes to the Design since the Preliminary Document
4.2.1 The largest change made to the system is that there is
now only one screen with which any user ever interacts. This one
screen replaces the buyer's search screen, the realtor's search
screen, the realtor/administrator window, and the search results
screen. All the functions of the system that relate to searching the
database or to displaying the results of a search are visible to the
user at all times. 4.3 Proposed Future Directions for the System's Development
4.3.1 Searching on the location of a property based on a map
of neighbourhoods might still be possible to implement, if there is
time. As envisioned, users would manipulate a control on the main
window and a large map would appear. Users would then select all of
the regions of the map corresponding to neighbourhoods in which they
were interested. The system would then find listings located in only
those neighbourhoods the users had selected. Controls on the map
would reset defaults, add a neighbourhood for searching, remove a
neighbourhood for searching, print the map with the selections
currently enabled, and return to the main screen.
5.1. General Summary.
5.1.1 Twelve Monkeys Software Limited is interested in providing PowerMax Realty with a
dynamic program that will assist customers searching for housing possibilities. With this
system, customers (or buyers) can search for housing using various search options, such as:
5.1.2 In addition to providing the buyer with a multitude of search options, we strive
to make buyer searching as user-friendly and effective as possible. A buyer should feel
comfortable with our "point-and-click" interface and easy to understand labeling and help
features. Further, the fact that buyers will interact with only one screen and one function
(ie: searching), confusion will be kept to a minimum. Our team has taken care to make the
buyer searching mechanism as accessible and learnable as possible. Finally, since
the system will be "started up" and "shut down" by PowerMax realtors or administrators, buyers
will not be encumbered with trying to figure out how to get the system going, but instead will
initially face an interface that is running and ready to serve them immediately.
5.1.4 Administrators will have access to all functions available to realtors, and
in addition will have the ability to :
5.1.5 Twelve Monkeys Software Limited has made the system as easy to use for
realtors and administrators as we have for customers. Functions available to realtors
and administrators are almost completely mouse-driven and easy to implement. We have
taken great care that the interface is not cluttered with too much information and too
many buttons. For example, pull-down menus are employed in the realtor and administrator
screens to keep the interface unconjested. The number of modes and screens have been kept
to a minimum to avoid confusion.5.2 Top-Down Description of the System.
5.2.1 This section describes the most common functions that the system provides
and will work down to functions that are more detailed and are used less frequently.
5.2.4.2 When a menu item is chosen, the realtor is presented with a pop-up screen and
fills in information accordingly, saves the information and then closes the window.
The system does not go any "deeper" for the realtor.
5.2.5.2 As in Realtor Mode, if one of these menu items is selected, the
administrator is presented with a pop-up screen and fills in the information
accordingly, saving and exiting when finished. Like Realtor Mode, the system
does not travel any deeper.5.3 Addressing the List of Comments from our Customers.
5.3.1 The following section addresses comments from our PowerMax customers, focusing
on problem areas in our system:
When in buyer/guest mode they should not be able to see the exit button at all.
Is it possible to remove or hide the exit button when in buyer/guest mode?
We have completely removed the ability for a buyer/guest to exit the system
at all. Only a realtor or administrator can logon/logoff the system. From
a buyers point of view, the system will appear to always be running.
To assist the buyer in entering a search and to reduce the amount of help on
the help screen, can we have little instructions on the screen to assist the
buyer in getting started? Maybe a little block of text at the top on how to get
started, and as you move the mouse over a field it will tell you what to do in
a little box along the bottom.
As suggested, when the user moves the mouse over a field, the system will tell
the user what to do in a strip box tucked at the bottom of the screen.
Can we reduce the number of list boxes they have to go through by having
predefined ranges? Ranges for price, square feet, age. ie: $80,000 - $100,000,
$100,000 - $125,000 etc. The buyer would pick one of these ranges.
As per discussed during one of our meetings, the interface would become
too cluttered if we used this method.
There should be no defaults when the buyer enters a search. If the buyer was
not paying attention to their search, it could limit their results. All fields
should be blank when performing a search and they only enter the data that is
important to their search.
OK, you got it.
Can we add realtor functions to this screen when in Realtor Mode This means
that we would not need the realtor screen that you proposed. The realtor should
be able to search for houses in the same manner as the buyer.
We have removed the realtor screen as you have proposed. The realtor can
now search for houses like a buyer can. The realtor is able to access
advanced realtor function through a pull-down menu.
We need to have the House's ID number visible on this screen. The buyer needs
to be able to identify a specific house to a realtor.
We have added the listing ID number to the area that features listing information.
The buyer should also be able to see properties that have been sold in the last
two weeks. If the buyer comes in one day, looks at a property, comes back a few
days later and looks for the same property the system should tell them it has
been sold.
The listing information will indicate whether a house has been sold.
Can we add realtor functions to the Listing Information Screen. The realtor
should be able to update, create, add comments to a listing right from this
screen.
We have deleted the realtor screen, and have added the realtor functions
in a pull-down menu on the buyer screen.
This screen is no longer needed as it has been proposed. The search screen and
the listing screen should contain all the realtor functions. However, there
should be a screen for the administrator that contains the functions specific
to the administrator.
The administrator's functions have been added onto the buyer screen in
the form of a pull down menu. Of course, this pull down menu will only
appear if an administrator has logged onto the system.
It is important, especially in the buyer mode, that the error messages be as
helpful as possible. In your proposal, if there are no houses found for a set
of requirements the message "NOT FOUND" is displayed. The system should instead
be able to tell the buyer that no houses that meet their requirements are
listed, and that they should change their requirements or ask for assistance.
We have developed a pop-up box error message system. Whenever an error is
encountered, our system shall explain the error in the appropriate detail
in the pop-up box.
There are still a few questions concerning the security of the data. This issue
is addressed indirectly through the use of login names for users. Id's will
keep people from tampering with data that is not their own while using the
application. Is it possible for one of our realtors to exit the program, start
up Access or some other database program, import the data into their database,
edit it, then save it back to it's original location? We ask this because a few
of our realtors are quite familiar with Access and other database packages and
this would not be beyond them. If the database itself were not protected then
we would have to look at getting a secondary security system that would lock
directories.
Our security system has been changed so that realtors and administrators can
log-on or log-off the system, and administrators can backup or restore the
database. These options are selected through pull-down menus.
Only four regions within a city are defined - the northwest, northeast,
southwest and southeast quadrants. Is it possible to select only
zero or one region in the city for any one given search?
If the user does not select a specific area, then by default the
entire city will be searched.
How about finer map resolution?
As discussed at a previous meeting, we have gotten rid of the
four quadrant map, since it appears to be a waste of space due to
its lack of detail. A high resolution map at this moment seems
beyond our capabilities, but we will try to deliver a system where a
buyer can press a button labeled 'Map', and a large map will appear
with all the major neighborhoods, which in turn can be individually
selected as a searching option. For now, we shall say that this is a
possible future implementation.
Is it possible, for example, to select any property style in addition
to the other search options?
We have employed a scrolling list to select, for example, property
styles - thus a user can only select one property for any given
search. We have done this because there are many property styles
that a user could choose from and it would clutter the screen if
all the styles were listed as, for example, radio buttons.
Many controls are cryptic in function, having only single words
as labels.
As you have seen from our new system, we have tried to rename
labels and buttons so that their functions are more clear.
What about dynamic searching?
We feel that dynamic searching may confuse the user - ie:
if a user chooses one options and something suddenly appears
in the hit listbox, the user may think they did something wrong.
We feel that for the user to select all the search options and
then press the search button is the most intuitive and straight
forward way of searching.
The two tables in section 3.6, one of which has been included, are confusing.
The format of these tables makes them hard to read and the points they raise
are rather cryptic. Are these items that are in the proposal but you won't have
time to implement them? Could they be implemented at a later date or are they
impossible? These tables will have to be clarified for us.
Sorry for the confusion - hopefully this document will clarify the information
we tried to relay to you in the tables.
5.4. Group Structure.
5.4.1 In order to co-ordinate a group of this size (12), a leader was
selected and jobs were divided among the groups. The positions given to
people are not permanent. Each group member is able to help other group
members in their position. For example, for Secretary, several group
members would work in this position, not just Mr. Jenkins.
5.4.2 Our company hopes that this additional specification manual meets your
desires for the Real Estate system. We look forward to hearing from
you.
A set of criteria that a user can used for a search of a
listing. For example: price of a house, number of bedrooms, etc.
A property that is currently available for sale or rent, or has recently been sold or rented. For example: a house, condo or apartment.
A listing includes information such as price, style,
location, etc.
Certain functions are activated depending on
whether a user is a buyer, realtor or administrator.
For example: a realtor can enter an offer made on a listing on behalf of a buyer, but a buyer cannot enter his/her own offer.
Change some aspect of a file. For example: an administrator
can reassign a listing from one realtor to another realtor
A user that supports the system, as well as has
access to certain functions that a realtor or
buyer does not, such as changing
realtors on a listing.
A small screen that 'pops-up' (or partially overlaps)
the screen that a user is currently using.
Listings that appear after a search is initiated that match
the user's search criteria
A help system which provides information directly related to the function the user is attempting to perform.
De-activated, will not work.
Each listing will have its own personal identification number,
and the data base will use this number to search
for a listing.
Amount that a user is willing to pay to buy a given listing.