User
Manual
CPSC 451 Supplier Group #1
Department of Computer
Science
University of Calgary
18 March 1997
Page maintainer: Terrence
Asgar-Deen
terrence@cpsc.ucalgary.ca
|
|
 The management and staff of Peachy Business Forms wish to thank dHacs Software
for the timely production of this manual. It has given us an excellent
opportunity to preview the operation of our new system before installation and
excitement is mounting in anticipation. Since we know you are seeking approval
along with some feedback regarding this document, comments have been inserted
throughout as before. To see the original page please refer to
Here.
The management and staff of Peachy Business Forms wish to thank dHacs Software
for the timely production of this manual. It has given us an excellent
opportunity to preview the operation of our new system before installation and
excitement is mounting in anticipation. Since we know you are seeking approval
along with some feedback regarding this document, comments have been inserted
throughout as before. To see the original page please refer to
Here.
Table of Contents
Introduction
The Sales Routing System is a powerful software
program developed specifically for the needs of Peachy Business
Forms to control their daily sales routes. Easy to use commands
and an intuitive interface allow staff members to immediately use
the system as part of their day to day activities. Functions
include the management of customers, products, purchase orders
and sales territories (routes).
Key Features
The Sales Routing System includes the following
features and capabilities:
Security
- Password protected access to information in the system.
- Constraints based on user privileges allow only relevant
data items and operations to be seen by each user. Any
menu items or buttons that provide access to restricted
operations will be greyed out and inaccessible.
- Versatility: Powerful database features in the Sales
Routing System allow the end user to view data in a
number of different ways.
Ease of Use
- Control through drop down or tool bar menus and push
buttons lets the end user access most of the Sales
Routing System's functions.
Overview
The Sales Routing System is based around the concept
of a central window. Using this central window provides a
constant frame of reference for the remainder of the system.
This window is a standard Windows 95 application window. The
window has the standard title bar, with the control box,
minimize, maximize and close buttons. The border is resizable,
and the contents of the window resize gracefully when the window
itself is resized. Within the window there are several components
that have become standard in Windows 95 applications. The menu
bar, toolbar and status bar are all described below.
The main area of the application window is referred to as the
"work area" in which the major functionality is
displayed. The work area will display one of the following four
areas of the system:
- Customer Area
- Products Area
- Purchase Orders Area
- Salesperson Area
Navigation between these areas can be accomplished in one of
three ways, depending on which the end-user is most comfortable
with:
- using the View menu
- using the toolbar
- using the navigation buttons in the upper right corner of
the work area
Each of the four product areas are described in detail later
in this guide as they pertain to the end user (Salesperson) and
administrator functions.
The security features as described above will be adequate to fill the needs
of Peachy Business Forms -- the additional feature of greying out menu items
inaccessible to the current user is a sensible idea. In general, a Windows 95
look and feel should be of great assistance in training the staff to use this
system.
Overall control of the system from a central window is another feature that
meets with our approval; however, in the above description, there is a
reference to four main areas of the system. We are unable to find specific
links to descriptions of these in the Table of Contents. Perhaps direct links
to further information on these four areas could be provided.
One other major concern. Many members of the team have made comments against
your chosen colour scheme in the screenshots. One member described them as
a sort of coffee stain motif. It does not seem very appropriate that the
system can resembles stains. It would be greatly appreciated if something
could be done about this minor problem. We do not mean to be nit-picky but we do
not feel it creates a suitable working environment as we hoped to attain with help
from dHACs. If you would like to ask us for suggestions for a new colour scheme, please
email Joseph Goethals or Keith Uyeno.
User Operations
Logging into the System
Overview
When any user/administrator wishes to access the system, the first step
is to log into the system using the Login Dialog. When the system is started,
the user will be presented with a dialog box consisting of two parts: the
Username and the Password.
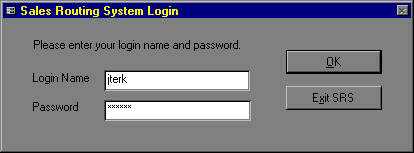
How to Log into the System:
- After the system is started, type your Username into the appropriate
field in the dialog box. If you are unsure of your Username, please contact
your administrator for further instructions.
- Type your Password into the appropriate field in the dialog box. The
Password will not be shown on the screen (for security reasons) so care
should be taken when entering it.
- When both fields are filled with the appropriate information, click
on the button marked "OK".
- If the Username and Password were correct, the user be allowed to access
the system. If for some reason either the Username or Password is incorrect,
the user will be notified and allowed to attempt another login.
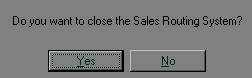
This window is very clear. But, could an explanation describing the events that occur
when the user clicks "Exit SRS" be included?
Changing your Password
Overview
A user may wish to change his/her password for any number of reasons.
Passwords should always be kept secret.
How to Change your Password:
- Using the mouse, select File->Change Password on the menu bar.
- The user's Username will automatically appear in the field marked "User
Name".
- The user must then enter their current password in the "Old Password"
field.
- Enter the new password desired in the "New Password" field.
- Repeat the new password in the "Confirm Password" field.
- When all fields are filled, click "OK" to change the password.
Note: For security reasons, none of the passwords will actually
appear on the screen when they are entered. Instead, they will appear as
a series of asterisks. ENSURE PASSWORDS ARE ENTERED CORRECTLY.
This window is simple and clear.
But, what would occur if the user entered an incorrect old password or
the new password does not match the confirm password?
Referring the the Error Message Appendix for any errors would be helpful.
Viewing your
Daily Route List
Overview
The main function of the Sales Routing System is to
allow salespeople to efficiently manage their sales routes. The
Daily Route List for a user may be viewed by the user at any
time. After a user logs into the system, the View Daily Route
screen will appear. The View Daily Route screen can also be
accessed through the menu bar.
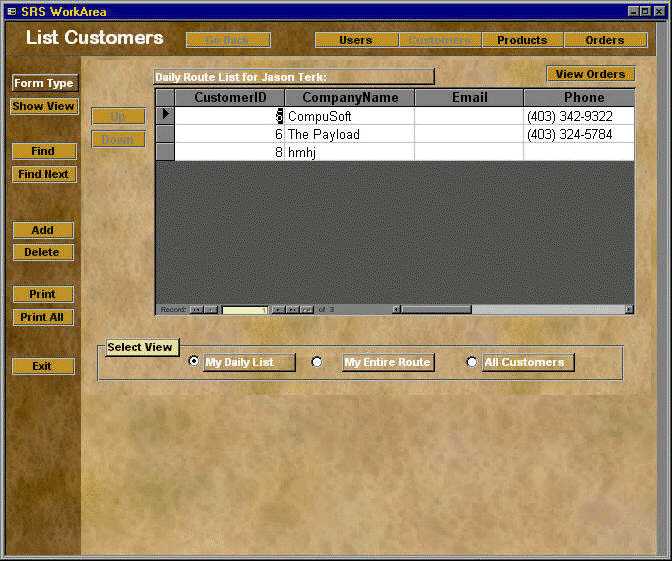
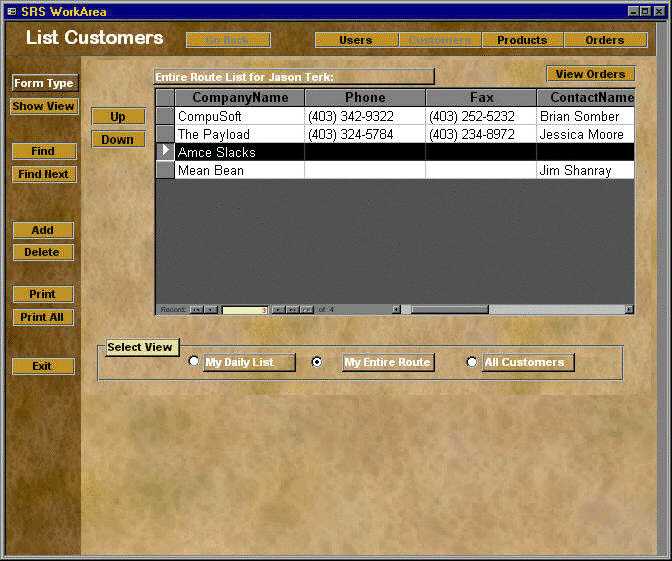
How to view your Daily Route List:
- Using the mouse, select View->Customers on the menu
bar.
- In the box marked "Select View" click on
"My Daily List".
The steps in viewing the daily route list are straight forward but we didn't
see the menu bar in the screen shot. Nice tidy user interface though.
Changing
the Order of the Daily Route List
Overview
To make users better able to manage their sales routes, the Sales
Routing System allows individual salespeople to modify the
order of their Daily Routes.
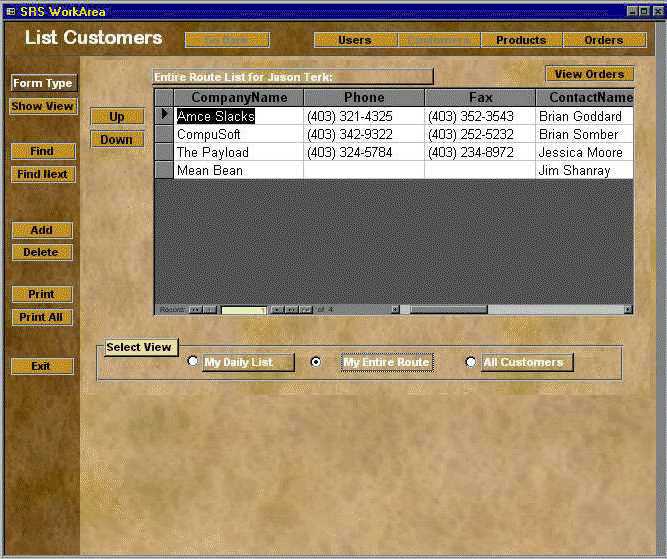
How to change the order of your Daily Route List:
- Access the View Daily Route window. (See "Viewing
Your Daily Route List")
- Select the Customer to be moved by clicking the mouse in
the box to the left of the customer entry. A pointer will
appear in the box.
- To move the customer entry up on the list, click the
"Up" button. To move the customer entry down,
click the "Down" button.
This seems very simple and straight forward.
Viewing All Of
Your Customers
Overview
A user may need to view his/her entire customer list, instead
of just the Daily Route List for any particular day.
How to view all of your Customers:
- Using the mouse, select View->Customers from the menu
bar.
- Click on the button marked "My Entire Route". A
list of all of the customers belonging to the user will
be displayed.
Viewing Customer
Orders
Overview
A user may need to view the ordering information pertaining to
a particular customer, either on his/her Daily Route or on their
entire route.
How to view a Customer's Orders:
- Access either the Daily Route List or entire route as
necessary (See "Viewing Your Daily Route List"
and "Viewing all of Your Customers" for more
information).
- Select the desired customer by clicking the mouse on the
box to the left of the customer entry.
- Click on the button marked "View Orders" on the
top right of the window to view ordering information for
that customer.
These two important view features seem straightforward and easy to use.
The instructions for Viewing the Product List and Detailed Product
Information are easy to follow, and understand.
Viewing the Product
List
Overview
The user can view the entire list of products that the company
has to offer.
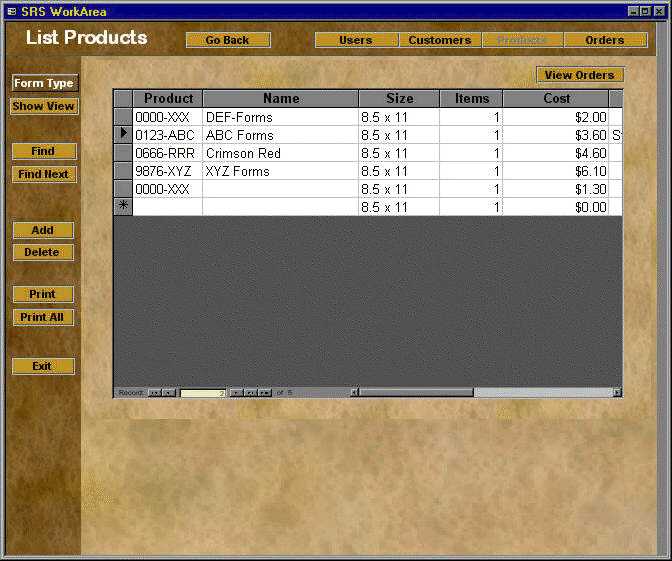
How to View the Product List:
- Using the mouse, either select View->Products on the
menu bar or click on the button marked
"Products" in the work area.
Viewing
Detailed Product Information
Overview
The user may view the detailed information for a particular
product in the company's lineup. This includes product ID, motif
number, name, number of items in stock, size, unit cost, and
additional comments.
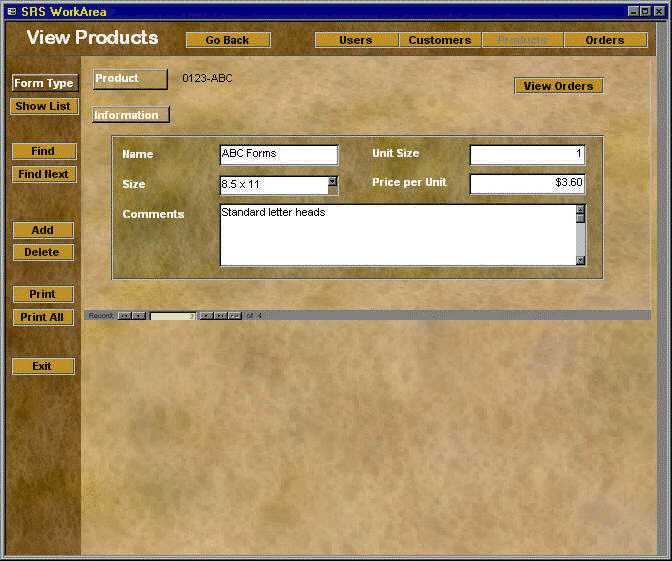
How to view Detailed Product Information:
- View the product list (See "Viewing the Product
List").
- Select a product by clicking on the box to the left of
the product entry in the list.
- Select View->View Details from the menu bar.
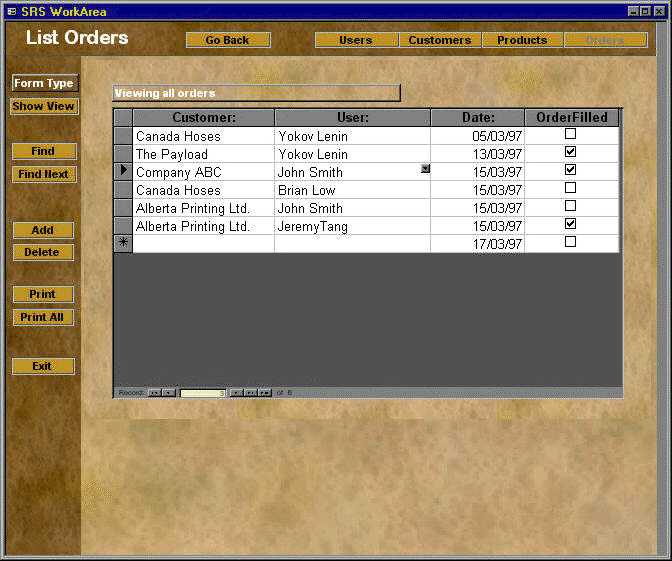
Viewing Purchase Orders
Overview
The user may view a list of all orders placed by his/her customers.
How to view Purchase Orders:
- Using the mouse, either select View->Purchase Orders on the menu
bar or click on the button marked "View Orders".
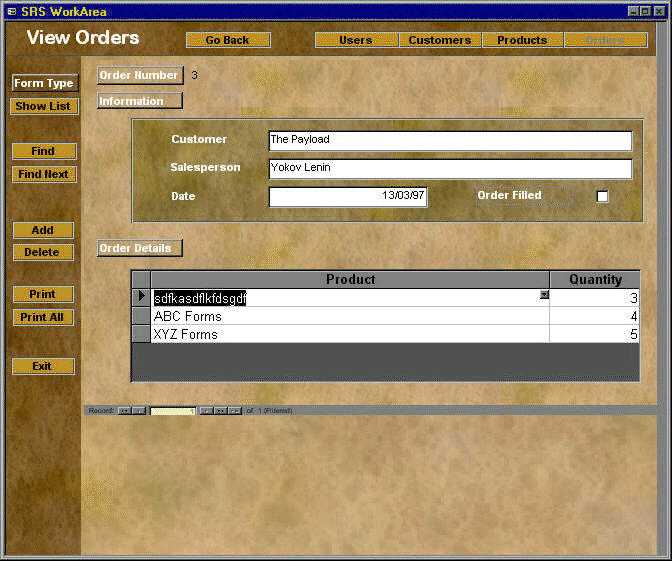
Viewing Detailed
Order Information
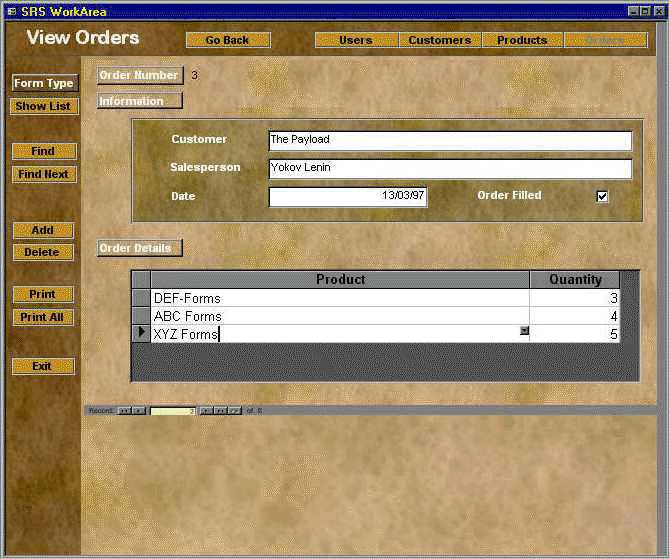
Overview
The user may view the detailed information pertaining to a customer's
purchase order. This information includes the order number, the salesperson
who handled the order, the customer who placed the order, the product ordered,
and the quantity ordered.
Image is currently unavailable.
How to view Detailed Order Information:
- Access the Purchase Orders screen (See "Viewing Purchase Orders").
- Select an order entry by clicking on the box to the left of the order
entry in the list. Then either click the "View Details" button
or select View->View Details from the menu bar.
- Alternatively, detailed information can be viewed by simply double-clicking
on the entry in the list.
Placing a Purchase Order
Overview
The user, upon receiving an order from a customer, may place the order
into the database.

How to place a Purchase Order:
- Access the Purchase Order screen (See "Viewing Purchase Orders").
- Using the mouse, select Items->Add from the menu bar.
- A form will be displayed requesting the relevant information.
- The "Salesperson" field will automatically be filled in with
the user's username.
- Click on the arrow to the right of the "Customer" field.
Hold the mouse button. Highlight the customer that is placing the order.
Release the button. If an incorrect customer was accidentally placed in
the field, repeat this step until the correct customer is placed into the
field.
- Enter the Product ID, the Motif Number and the Product Name into their
respective fields.
- Ensure ALL information is correct, and click on the "OK"
button. Note: If any of the fields are left out or filled in incorrectly,
the user will be notified and prompted to correct the fields in question.
Great! It sounds easy to add a new order.
We are wondering that if an order has been processed,
can we remove any products from the order?
Administrator
Operations
Adding a New User
Overview
When the administrator wishes to add a new user to the Sales
Routing System database, a window appears in the work-area
on the screen. This window allows the administrator to enter the
name, phone number, cellular number, e-mail address, pager
number, maximum visits per day, and any pertinent comment about
this new user by using the keyboard. Additionally, the
administrator can choose the territory and security level for
this new user through a pull-down menu.
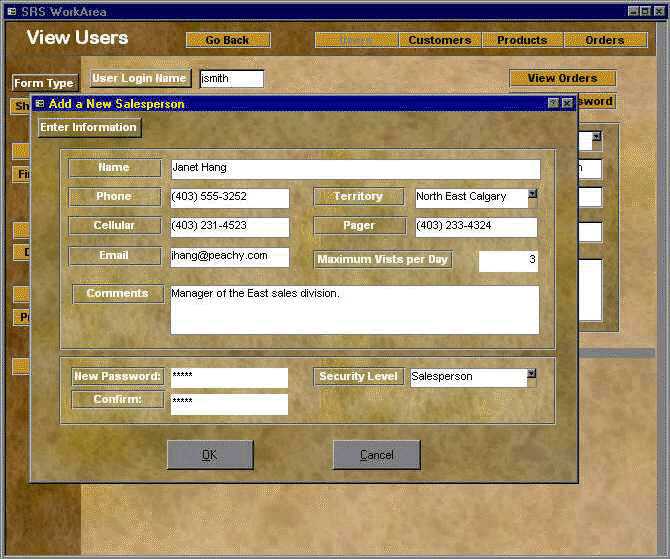
How to Add a New User:
- Using the mouse, click the button called "Enter
Information".
- Enter in the appropriate information into the data fields
using the keyboard and/or mouse where appropriate.
Specific fields can be selected using the mouse or the
tab key.
- Using the mouse, click the button called "OK"
to save the information about this new user in the
database. To cancel this operation and discard all
information, click the button called "Cancel".
The instructions are easy to follow and concise. I am unclear on
the results of not filling in some fields. Are there fields that
MUST be filled in or are they all optional? As well, what if a
user is added with the same name as another user?
Are the fields error checked? For example if a string was placed
in the Max Visits per Day. In addition, are the passwords checked
as was requested and if errors occur how are they displayed. Links to
Error Message Appendix would be very helpful.
Deleting an
Existing User
Overview
When the administrator wishes to delete an existing user in
the Sales Routing System database, the administrator
must access the User Work Area to display a list of users and
from this list, a specific user may be deleted.
How to Delete an Existing User:
- Using the mouse, click on a specific user.
- Using the keyboard, press the delete key. This specific
user should now be deleted from the list.
This is very straight forward, although a confirmation of deletion
would be greeatly appreciated to avoid the accidental deletion
of any salespeople.
Viewing User List
Since this is a manual for user, it would be helpful to see a
better user interface, such as function descriptions and then
having step by step instructions. Possibly a clearer decsription
of how to get to each window discussed from a starting window
so users get a basic understanding of moving through the
windows. Otherwise, it look pretty good. Thank you.
Overview
When the administrator wishes to view a list of the users in the Sales
Routing System database, the administrator must first access the User
Work Area and from this screen, a list of all the users of the system may
be displayed.
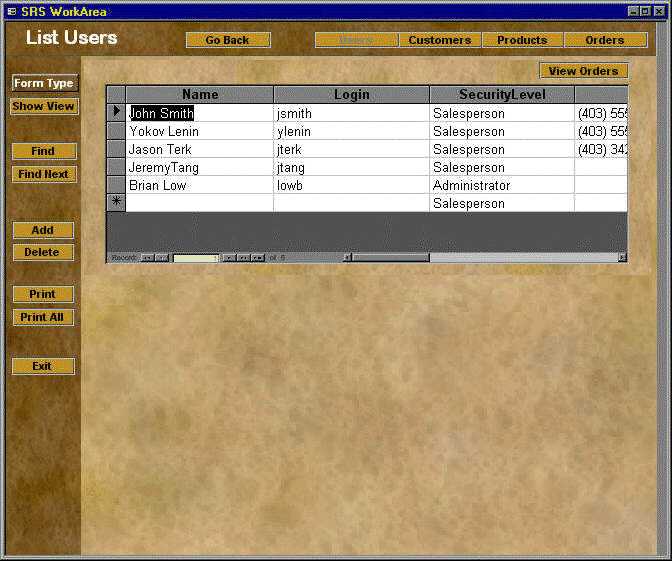
How to View the List of Users:
- Using the mouse, click on the button at the top of the screen called
"Users". A new screen should appear in the work area, listing
all the users in the database.
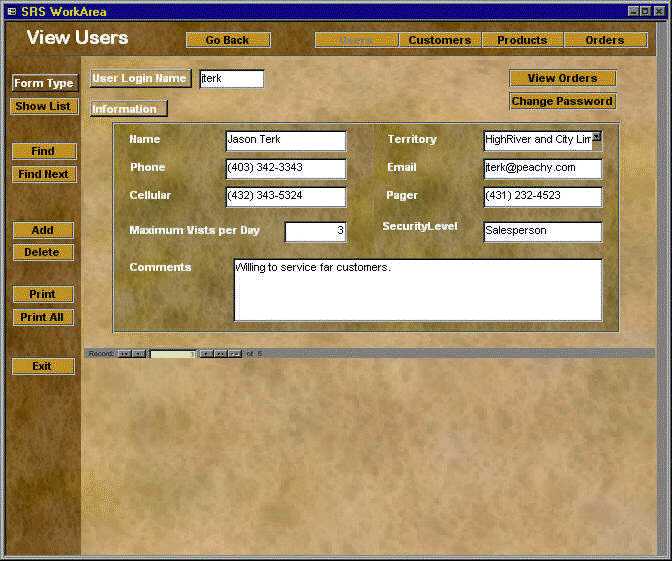
Viewing User Information
Just a reiteration of the previous comment, and once again clearer
description of changing from window view to window view for the user.
Thank you all.
Overview
When the administrator wishes to view the detailed information about
an existing user in the Sales Routing System database, a specific
user must be selected from the User Work Area.
How to View Detailed Information about a User:
- Using the mouse, select a specific user by clicking on it.
- Using the mouse, click on the button in the upper left corner of the
screen called "View User". A new screen should appear in the
work-area that shows the detailed information about that particular user.
Modifying User
Information
Overview
When the administrator wishes to change the information about
an existing user in the Sales Routing System database, a
window appears in the work-area on the screen. This window allows
the administrator to change various attributes including the
name, phone number, cellular number, territory, e-mail address,
pager number, security level, maximum visits per day, and
comments about this user.
How to Modify the Information about an Existing User:
- Select the data field that is to be modified by using the
mouse or the tab key.
- Change the information in that field using the keyboard
or mouse as required. Old information may be erased from
the field by using the backspace key.
- When finished modifying the desired fields, exit the
screen. A dialog box should appear. Using the mouse,
click the button called "OK" to save the
updated information about this user in the database. To
cancel this operation and discard all changes, click the
button called "Cancel".
The windows here looks great.
Is there any validation on the data being entered into these fields? If so
when is this performed and when do the error messages occur in the sequence
given.
Adding a New Customer
Overview
When the administrator wishes to add a new customer to the Sales
Routing System database, a window appears in the work-area
on the screen. This window allows the administrator to enter the
company name, street address, postal code, phone number, e-mail
address, fax number, comments about the company, contact's name,
contact's phone number, contact's e-mail address, date of last
contact, and the date of next contact by using the keyboard.
Additionally, the administrator can choose enter the city and
province that this company is located through a pull-down menu.
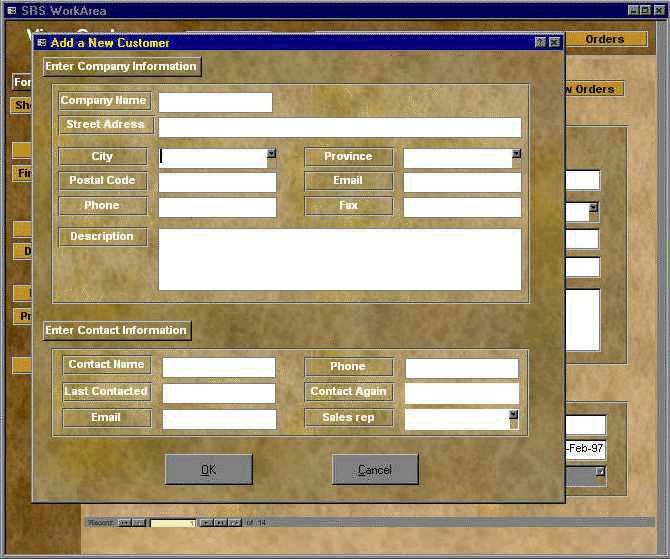
How to Add a New Customer:
- Using the mouse, click the button called "Enter
Company Information".
- Enter in the appropriate information into the data fields
pertaining to the company using the keyboard and/or mouse
where appropriate. Specific fields can be selected using
the mouse or the tab key.
- Using the mouse, click the button called "Enter
Contact Information".
- Enter in the appropriate information into the data fields
pertaining to the company's contact person using the
keyboard. Specific fields can be selected using the mouse
or the tab key.
- Using the mouse, click the button called "OK"
to save the information about this new customer in the
database. To cancel this operation and discard all
information, click the button called "Cancel".
Is there any validation on the data being entered into the new fields? If
so when is this performed and when do the error messages occur in the
sequence given.
Deleting an Existing
Customer
Overview
When the administrator wishes to delete an existing customer in the
Sales Routing System database, the Route List screen must be accessed
first. >From this screen, a list of customers can be displayed from
which the administrator may delete a particular customer.
How to Delete an Existing Customer:
- Using the mouse, click on the button in the lower right of the screen
called "All Customers". This should bring up a list of all the
customers in the database.
- Using the mouse, click on a specific user that is to be deleted.
- Using the keyboard, press the delete key. This customer should now
be removed from the list of customers.
Modifying Customer
Information
Overview
When the administrator wishes to change the information about an existing
customer in the Sales Routing System database, a window appears
in the work-area on the screen. This window allows the administrator to
change various attributes including the company name, city, province, postal
code, phone number, e-mail address, fax number, comments about the company,
contact's name, contact's phone number, contact's e-mail address, date
of last contact, and the date of next contact for this customer.
How to Modify the Information about an Existing Customer:
- Select the data field that is to be modified by using the mouse or
the tab key.
- Change the information in that field using the keyboard or mouse as
required. Old information may be erased from the field by using the backspace
key.
- When finished modifying the desired fields, exit the screen. A dialog
box should appear. Using the mouse, click the button called "OK"
to save the updated information about this customer in the database. To
cancel this operation and discard all changes, click the button called
"Cancel".
Please clarify which window must be accessed first in order to modify the
Customer Information.
Viewing the
Entire Customer List
Overview
When the administrator wishes to view all of the customers in
the Sales Routing System database, the Route List screen
must be accessed first and from this screen, a list can be
displayed.
How to View the Entire Customer List:
- Using the mouse, click on the button in the lower right
of the screen called "All Customers". A new
screen should appear in the work-area showing a list of
all the customers in the database.
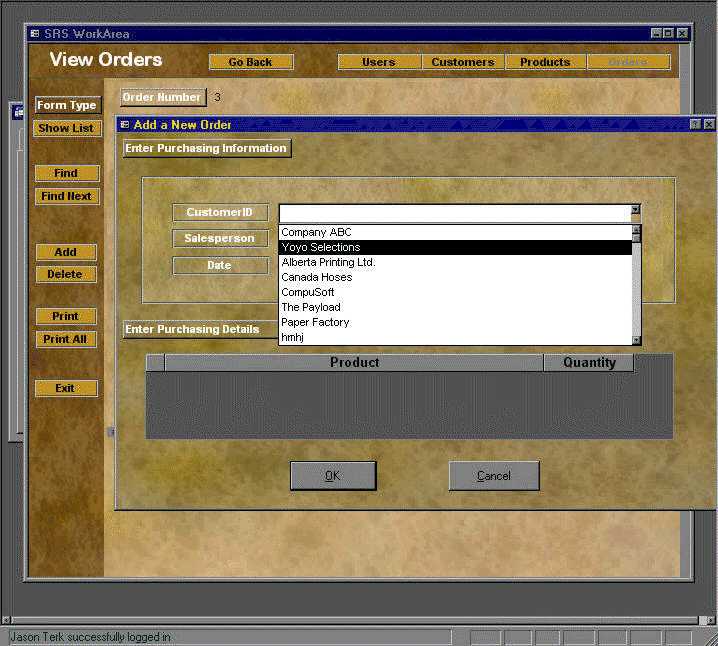
Add a New Order
Overview
When the administrator wishes to add an order to the Sales
Routing System database, the user must select the function
Add a New Order from the modules work area. The user must specify
all the information in the Add a New Order screen. The order
numbered is automatically, so there is no need to enter in the
order number.
How to Add a New Order:
- Using the mouse, from the main work area, choose the
"Modules" tab.
After much scrutiny, no "Modules" tab can be found. Is
this supposed to be the "Order" tab on the main work area?
- Using the mouse, click twice on the "Add a New
Order" icon.
- Once the screen appears, the user must enter in all the
information. The customer identification field provides a
pull down menu, so the user does not need to remember the
identification number. The salesperson is also a pull
down menu. The date which is specified by the format
**/**/**, is generated by the system, and does not need
to be entered in by the user.
This system must be truly powerful if it allows for salespeople to
be items in a pull down menu. One can only hope that our computers will
have enough memory to enable this :). On a more serious note, in what
particular order is the date format to be generated - year/month/day or
year/day/month?
- Click the "OK" button, when finished.
- A confirmation screen will appear, the user can either
confirm the the entry of a new order or cancel it. If the
user confirms the addition, the order will be
successfully added on the system.
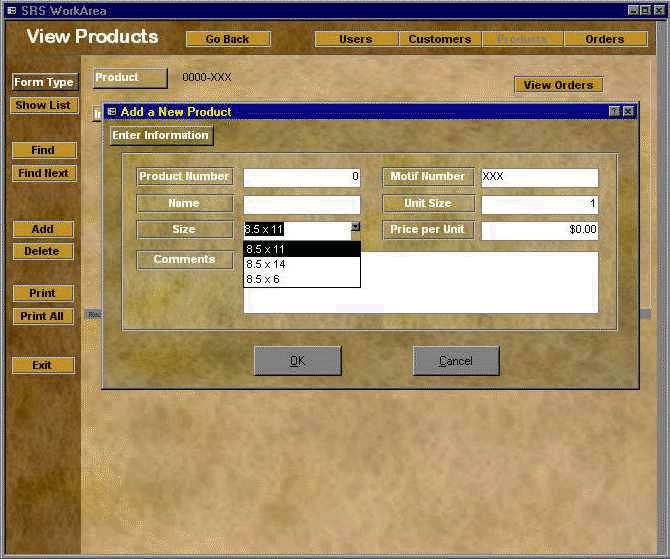
Add a New Product
Overview
When the administrator wishes to add a new product to the Sales
Routing System database, the user must select the function
Add a New Product from the modules work area. The user must
specify all the information in the Add a New Product screen. The
order numbered is automatically, so there is no need to enter in
the order number.
How to Add a New Product:
- Using the mouse, from the user's work area.
Is it necessary to click the "Product" tab from the main work area
in order to access the screen above? This step seems to preparing
to say that but it never does.
- Using the mouse, click twice on the "Add a New
Order" icon.
So to add a new product, a person selects "Add a New Order"?
Selecting "Add a New Product" would make more sence. Plus the only
button I see on the screen is the "Add" button, is that what is
being referred to?
- Once the screen appears, the user must enter in all the
information. The product number, Motif Number, Name of
the product, Unit Size, Size, Price per Unit, and
comments must be filled to it entirety before this
product can be added.
Just for clarity, in what particular ways can one enter the relevant
product information? Can fields be selected at will by mouse clicks
(single or double), or sequentially left to right by using the 'tab' key?
- Click the "OK" button, when finished.
- A confirmation screen will appear, the user can either
confirm the the entry of a new order or cancel it. If the
user confirms the addition, the order will be
successfully added on the system.
This portion does not describe what would happend a user tried to
add a Product-Motif number that already existed in the system.
Would the error occur or would the confirmation screen still appear?
Deleting an
Existing Product
Overview
When a user wishes to delete a product from the database.
How to delete a Product:
- List all the products (see List all Products).
- Using the mouse button, to highlight the product.
- Press, the delete button.
Could be a dialog box to confirm the user's actions such as ,
"Do you really want to delete this product?". This would help to prevent accidental
deletion by the user. Also, a link to 'Viewing the
Product List" would be appreciated so the user won't have to search for it.
There isn't a 'List All Products" function included as I think was requested.
Please clarify if this information is incorrect.
Modifying
Product Information
Overview
If the administrator wishes to change information about a
particular product, it can be done by highlighting the product
that needs to be changed in the view orders screen. While
highlighted the user must click on the "details"
button. When the screen appears the user can change any of the
fields they wish to change. They may add more information in the
comments area without deleting any of the previous information.
How change Product Information:
- Get a listing of the orders.
- Highlight the product that needs to be changed.
- Using the mouse button, click on the "details"
button.
- Change any of the information listed.
- When the information is correctly changed, the new
product information will be saved on the system.
Modifying product attributes from a "list of orders" seems strange? It would
seem more logical to do modifications from a "list of products", for
example. Please clarify. You also mentioned a "details" button but the
location of such a button is undeterminable by the screenshot.
Overall, this function does not appear to be supported by the
above screenshot. Again, some sort of dialog box to confirm
the user's actions before the changes are made would be helpful
.
Add a New Order
Overview
When the administrator wishes to add an order to the Sales
Routing System database, the user must select the function
Add a New Order from the modules work area. The user must specify
all the information in the Add a New Order screen. The order
numbered is automatically, so there is no need to enter in the
order number.
How to Add a New Order:
- Using the mouse, from the main work area, choose the
"Modules" tab.
- Using the mouse, click twice on the "Add a New
Order" icon.
- Once the screen appears, the user must enter in all the
information. The customer identification field provides a
pull down menu, so the user does not need to remember the
identification number. The salesperson is also a pull
down menu. The date which is specified by the format
**/**/**, is generated by the system, and does not need
to be entered in by the user.
There is no mention on putting
products on the order. Additionally, this section is not in the same
order as indicated by the table of contents.
- Click the "OK" button, when finished.
- A confirmation screen will appear, the user can either
confirm the the entry of a new order or cancel it. If the
user confirms the addition, the order will be
successfully added on the system.
Deleting an Order
Overview
When the administrator wishes to delete an order from the Sales
Routing System database, button will appear on the top right
hand corner of the screen indicating View Orders. The user must
click on this button to access the orders. To delete the order
"something" must be selected. When this screen appears
the administrator must delete the order.
The overview is very vague, clarification
would be helpful. However the HOWTO is very concise.
How to Delete an Order:
- Using the mouse, click the button called "View
Orders".
- Using the mouse, highlight the order you wish to delete.
- Using the mouse, click the "Delete" key.
- A confirmation screen will appear, from this the user
must click "OK" if they want to delete, or
"Cancel" if they don't wish to delete the
order.
Viewing the Orders
Overview
When the administrator wishes to view the orders from the Sales
Routing System database, the button which appears on the top
right hand corner of the screen indicating "View
Orders" must be clicked once. The administrator can either
view all the orders on the system, or choose to view only a
particular salespersons orders.
How to View the Orders:
- Using the mouse, click the button called "View
Orders".
- Using the mouse, select which way you want the list to be
sorted.
- A list of orders should appear according to the sorting
method selected.
Step 2 is pretty vague, and there is
nowhere else in the manual where sorting is covered in more
detail. This would be a nice point to expand on. Otherwise excellent.
In conclusion you did a very good job on the User Manual. We look forward
to seeing your product and hope our comments do not cause too many
problems for you. Thank you again and congratulations on a great job.
Additional Help
Additional assistance can be obtained by calling the dHACs
support line at 1-800-SRS-HELP (1-800-777-4357). Our staff will
be pleased to help with any questions related to the system
operation.
APPENDIX A ERROR MESSAGES
The following error messages may appear from time to time
during operation of the system:
| Error Message |
An incorrect login name and password has
been entered. Please check the login name and password. |
| Solution |
Make sure that the login name and
password are correct. Passwords are case-sensitive, login
names are not. |
| Error Message |
The confirmation password you typed in
does not match your new password. |
| Solution |
Try retying your new password and the
confirmation password. |
| Error Message |
The old password you typed in was
incorrect. |
| Solution |
Try retyping your old password. Passwords
are case-sensitive. |
| Error Message |
Sorry, you cannot use find now, since
there are either no records, or no searchable data. Try
to select a particular field. |
| Solution |
Try to select a particular field. |
| Error Message |
You have not used the Find command yet,
so Sales Routing System does not know what to
find again. |
| Solution |
Use the Find command first, then the Find
Next command will be available. |
| Error Message |
Unable to find the User ID or Login name.
Please check the User ID or Login name entered. |
| Solution |
Enter a valid User ID or Login name. |
| Error Message |
You did not specify a password. |
| Solution |
Enter a new password for the new user in
the Password field. |
| Error Message |
Your confirmed password does not match
your password. |
| Solution |
Retype the new user's password in the
Password field and the Confirm password field. Passwords
are case-sensitive. |
| Error Message |
Canadian postal codes must be exactly six
characters long, in format A9A-9A9, where A is any
letter, and 9 is any digit. |
| Solution |
Make sure the postal code is correct. |
| Error Message |
The phone number must be a full 10 digit
phone number including area code. |
| Solution |
Make sure the phone number is correct,
and includes an area code. |
| Error Message |
The fax number must be a full 10 digit
fax number including area code. |
| Solution |
Make sure the fax number is correct, and
includes an area code. |
| Error Message |
The Product's size must be 8.5 x 11, 8.5
x 14, 8.5 x 6. |
| Solution |
Make sure the product size matches one of
the predefined sizes. |
| Error Message |
The Unit Size must be less than 1000000. |
| Solution |
Ensure the unit size is less than
1000000. |
| Error Message |
The Price per Unit must be at least
$0.00. |
| Solution |
Make sure the price per unit is greater
than or equal to $0.00. |
| Error Message |
The Product Number must be exactly 4
digits long. |
| Solution |
Make sure the product number is 4 digits,
and only consists of numbers. |
| Error Message |
The Motif Number must be exactly 3
characters. |
| Solution |
Make sure the motif number is 3
characters. |
| Error Message |
Must be Administrator or Salesperson. |
| Solution |
Ensure the user's security level must be
either Administrator or Salesperson. |
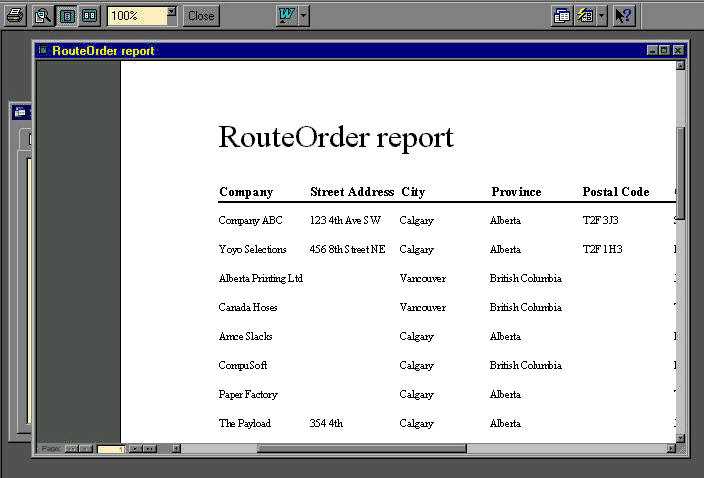
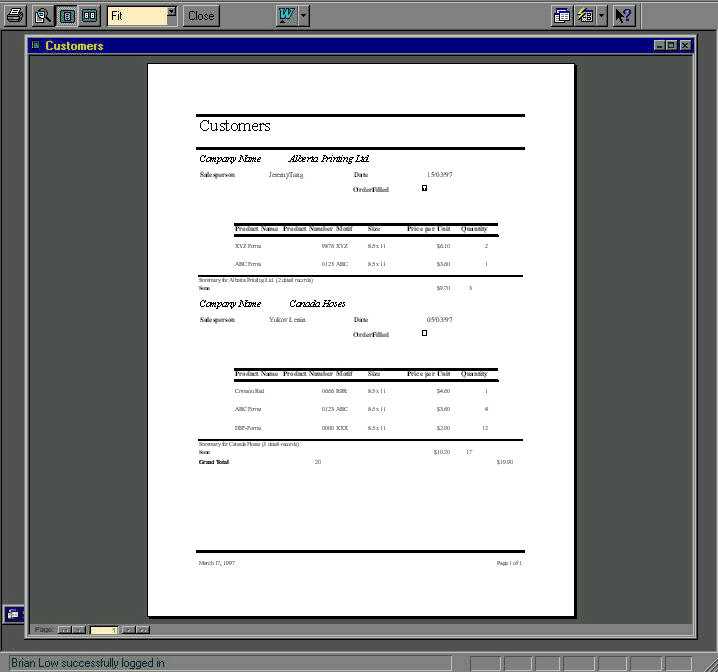
Appendix B Misc. Screen Dumps
Sample Report
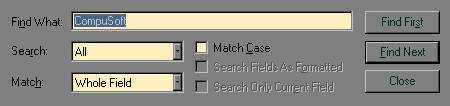
Find Dialog
Exit Dialog