![]() Once again our comments appear in this format. We will be commenting mostly
on the manual itself and how well it describes the AGS system.
Also, we will ignore spelling and grammar errors for the most part.
Once again our comments appear in this format. We will be commenting mostly
on the manual itself and how well it describes the AGS system.
Also, we will ignore spelling and grammar errors for the most part.
Welcome to the Petro451 AGS system. AGS software is a proprietary data management tool for Petro 451 automated gas stations. AGS allows virtually all of the accounting functions normally performed on-site at staffed gas stations to be executed remotely from the head office or handled automatically via batch processing and reporting of data. The AGS system leverages embedded system micro-controller technology at the pump level to permit fully automated operation of Petro 451 gas stations.
The AGS system is connected to the head office via a dedicated network connection. A dedicated network prevents unauthorized 'hackers' from logging into the system remotely via a 'modem'. This custom network solution also affords reliability with respect to the integrity of the connection between the head office and the remote station operations, an important issue for the unmanned environment of Petro451 gas stations.
![]() A very well-written and professional introduction.
A very well-written and professional introduction.
The functions of the AGS system are entirely segregated based on the access level of the user. This segregation of function insures secure operation of the system. Not only are the distinct functions of the system unavailable to users who do not have authorization to access them, but users are simply not made aware aware of functionality to which they do not require access. Thus distinct menus are available for each individual access level.
AGS encompasses the administrative, accounting, price regulation and fuel delivery facets of the automated Petro 451 gas station.
* Administrative access allows the administrator to: -- add new users to the system -- remove users from the system -- modify user information and/or access levels
* Accounting functions allow the user to: -- generate on demand 'snap-shot' accounting reports -- generate complete AGS login/usage logs -- customize batch reporting schedules -- modify fuel prices in real time
* Fuel deliver functions allow: -- all fuel delivery functions to be logged -- prevention of unauthorized tampering with fuel tanks AGS integrates all of the functionality required to manage a fully automated gas station into an easy to use, reliable, fast and secure system.
![]() A good, well-written summary of the system functions.
A good, well-written summary of the system functions.
II. Navigating Through the AGS System
The AGS interface consists of two main types of screens: menu screens, and action screens.
Menu screens (e.g. the Station Control and Reports menu) generally consist of several buttons which, when clicked, each invoke a task associated with that button. This may take the form of displaying helpful hints, taking you to another menu, or displaying information. Usually, each menu button will take you to a different screen (another menu screen or an action screen), from which you will be able to perform other tasks. This lends a hierarchical, intuitive structure to the system.
Action screens (e.g. the Login Screen) are screens which ask you for information, and/or give information back to you. Generally, you are asked to fill in fields which tell the system what you want it to do. Simply move the cursor into the appropriate field by clicking in the white window field, and type the information in with the keyboard or keypad. Generally, action screens are equipped with Cancel and OK buttons. The Cancel button will clear the input fields on the screen in case you want to start input again with a clean slate. The OK button will perform the action associated with that screen. (e.g. Clicking OK on the Delete User screen in the Administration subsystem will erase the user specified by the input fields from the database - provided that that user actually exists.) Each of the screens of the system and the actions they allow you to perform are described in detail in the following pages.
Most screens in the system also have Help and Exit buttons in the bottom left corner. Use the Help button when you have forgotten the exact action that a button evokes, or to remind you of the format for a certain input field. The Exit button will stop the operation in progress and log you out of the system, returning you to the login screen. Use this button when you have finished your work and are leaving the machine, or if another user needs access to a different part of the system on that machine. The auto logout feature will automatically activate this function if the machine is completely inactive for 10 minutes.
![]() Very good descriptions, but it would be nice to see some screen shots
showing what they describe.
Very good descriptions, but it would be nice to see some screen shots
showing what they describe.
Once the network has been configured, the link between the head office and the gas station has been established and AGS has been initialized, AGS runs on a 24hr/day basis. Should the head office network go down, the station will shutdown operations pending the re-establishment of the network connection to the head office. If any significant problem occurs at the gas station level, please contact Group 11 Oil and Gas Solutions Technical Support immediately at : 1-800-555-HELP
![]() Excellent. An emergency help line is a good customer support idea.
Excellent. An emergency help line is a good customer support idea.
Login is available at the head office as well as at the station itself. The login terminals in both cases are identical. The user is required to enter his User Name and Password, as assigned by the head office site administrator (see Administration Functions). Once the user has logged in, he will automatically gain access to a menu associated with his access level (see User Access Levels).
![]() What does the login screen look like?
What does the login screen look like?
The AGS system offers a consistent interface throughout. In order to exit the system at any point, simply press the EXIT button at the screen. Note that any information you have not updated in the system (by clicking on the OK button) may be lost if you prematurely exit the system.
![]() Most of the Windows software we use will display a warning if the user
tries to close the program with unsaved information. We are concerned
that our employees may lose a lot of data when leaving your system
because it does not confirm the exit operation.
Most of the Windows software we use will display a warning if the user
tries to close the program with unsaved information. We are concerned
that our employees may lose a lot of data when leaving your system
because it does not confirm the exit operation.
AGS consists of 3 distinct access levels:
Administration enables the user to ADD, DELETE, and MODIFY user information, such as login and password, as well as access usage logs for the system.
![]() Does the system allow more than one Administrator? We need to be able to
recover if an Administrator forgets his or her password or a crash garbles it.
Does the system allow more than one Administrator? We need to be able to
recover if an Administrator forgets his or her password or a crash garbles it.
Station Control is the main portion of the system which includes Station Operations (automatic re-start, shutdown, locking of gas station, etc.), Report Generation, Fuel Price modification and Fuel Quantity adjustment.
Fuel Delivery enables delivery personnel to login to the system in order to specify information about the fuel they are delivering and to keep track of the status of the main fuel tanks.

![]()
You may select one of the following options:
1) Add User
2) Delete User
3) Change Password
4) Usage Logs
![]()
By selecting the appropriate option, one of the following operations can be initiated.
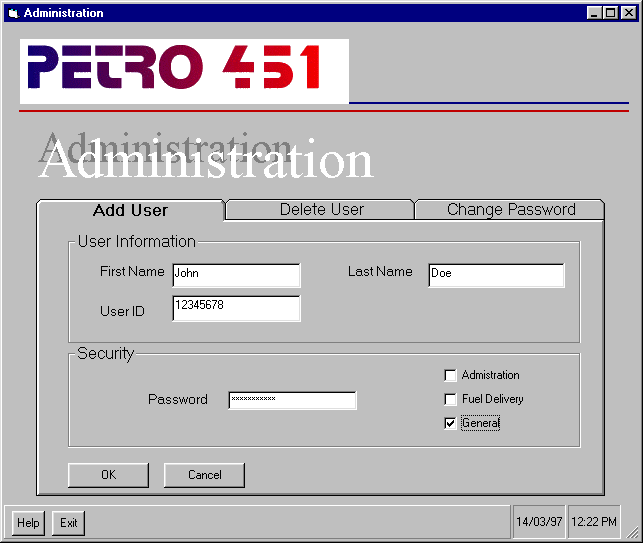
Steps:
1. Type in first name of the user being added in the box labeled 'First Name'. example: John Note: Length should not exceed 50 characters.
2. Type in last name of the user being added in the box labeled 'Last Name'. example: Doe Note: Length should not exceed 50 characters.
3. Type in the employee number of the user being added in the box labeled 'User ID'. example: 12345678 Note: Must be numerical and should not exceed 8 digits.
4. Type in the password for the new user in the box labeled 'Password'. example: abc123 Note: This is a field of a minimum of 4 characters and a maximum of 8 characters. For security purposes it is highly recommended to use length of 8 characters.
5. Select one of the access levels: Administration, Fuel Delivery or General (Station Control).
6. To clear all the boxes click the 'Cancel' button. Click the 'OK' button to proceed.
If all fields were filled correctly the system will update the database with the new user.
![]()
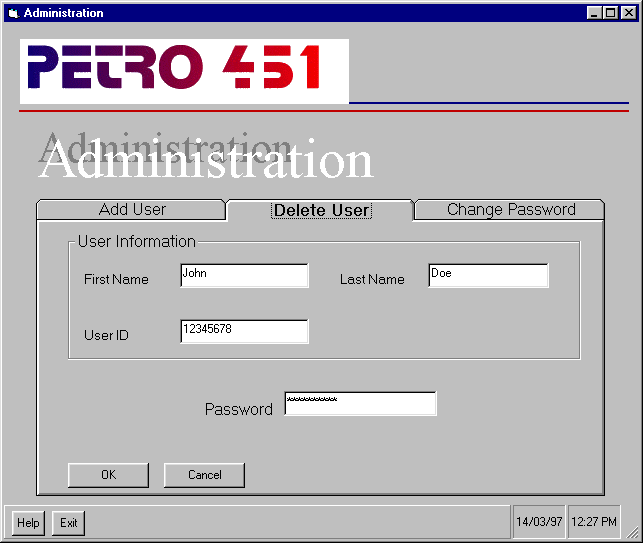
Steps:
1. Type in the employee number of the user that is to be deleted in the box labeled 'User ID'. example: 12345678 Note: Must be numerical and should not exceed length 8.
2. To clear the 'User ID' box click the 'Cancel' button. Click the 'OK' button to proceed.
The system will first verify if the user is in the database, and if there is no corresponding entry, a message will be displayed to that effect. If the User ID matches an existing user the system will remove him from the database.
Note: The administrative account on the system will be unable to delete itself from the system, so that the user database can never be sealed.
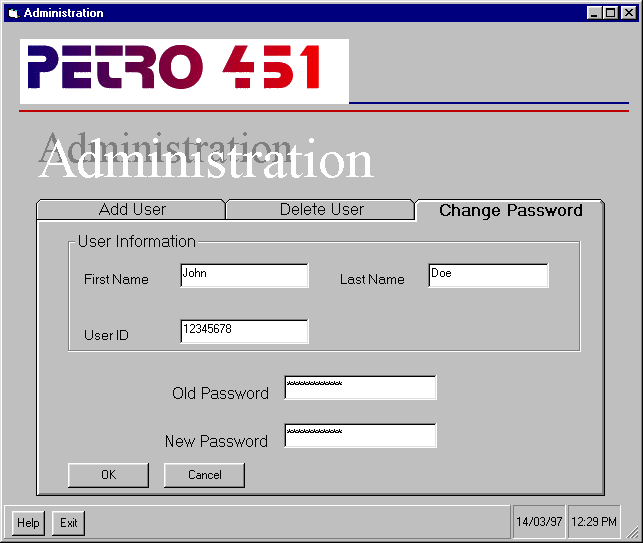
![]() Is the new password confirmed? Normally secure systems make the user
enter the new password twice to prevent errors.
Is the new password confirmed? Normally secure systems make the user
enter the new password twice to prevent errors.
Steps:
1. Type in the employee number of the user whose password is to be changed in the box labeled 'User ID'. example: 12345678 Note: Must be numerical and should not exceed length 8.
2. Type in the old password in the box labeled 'Old Password'. example: abc123 Note: This is a string field of minimum of 4 characters and maximum of 8 characters.
3. Type in the new password in the box labeled 'New Password'. example: abc123 Note: This is a string field of minimum of 4 characters and maximum of 8 characters.
4. To clear all of the boxes click the 'Cancel' button. Click the 'OK' button to proceed.
The system will first verify if the user is in the database, and if there is no corresponding entry, message will be displayed to that effect. You must add a user (see ADD USER) in order to modify a user's password.
If the User ID matches an existing user the system will update the database with the new password.
NOTE: It is highly recommended to change the passwords of the users of the system on a regular basis for security reasons.
HELP: When the help button is pressed, the purpose of each option will be displayed, as well as a description of the fields which need to be filled for each.
EXIT: The exit button will log the user out and redisplay the login screen.
![]() Where is Usage Logs button? It doesn't appear on any of these screen shots.
Where is Usage Logs button? It doesn't appear on any of these screen shots.
Clicking on the Usage Logs button in the Administration Menu will bring you to a menu which allows you to review accesses to the system. In case of a security breach at the General User (Station Control) level, the administrator can review who has logged in to the AGS system, when they logged in, etc. This permits the administrator to diagnose repeated unauthorized attempts at access, or to review existing unauthorized transactions. In order to prevent unlawful access, we encourage you to change the user passwords on a regular basis as well as to insure confidentiality of passwords (see Changing User Passwords for details).
VIII. Station Control Functions
![]() These navigation buttons in your online manual are great. They make it easy to
move from section to section. Having the buttons light up under the mouse is
a nice touch.
These navigation buttons in your online manual are great. They make it easy to
move from section to section. Having the buttons light up under the mouse is
a nice touch.
This subsystem is designed for users who have access level General (See User Access Levels). Under this subsystem, you will be able to change fuel price, maximum amount purchasing. You will also be able to generate reports and perform remote station control functions.
![]()
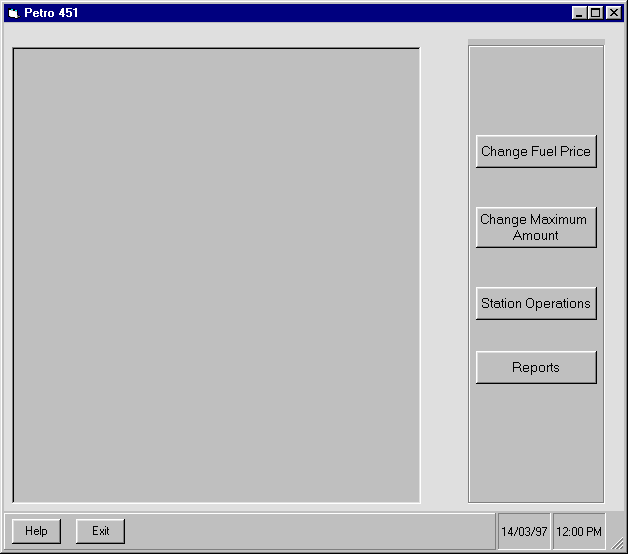
After the login session, the main menu for this subsystem will be displayed (see figure 3). In this menu, you will have the following choices:
- Change Fuel Price: This option allows you to change the fuel price for each type of fuel.
- Change Maximum Amount: This allows you to change the maximum amount purchase per transaction.
- Station Management: This option will open a submenu in which you may do operations related to the remote control of the gas station (eg. get pump status, activate/shutdown gas pump,...etc.)
![]() Does this refer to the Station Operations button in the screen shot?
Does this refer to the Station Operations button in the screen shot?
- Reports: This option allows will also lead you to a submenu in which you can generate monthly transactions reports, delivery reports, ...etc (see Report Generation).
- Help: This option will open a help screen which has a description for each button and what it does.
- Exit: This will return the user to the login prompt.
By clicking on the one of the buttons above, you will be able to do the task specified under each option.
Once you have chosen this option, the Change Fuel Price screen will be displayed (see figure 3.1). Initially, all the boxes for the new price are blank. If you want to change the fuel price, you must enter the new value to the specific box. Once you have entered the new value, you must click on the Ok button to confirm the change. If you don't want to process the change, click on the button Cancel instead.
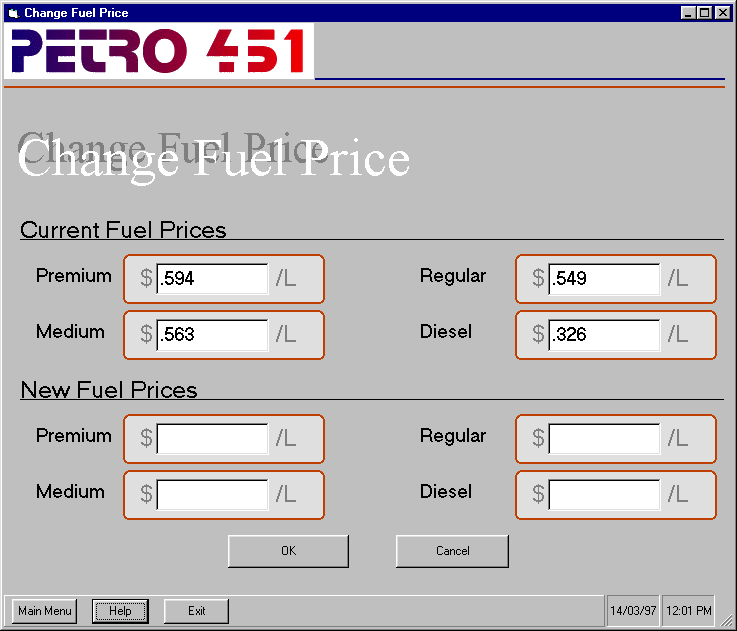
![]() Great screen shots. We really like the way your screens are formatted.
Great screen shots. We really like the way your screens are formatted.
Figure 3.1
For example, to change the current value of regular gas to $0.50/L: 1. Under Station Control & Reports Main Menu, click on the button Change Fuel Price. A screen similar to figure 3.1 will be displayed.
2. Under the box labeled Regular, enter the value 0.50
3. Click button OK to confirm the change.
You may change the values all at once by entering new values to all the boxes. Also, you could change specific the value for specific gas type (as shown in the above example).
From this screen, if you want to go back to Station Control & Reports main menu, simply click Main Menu. If you want to exit the system immediately, click on Exit, and the system returns to the login session.
![]() What happens if Cancel is pressed? Does it return to the Main Menu or
exit the system?
What happens if Cancel is pressed? Does it return to the Main Menu or
exit the system?
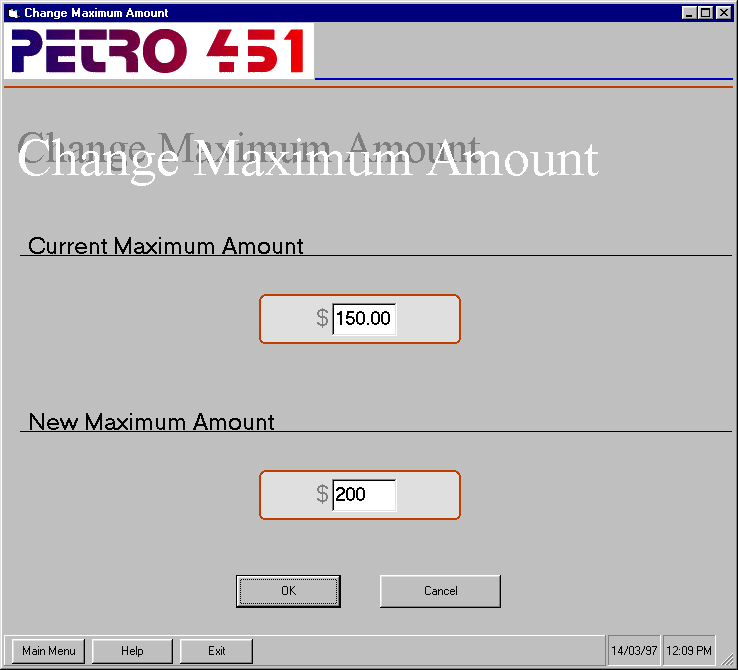
Figure 3.2
Operation in this option is straight forward. If you want to change the value of maximum amount purchase, simply enter the new value to the box under the section New Maximum Amount and click OK to confirm the change. If you don't want to modify the current maximum amount, click on button Cancel instead.
For example, to change maximum amount purchased to $200:
1. Under Station Control & Reports Main Menu, click on the button Change Maximum Amount.
2. In the box label New Maximum Amount Purchase, enter 200.
3. Click on button OK to confirm the changes. In this screen, the Main Menu button is used to return to Station Control & Report main menu. Also, the Exit button is used to exit from the system.
This submenu is displayed when you click on the button Station Operations from the Station Control & Reports main menu. Under this menu, you may peform these operations:
- Activation/Shutdown facilities: This option allows you to Activate/Shutdown any pump and Lock/Unlock any tank at the gas station.
- Pump status: This option will display information about the status of all the pumps at the station.
- Tank status: This option will display the status of all tanks at the stations and their related informations. - Diagnostic check: This option allows you to see the status of the station equipment such as calibration equipment, meters, and gas flow rate.
- Return to Main Menu: This options will take you back to the Station Control & Reports main menu. - Help: This option will display a brief description for each button in this screen.
- Exit: This allows you to immediately exit from the system.
![]() A screen shot for this section would be very helpful.
A screen shot for this section would be very helpful.
a. Shutdown and Activate Pump/Tank
Under this option, you may view the current status of all pumps and tanks. In addition, you may activate or shutdown any pump or tank at the station.
Initially, the system will display a table containg pump numbers, their current status (On or Off), tank numbers and their current status (Locked or Unlocked). If you want to active a pump or shut down a pump, you could select On or Off for that specific pump, respectively. The same way is applied when you want to Lock or Unlock a tank.
For example, if you want to activate pump 12345, pump 12346, and shut down pump 12347, follow these steps:
1. From the Station Operation Control Submenu, click button Shutdown/Activate Facilities. A screen is displayed showing the current status of all pumps and tanks at the gas station.
2. At pump 12345, click On. At pump 12346, click On. At pump 12347, click Off.
3. Click OK.
You could activate/shutdown pumps and Lock/Unlock tanks at the same time. To do so, simply click on the appropriate button at those pumps and tanks and click OK to confirm the changes.
Cancel changes: If you want to abort the change, click on the button Cancel instead of Ok (at step 3 in the above example). This would reset all the status of pumps and tanks to the value they have before.
Print the screen: If you want to print the status of all pumps/tanks, click on button Print. This generates a hard-copy (ie, paper form) of the status.
Return to Station Control submenu: From this screen click on the button Station Menu. This would take you back to the Station Control submenu.
Exit: Click on the Exit button to returns to login session.
This operation is performed by clicking on button Pump Status at the Station Control submenu. A screen will display all information related to each pump such as pump number, fuel type, pump status (On or Off), price per litre and total gas sold at the pump.
Also, you can make a hard-copy of this screen by clicking on the button Print.
To return to Station Control submenu, click Station Menu.
To exit from the system, click Exit.
By clicking on the button Tank Status from Station Control submenu, a screen will be displayed containing every information related to tank such as tank number, tank status (Locked or Unlocked), and fuel type.
To print the screen, click Print.
To return to Station Control submenu, click Station Menu.
To exit from the system, click Exit.
d. Display Station Diagnostics
This screen will be displayed once you've clicked button Display Station Diagnostics from the Station Control submenu. This will show you all the information on station equipments. Each piece of equipment could either be calibration equipment, tank equipment, or pump equipment. A status will show if the equipments have any problem. If the equipment has a problem, its status will be "NOT OK", otherwise the status will be "OK".
Printing the screen:
By clicking on the button Print, you could make a hard-copy containing information in this screen. This is useful for a technician to identify any technical problem at the gas station.
To return to Station Control submenu, click Station Menu.
To exit from the system, click Exit.
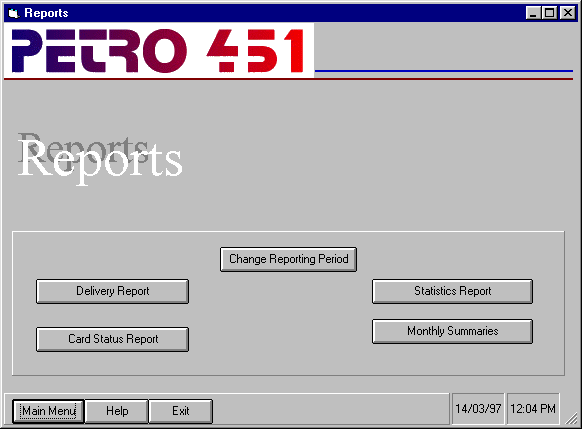
Figure 3.2
![]() The previous screen was also labelled Figure 3.2.
The previous screen was also labelled Figure 3.2.
This submenu is displayed when you click on the Reports button from the Station Control & Reports main menu (figure 3). The following tasks can be performed from the Reports menu:
- Change Reporting Period:
![]() Missing description. What does this do?
Missing description. What does this do?
- Delivery Report: This button allows you to see a list of fuel deliveries made to the station.
- Card Status Report:
- Statistics Report:
![]() Missing descriptions. What do these do?
Missing descriptions. What do these do?
- Monthly Summaries: This button takes you to a screen which will display a summary for a one month period.
- Main Menu: This button will take you back to the Station Control & Reports menu. (See figure 3)
- Help: This option will display a help screen with descriptions of each of the buttons and what they do, much like the above descriptions.
- Exit: This button will exit the system, returning you to the login screen.
By selecting one of the above buttons, you will invoke the associated task. Each task is described in detail below.
This screen allows modification of the times for automatic report generation.
The date and time of the old reporting period is displayed. The input field specifies the date and time of the new reporting period.
Clicking Cancel will clear the input field.
Clicking OK will first summon a confirmation, which will ask if the the new data entered are indeed correct. If so, the change will be made in the database.
The following buttons are available on this screen:
- Reports: This button takes you back to the Reports Menu. (See figure 3.2)
- Main Menu: This button takes you back to the Station Control and Reports menu. (See figure 3)
- Help: This will display a brief explanation of what the reporting period is and how to change it.
- Exit: This button will exit the system, returning you to the login screen.
On this screen, you will see input fields specifying a range of dates as well as a range of delivery IDs. You can fill in either of these (a range of dates or delivery IDs). If you specify a range of dates, a report of all deliveries made between the two dates (including deliveries on those dates) will be displayed. If you enter delivery IDs, a report will be generated for those deliveries with ID numbers between (and including) those specified.
![]() This is rather tough to visualize. A screen shot would be handy here.
This is rather tough to visualize. A screen shot would be handy here.
Clicking Cancel will clear the input fields.
Clicking OK will display the report screen:
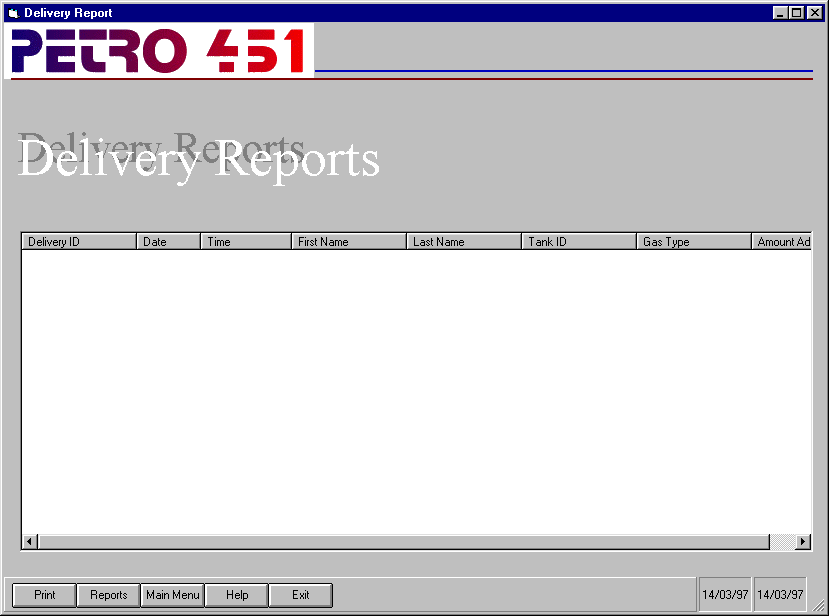
If no reports are found in the specified range, a blank report will be generated. You can try a wider range of valued by returning to the previous screen and retyping your input values.
The report includes Delivery ID, Date and Time the delivery was made, the First Name and Last name of the person who made the delivery, the Tank ID of the tank filled, the Type of fuel delivered, the Tank Level, before and after the delivery, the amount of fuel entered as being added by the delivery person, and the Total Value of the delivery.
You will then have the option of printing the report, or going back to a previous menu by clicking on one of the buttons.
The following buttons are available on this screen:
- Print: This will generate a hardcopy of the report by sending the displayed report to the printer.
- Reports: This button takes you back to the Reports Menu. (See figure 3.2)
- Main Menu: This button takes you back to the Station Control and Reports menu. (See figure 3)
- Help: This will display a brief explanation of each of the fields on the generated report.
- Exit: This button will exit the system, returning you to the login screen.
Here you will be asked for a range of dates. The report generated will show information about all the credit cards which were rejected between and on the dates specified.
Clicking Cancel will clear the input fields.
Clicking OK will display the report screen.
If no reports are found in the specified range, a blank report will be generated. You can try a wider range of valued by returning to the previous screen and retyping your input values.
The report shows the Credit Card Number, Card Holder's Name, Card Status (whether lost or stolen), and the Action Taken (whether the card was kept, returned, or whether the credit card company system was informed).
You will then have the option of printing the report, or going back to a previous menu by clicking on one of the buttons.
The following buttons are available on this screen:
- Print: This will generate a hardcopy of the report by sending the displayed report to the printer.
- Reports: This button takes you back to the Reports Menu. (See figure 3.2)
- Main Menu: This button takes you back to the Station Control and Reports menu. (See figure 3)
- Help: This will display a brief explanation of each of the fields on the generated report.
- Exit: This button will exit the system, returning you to the login screen.
This screen automatically generates a report on the current station. For each pump at the station, this will show Pump Number, Pump Status, Fuel Type, Fuel Price, and amount of Fuel Sold.
You will then have the option of printing the report, or going back to a previous menu by clicking on one of the buttons.
The following buttons are available on this screen:
- Print: This will generate a hardcopy of the report by sending the displayed report to the printer.
- Reports: This button takes you back to the Reports Menu. (See figure 3.2)
- Main Menu: This button takes you back to the Station Control and Reports menu. (See figure 3)
- Help: This will display a brief explanation of each of the fields on the generated report.
- Exit: This button will exit the system, returning you to the login screen.
In the input field, you will be asked for which month the report should be generated. Enter the month as a number from 1 to 12.
Clicking Cancel will clear the input field.
Clicking OK will display the report screen.
The report will show the transactions for the given month, including totals, GST, and PST, as well as summary statistics.
You will then have the option of printing the report, or going back to a previous menu by clicking on one of the buttons.
The following buttons are available on this screen:
- Print Report: This will generate a hardcopy of the report by sending the displayed report to the printer.
- Reports: This button takes you back to the Reports Menu. (See figure 3.2)
- Main Menu: This button takes you back to the Station Control and Reports menu. (See figure 3)
- Help: This will display a brief explanation of each of the fields on the generated report.
- Exit: This button will exit the system, returning you to the login screen.
The user will be presented with the following screen:
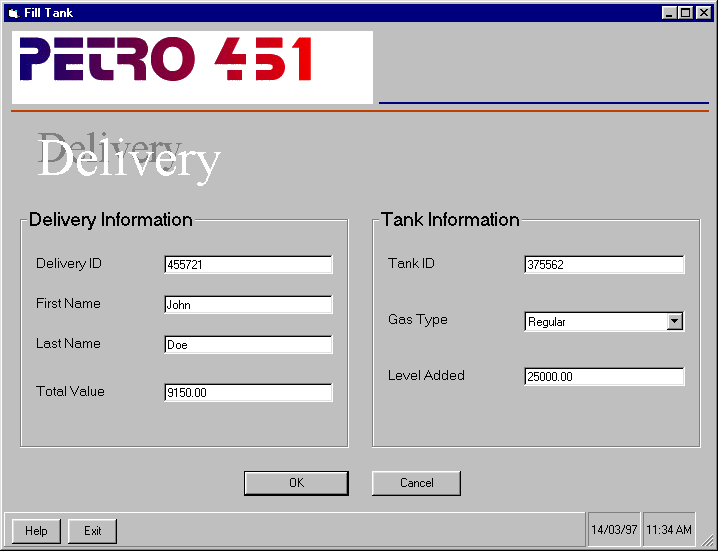
Steps:
The 'Delivery ID' field will be filled automatically by the system. Delivery ID is used to identify fuel deliveries.
1. Type in your first name in the box labeled 'First Name'. example: John Note: Length should not exceed 50 characters.
2. Type in your last name in the box labeled 'Last Name'. example: Doe Note: Length should not exceed 50 characters.
3. Click the 'OK' button to proceed.
After the above information was correctly entered the screen will show tank ID and type of fuel stored in each tank.
4. Click on the down arrow located on the right hand side of the box labeled 'Gas Type'.
5. From the pull down menu that appeared select tank that is to be unlocked.
Once selected, the appropriate tank will be unlocked and filling may start. When the filling is finished a message will be displayed, asking the user to enter the amount of fuel dispensed into the tank.
6. Type in the amount of fuel dispensed in the box labeled 'Total Value'. example: 9150.00 Note: Units are not required, this is a dollar amount - total value of the fuel dispensed.. The input will be checked to ensure that it is numeric. If it is not, a message will be displayed asking to reenter the value.
![]() The amount should be in litres. The delivery person typically knows the volume
of fuel in the truck but not its current value.
The amount should be in litres. The delivery person typically knows the volume
of fuel in the truck but not its current value.
The input value as well as the new gauge level reading will be checked by the system and the 'Level Added' box will be updated. The tank will be automatically locked and the system will return to the login screen.
HELP: When the help button is pressed, the purpose of each option will be displayed, as well as a description of the fields which need to be filled.
EXIT: The exit button will log the user out and redisplay the login screen.
![]() General comments:
General comments:
Send comments about the comments to Soleil Lapierre
Authors: Vlad | Branko | Dom | Francis
Last Updated on 03/16/97
By Carey Bingham
e-mail : bingham@cpsc.ucalgary.ca