SquidSoft Inc. - GUIDOs
Personnel
|
Only authorized users can access this window. To access this
window see logging in, and the main menu section under getting
started.
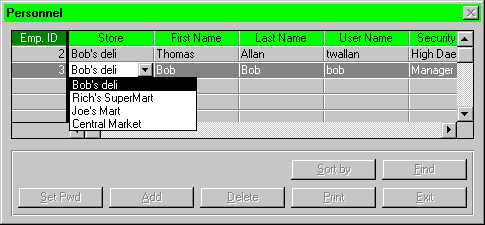
 This window contains information on all
the employees of the Calgary Foods chain. Each employee record
contains six fields which are:
- Employee ID - a unique number that identifies each
employee
- Store name - the store name where the employee works
- Employee's First Name
- Employee's Last Name
- User Name
- Security Level - defines what access level the employee
has for this system
- Position - the employee's job
- Click on the Add button shown on the Personnel
window, a cursor will appear immediately at the bottom of
the current list in the store field.
- Enter a store name of an existing store in the Store
field, by clicking on the down arrow in the store field
and highlighting one of the items in the pop up list.
- Use the tab or the arrow keys on the keyboard to
move to the First Name field. Note: the new
employee id well be automatically generated by the
system.
- Enter the first name of the employee in First Name
field.
- Use the tab or arrow keys on the keyboard to move
to the Last Name field
- Enter the last name of the employee in Last Name
field.
- Use the tab or the arrow keys on the keyboard to
move to the User Name field.
- Use the tab or the arrow keys on the keyboard to
move to the Security Level field
- Use the mouse to click on the down arrow. A pull
down menu will appear.
- Use the mouse to select the appropriate security level
from the pull down menu. The selected value will be the
one entered in the Security Level field
- Use the tab or the arrow keys on the keyboard to
move to the Positon field.
- Enter the employee's position.
- Hit the enter or the return key on the
keyboard to add the new employee record to the database.
How does the user cancel
this procedure if the user changes his or her mind? (e.g. a
Cancel button and/or the Escape key)
- Use the scroll bar shown on the right side of the Personnel
window to scroll up or down to find the employee to be
deleted or use the find function.
- Use the mouse to highlight the employee to delete by
clicking with the left mouse button on any field
of that employee.
- Click on the Delete button displayed in the Personnel
window.
- A message will be displayed to confirm the user's
decision to delete the employee, use the left
mouse button to click on the yes button to confirm
the deletion of the record from the database. Otherwise,
click on the no button to cancel the deletion
process.
| |
|
|
|
|
|
|
|
|
|
Searching for an Employee
|
|
|
|
|
|
|
|
|
|
|

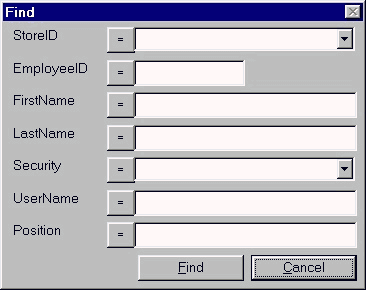
- Use the mouse to click on the Find button. A new Search
window will appear. With seven blank fields (store id,
employee id, first name, last name, security, username
and position)
- Use the mouse to click on one of the fields. Enter the
search criteria into the field.
- If the logical operator beside the field the information
was entered into is not correct, use the mouse to click
on the button until the required operator is displayed.
- Then click on the Find button to execute the
search, the requested employee(s) will be displayed in
the Personnel window. To cancel the search click
the cancel at any time.
| |
|
|
|
|
|
|
|
|
|
Change the Employee's Password
|
|
|
|
|
|
|
|
|
|
|
- Click on the Set Pwd button on the Personnel
screen. A Change Password window will appear with two
blank fields.
- Type the new password into the two blank fields. Second
is for confirmation of the first.
- Press the enter or return key on the
keyboard to execute the change. A another window will
appear that asks "Do you really want to change the
password?"
- Use the mouse to click on the OK button to change
the password, or else use the mouse to click on the Cancel
to cancel the change password process.
Some way of identifying the
employee whose password is to be changed would be useful.
Changing the wrong employee's password could cause problems.
| |
|
|
|
|
|
|
|
|
|
Sorting the Employee Table
|
|
|
|
|
|
|
|
|
|
|
- Click on the Sort button on the Personnel
screen. A Sort window will appear with a number of
buttons. Beside each button is a description on what to
sort by.
- Use the mouse to click on the button for the desired
sorting criteria.
- Then click on either ascending or descending.
- Then click on the OK button in the Sort
window. The employees in the Personnel screen will
now be sorted by the requested sorting criteria. Note:
secondary and tertiary sorting is possible by clicking on
the scroll bar and performing the above steps before
clicking the OK button.
- Use the scroll bar shown on the right side of the Personnel
window to scroll up or down to find the employee to be
modified or use the find function.
- Use the tab or the arrow keys to highlight
whatever field is to be modified (except for the Employee
ID field which cannot be modified)
- Use the delete key or back space key on the
keyboard to delete the old information. Type in the new
information.
- Hit the enter key or the return key on the
keyboard to confirm the update.
- Move the mouse to click the Print button shown on
the Personnel window, a listing of all the
employees, in the current sorted order, will be sent to
the printer.
| |
|
|
|
|
|
|
|
|
|
Exiting the Personnel Window
|
|
|
|
|
|
|
|
|
|
|
- Use the mouse to click the Exit button shown on
the screen. The main menu will be redisplayed.

 This window contains information on all
the employees of the Calgary Foods chain. Each employee record
contains six fields which are:
  This window contains information on all
the employees of the Calgary Foods chain. Each employee record
contains six fields which are: