SquidSoft
Inc. - GUIDOs
Security |
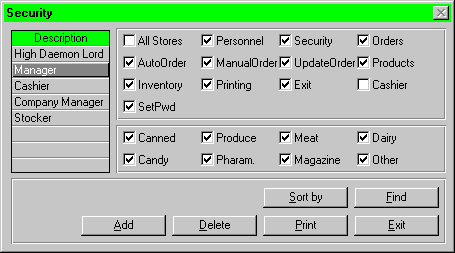
 In general, employees do not have access to all different functions of
the system. The security window is used to pre-define the access of each
security level and therefore the system can restrict certain information
that an employee want to access.
All the tasks can be performed easily by using a mouse and a keyboard.
There are also some check boxes indicate the authority of a security
level.
Note: Box with check mark indicate the security level can asscess
to.
- All Stores - can access to database of all stores.
- Personnel - can change the information of an employee.
- Security - can change the information of a security level.
- Orders - has access to Orders Window.
- AutoOrder - can change details of auto order.
- ManualOrder - can do a manual order.
- UpdateOrder - can update an order.
- Products - has access to Product Window.
- Inventory - can check the inventory of the store.
- Printing - has access to print.
- Exit - has access to exit from the an interface window or the system.
- Cashier - can asscess to Cashier Window.
- SetPwd - has access to set password.
- Click on the blank line under Description.
- Type the name of the new security level on the blank line.
- Check the check box that the new security level has authorization to
access.
- Click on the Add button on the Security Window to add the new security
level.
- If success, a dialogue box "The new security level is added"
will be displayed.
- If the new security level is being used, it results in a dialogue box
being desplayed which reads "The Security Level is being used".
And the new entry will not be added to the database.
- If user does does not grant any access permission to the new security
level, it results in a dialogue box being displayed which says "No
access permission is granted to the new security level. Failure to add
a new security level"; and the new entry will not be added to the
database.
- Select the security level that want to remove under Description.
- Click on the Delete button on the Security Window.
- A confirmation box will be poped out and ask if this is the correct
security level to be deleted.
- If answer "No", then the database will not be updated and
return to the Security Window.
- If answer "Yes", then the database will be updated with the
selected security level removed from the database.
- If there exists employees having the selected security level that is
about to be deleted, it results in a dialogue box being displayed. It informs
the user that the selected security level cannot be deleted because there
are employees having that security level and the user has to change the
security level of those employees before deleting the selected entry. Therefore,
the database will not be updated.
Note: Data on the Security window is, by default, sorted by the
security levels in ascending order.
How is the list sorted by "security
level"? Was this meant to be "description" on the screen
shot?
- Click on the Sort by button on the Security Window.
- A 2-options sort menu will be displayed - ascending and descending.
- Select either "Ascending" or "Descending".
- Data will be listed according to the security levels by which the user
selected.
- Click on the Find button on the Security Window.
- Type in the name that the security level you wish to find.
- The system will find the security level and display the corresponding
informations on the screen.
| |
|
|
|
|
|
|
|
|
|
Print
All Security Levels |
|
|
|
|
|
|
|
|
|
|
- Click on the Print button on the Security Window.
- The system will print all security levels with the corresponding informations.
- Click on the Exit button on the Security Window.
- All process in security window will be terminated and Main Menu being
displayed.

 In general, employees do not have access to all different functions of
the system. The security window is used to pre-define the access of each
security level and therefore the system can restrict certain information
that an employee want to access.
  In general, employees do not have access to all different functions of
the system. The security window is used to pre-define the access of each
security level and therefore the system can restrict certain information
that an employee want to access.