SquidSoft
Inc. - GUIDOs
Stores |
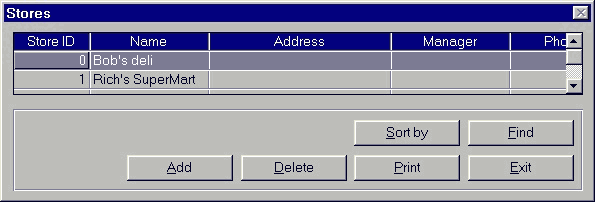
This window can only be accessed by authorized users. Once the user
has logged into the GUIDOs System, the Main Menu will be displayed. If
the button next to "Stores" shown on Main Menu has been double
clicked, the "Stores" window will be immediately displayed in
the terminal screen.
There is a minor problem with
this picture and the following text. The text appears behind the image
and is unreadable.
 This window contains information pertaining to each supermarket in the
Calgary Foods chain. Each store record will contain five fields which are:
- Store ID - a unique number to identify a specific store
- Name - the name of the store
- Address - the location of the store (including the postal code and
province)
- Manager - the store manager's full name (first name should be entered
first and last name last)
- Phone Number - the telephone number of the store (including the area
code)
Excellent instructions. How about
underlining the keywords in each step, so that users can read instructions
faster.
- Click on the "Add" button shown on the "Stores"
window, a cursor will appear immediately at the bottom of the current list
in the store ID field.
- Enter a unique number (a number has not been used before) for the "Store
ID" field.
- Use the "tab" or arrow keys on the keyboard to move to the
"Name" field
- Enter the name of the new store for the "Name" field
- Use the "tab" or arrow keys on the keyboard to move to the
"Address" field
- Enter the address of the new store (including postal code and province)
for the "Address" field.
- Use the "tab" or arrow keys on the keyboard to move to the
"Manager" field
- Enter the manager's full name of the new store (enter first name first
and last name last)
- Use the "tab" or arrow keys on the keyboard to move to the
"Phone Number" field.
- Enter the telephone number of the new store (area code should be included)
- hit "enter" key on the keyboard to confirm the GUIDOs System
to add the new store record to the database.
- Use the scroll bar shown on the right side of the "Stores"
window to scroll up or down to the store to be deleted.
- Use the "tab" or arrow keys on the keyboard to select the
"Store ID" field.
- Click on the "Delete" button shown on the "Stores"
window.
- A message will be displayed to confirm the user's decision to delete
a store, use the left mouse button to click on "yes" to confirm
the system to delete the record, and the entire store record will be removed
from the database. Otherwise, if "no" has been clicked, the entire
store record will not be changed.

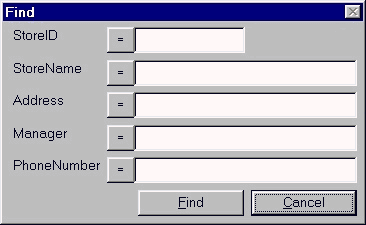
- Use a mouse to click on the "Find" button. A new Search window
will appear. With five blank fields (store id, store name, address, manager,
phone number).
- Use a mouse to click on one of the fields. Enter the search criteria
into the field.
- If the logical operator beside the field the information was entered
into is not desired, use the mouse to click on the button until the desired
operator is displayed.
- Then click on the "Find" button to execute the search, the
information of the requested store will be displayed in the "Store"
window. To cancel the search click the "cancel" button at any
time.
- Use a mouse to click on the "Sort by" button on the "Stores"
window. A "Sort" window will appear with a number of buttons.
Beside each button is a description on what to sort by.
- Use the mouse to cllick on the button for the desired sorting criteria.
- Then click on either "ascending" or "descending".
- Then click on the "OK" button in the "Sort" window.
The stores in the "Stores" window will now be sorted by the requested
sorting criteria.
- Use the scroll bar shown on the right side of the "Stores"
window to scroll up or down to the store to be modified
- Use the "tab" or arrow keys to highlight whatever field to
be modified (except the "Store ID" field which can be changed)
- Use the "delete" key on the keyboard to delete the old information
and type in the new information.
- Hit "enter" key on the keyboard to confirm the GUIDOs System
to update the database.
| |
|
|
|
|
|
|
|
|
|
Printing
the Entire List of Stores |
|
|
|
|
|
|
|
|
|
|
- Move the mouse over the "Print" button shown on the "Stores"
window and press the left mouse button, a listing of all the stores along
with each store's information will be sent to the printer connected to
the system.
| |
|
|
|
|
|
|
|
|
|
Exiting
the Stores Window |
|
|
|
|
|
|
|
|
|
|
- Move the mouse over the "Exit" button shown on the screen
and press the left mouse button.
- All changes will automatically be saved to the databases, the "Stores"
window will disappear, and the Main menu will be immediately displayed
in the terminal screen.

 This window contains information pertaining to each supermarket in the
Calgary Foods chain. Each store record will contain five fields which are:
 This window contains information pertaining to each supermarket in the
Calgary Foods chain. Each store record will contain five fields which are:

