Detailed
Design Document Department of Computer
Science Page maintainer: Terrence
Asgar-Deen |

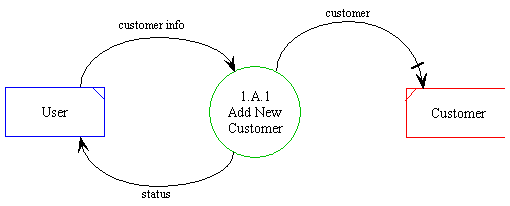
Adding a new customer is described in the above diagram. The user passes in all of the customer information to the system. This information is composed into and instance of the data table customers. For each new instance, a unique customer ID is generated for the customer and placed into the instance. The new instance is then added to the customer datastore.
The returned status corresponds to the success of the operation. If the new customer is successfully added to the datastore, the status returns Successful.
| Process ID | 1.A.1 |
|---|---|
| Process Name | Add New Customer |
| Inputs | customer info |
| Outputs | None |
| Permissible User | Administrator, Salesperson |
| Assumptions | All information entered is syntactically correct. |
| Error Conditions | Successful |
| Name | customer |
|---|---|
| Kind | Data movement in DFD |
| Type | Instance of an Entity |
| Description | This data element corresponds to a complete instance of the Entity Customer. |
| Name | customer info |
|---|---|
| Kind | Data movement in DFD |
| Type | Multiple Field User Input |
| Description | These fields are input values from the User. They correspond to the fields in the Entity Customer. Not all fields in the Customer data table are necessarily present in an instance of the customer information. |
| Name | status |
|---|---|
| Kind | Data movement in DFD |
| Type | Return Message |
| Description | This data element corresponds to an error message being returned from an operation. An error message may be both successful and unsuccessful. Unsuccessful error messages are further subcategorized into different errors based on the possible errors that can occur in an operation. |

The Add a New Customer dialog can be opened by selecting Add from the Items menu, or clicking on the Add toolbar button when in the Customers, View Customers, or Modify Customers areas. When the Add New Customer dialog is opened, the user is presented with a screen containing fields to enter the new information about the customer.
The ID for the customer will be automatically generated. The customer will be automatically assigned to a territory and salesperson. The salesperson can be changed by selecting a new salesperson in the drop down list. The drop down list will display both the name of salespeople and their ID, in case two users have the same name.
Clicking OK will ensure all fields are valid, and if so, add the customer to the system. The user can click Cancel at any time to discard the new customer. After clicking either button, the user will be returned the previous area (the Customer, or Modify Customer areas). Since Add a New Customer is a dialog, none of the functionality of the main window is available. The user must click OK or Cancel to return to the main window.
Salespeople are allowed access to this dialog.