
Presents



Fig 1.
A system login is required for a user who wishes to enter the Police
Gathering Information System. A successful login to the system requires
a valid username with the corresponding password. Each security level
has a different main menu, and in order for the system to load the
correct main menu the system will require this information to associate
with a security level.
User Name
The user name is the actual name of the user, for example if the name
of the user logging in is Joe Smith, the user name is "Joe Smith". This
will allow for easy identification of who was using the system and what
they did while on it.
Password
A valid password is one that is 3-10 alphanumeric characters. The first
character must be alphabetic. Passwords should not be recognizable
english words as they make it much too easy to 'hack' into the
system.
Clear Button
This button clears the User Name and Password boxes.
OK Button
Upon clicking this button an attempt to access the system with current
name and password will be made. The system will verify that the user
name and password entered was correct. If the user name was not
contained in the database a failed login dialog box will be displayed.
Similarly, a dialog box will be displayed if the User Name field is
blank. If the attempt was unsuccessful due to the user entering in an
invalid password, it will be recorded in a login file, and a failed
attempt will occur. Otherwise, if both user name and password are
valid, the user is granted access into the system with the security
level given to them by a Superuser.





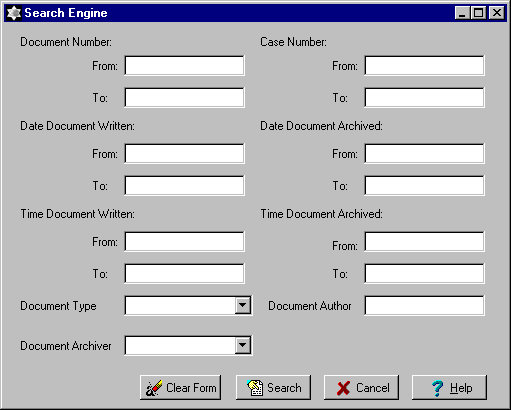
The Search Engine consists of 2 main parts. The first part contains
all of the searchable fields in which users can enter in any
desirable values for their searches.
(Note: Certain error checking conditions apply)
The following fields are included in the Search Engine and are range searchable :
The following fields are to be selected using drop down menus, in which all possible values were already enumerated:
The very last field in the window which does not allow Range search nor does it contains any enumerated data:
In addition to the searching fields, there are four buttons located at
the button of the window:
(See The cection named "Buttons for Search Engine" below for furthur details in the usage of these buttons)
Again, several common buttons were used in this window. The four buttons used to traverse the list were included, and also the Cancel and Help buttons (See details of the buttons below).
In this window, a list of the results were displayed. Users can highlight any document that they feel interested in, and then click on the "View Document" button to view the details of the record in another window named "Document Information".
In the "Document Information" window, all details of the record were displayed. User can as well view the image of the scanned document by clicking on the "View Case" Button located near the bottom of the screen. The "Append" button also allows users to append notes to the current document. The "print" button outputs the contents of the current document to the printer attached.
In addition to the screens introduced above, there are two windows that pertain to the Common User section. They are the "Scanned Image Editor" and "Enter New Note" windows. They are invoked by the two buttons located in the "Document Information" window, these buttons are named "View Case" and "Append" respectively.
The "Scanned Image Editor/Viewer" window allows the user to view the image of the original document which was scanned at archive time.
The "Enter New Note" window allows users to append new notes to the document located by a previous search.
Functions:
Search for specific document(s)
View the document(s) and note(s)
When user found the specific document that appear in the "Search Results" window, he may view the document in the following steps: Using the different buttons (Previous, Next,...etc) to highlight the specific document that the user want to see. Then press the "View Document" button. This will bring the user to the "Document Information" window. In this window, the following fields will be display:
Append note(s) in specific document(s)
If user want to append a new note to the current document, he may then press "append" button and system will pop up the "Enter New note.." window. User may type in the any text in the box, if user finish the note. He may then press "OK" to confirm the appending process. User may abort the operation anytime by pressing the "cancel" button and return to the "Document Information" window.
View the original document(s)/image(s)
If user want to view the original document(image) for the current document, he may press the "View Case" button to call up the "Scanned Image Editor" window. The original image will be displayed right away. But user CANNOT edit the original image. User may also use the "Zoom In" and "Zoom Out" buttons to view the image.
Zoom In
The 100% zoom is the actual full screen image of the document. A 200% zoom will enlarge to document to twice its size allowing you to view only 25 percent of the full page at one time. The 400% zoom will further enlarge to document to allow viewing fine details such as signatures. Once the document is zoomed to 400% the Zoom In button will be disabled.
Zoom Out
Due to scanned images being very large in both physical size and display size zooming out will decrease the document size. A document in 50% zoom mode will shrink to a half the size allowing a broader picture. As well a 25% zoom mode will allow even a greater overall picture.
OK button
When the OK button is depressed the scanned image viewer closes.
Help button
By hitting the Help button, help pertaining to the current window is displayed. i.e. the help changes depending on the context.
Search Button
When pressed, the search button will start the search. The search button may be pressed by using the tab key in the keyboard until the button is highlighted or by pointing and clicking with the mouse. A dialog box containing a Cancel button and progress bar is then displayed showing the progress of the search. If at any point in time while the search is going on the user decides to cancel it, all the user has to do is to click on the cancel button.
Cancel Button
The cancel button is used to stop any type of ongoing process, when desired. To activate it the user may tab, until it is highlighted or the user may point and click with the mouse. The user is then return to the Main Screen.
Clear Form Button
The clear form button is used to clear all the contents of the form at once. The user may either tab to the button and then press the "enter" key or point and click with the mouse.
Help button
By hitting the Help button, help pertaining to the current window is displayed. i.e. the help changes depending on the context.
Under "Search Results" window:
First Document Button
This button will highlight the first document in the table. If the first document is already highlighted, or there is only one document in the list this button will be disabled.
Previous Document Button
This button will select the previous document to the current document. If the first document is already selected, or there is only one document in the list this button will be disabled.
Next Document Button
This button will select the next document to the current document. If the last document is already selected, or there is only one document in the list this button will be disabled.
Last Document Button
This button will select the last document in the list. If the last document is already selected, or there is only one document in the list this button will be disabled.
Search Results Button
This function button will allow the search engine (See 4.1.1 Search Entry Screen ) do a further search of the existing table of documents. If new search criteria is entered, only a search will be done on the existing items in the list.
View Document Button
If a document is highlighted this button will be active to the user. If the user activates this button the document information will appear.
Cancel Button
The cancel button will return the user to a new search engine form, where the user will be able to begin a new search.
Help button
By hitting the Help button, help pertaining to the current window is displayed. i.e. the help changes depending on the context.
Under "Document Information" window:
View Case/Image button
Activating this button will display 4.1 Scanned Image Editor window. This window displays the original scanned image that the archiver scanned into the system. Scanned images cannot be edited.
Append button
This button will allow the user to add additional information to a document by bringing up the Enter New Note dialog. A memo number, the current user, date, and time will be will be assigned to each newly appended note.
Print button
This button will allow the user to output the current document to the printer(s) attached.
First Document Button
This button displays the first document from the search table. If there is only one search result or you are at the top of the table this button will be disabled.
Previous Document Button
Clicking this button displays the previous document from the search table.
Next Document Button
The next document button will display the document which follows the current document from the search table.
Last Document Button
Clicking this button displays the last document from the search table. If there is only one search result or you are at the bottom of the table then this button will be disabled.
Return Button
Pressing this button will return the user to 4.1.2 Search Results window. The current document will remain active.
Help button
By hitting the Help button, help pertaining to the current window is displayed. i.e. the help changes depending on the context.
Under "Document Archiver Editor" window:
Document Type Pulldown Box.
Each report saved in the system has an associated type, which is typically the name of the crime described in the document. By selecting the pulldown list button at the right end of this field, the user is presented with a scrollable list of document types the system currently knows about. The user may select one from this list, at which point it is automatically placed in the field. Direct editing of the field is not possible, though new document types may be created with the New Document Type Button.
New Document Type Button
Beside the Document Type field there is a "New Type" button. Selecting this button will take the user to another window that allows them to add a new type to the list.
Attach Notes Button
Clicking this button pops up a file selection window that lets the user locate and read in a text document containing pre-typed comments for the Notes field. Provided the selected document contains valid characters for the Notes field (i.e., is actually a text file), its contents are added to the Notes field as if they had been typed from the keyboard. If the selected file is not readable as plain text, a dialog box pops up saying so and the user is placed back in the Document Archiver Editor window.
Scan Image Button
In the final complete system, selecting this button will allow the user to operate a scanner attached to the computer in order to scan in an image of the paper document. This function will not be implemented for the demonstration system.
Attach Image Button
This button causes a file selection window to pop up so that the user can select a pre-scanned document image for inclusion in the database. If the selected file is not an image format understood by the system, it will pop up a dialog box that says so, and the user will be returned to the Document Archiver Editor window. If the image is readable, the file selection box closes with no error message.
View Image button
Selecting this button leads to the image viewing window, described elsewhere. That window allows the user to view the document image that was scanned or read in using the Scan Image or Attach Image buttons. An image must be attached to every database record, since each record is meant to be an electronic representation of a paper document.
OK button
When the user has finished entering all the relevant data, he or she will click on the OK button to add the new document record to the database. At this point, and error checking on field contents that has not yet been performed will be done. If there is an error in any field, the filing operation will be aborted and the editing cursor will move to the first incorrect field so that the user can fix the error. A dialog box pops up to indicate what type of error was found. If the error is that there is no image attached, the error dialog box will say that an image must be scanned or attached to every new document, and that the Scan Image or Attach Image buttons can be used to accomplish this.
Help button
By hitting the Help button, help pertaining to the current window is displayed. i.e. the help changes depending on the context.
Cancel button
Under "Enter New Note" window:
OK button
new note will be appended into the current document when user presses this button and brings the user back to the "Document Information" window.
Cancel Button
Cancel what the user entered and return the previous "Document Information" window.
Archiver
Overview
When the user clicked on the Archiver Button in the "Police Information
Gathering System" Screen, a window named "Document Archiver Editor" will
appear. This window allows the user (ie: Archiver) to enter in
information and images of the original documents to the database.
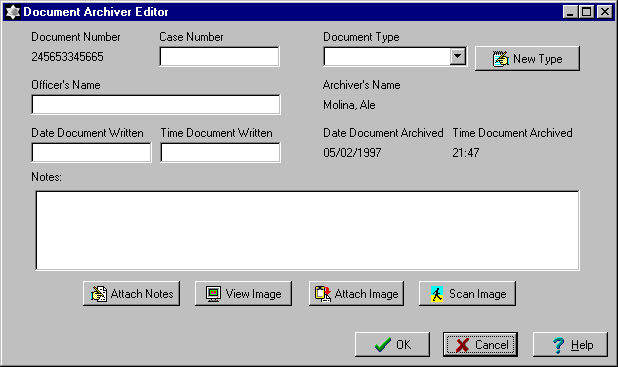
The Archiver Editor window was logically divided into two parts. The first part containing all the fields to be entered by the Archiver. Here's the list of fields :
The second part consists of four buttons located at the bottom of the window. The "Scan Image" button signals the scanner attached to the system to scan the document. The "Attach Image" button can either import an existing image or it is to attach the image scanned by the "Scan Image" function. The "View Image" button pops up the "Image Editor" which is for viewing the image attached with the record to be archived.
The last button included in the set of four is the "Attach Notes" button. This button provides the archiver the ability of attaching written notes to the record from an existing text file.
On the other hand, the archiver can also attach notes to the current document by typing in the notes in the "Notes Area" located near the bottom of the screen. (Note: no error checking is provided in this editing window, therefore, anything can be written as comments. Archivers have to be cautious in using this field.)
Again, this window shares the common buttons such as "OK" and "Cancel" as the other windows. Please refer to the "Archiver Buttons and Toolbar" section for furthur details.
Functions
Enter a new document
Archiver may add a document to the existing system. When "Document Achiver Editor" was pop up ,there are followings field can be contained into the new document:
Attach note to the document
Archiver can either attach an existing note to the record by using the "Attach Notes" button, or he/she could type the notes into the "Notes Area". The notes attached will be kept as a record with the scanned original document's image.
View the scanned image
Archiver can view the scanned image by pressing the "View Image" button. This will call up the "Scanned Image Editor" window. The scanned image will be display right away. Users may also use the "Zoom In" and "Zoom Out" features from the "Scanned Image Editor" to have a different view of the image.
Attach scanned image to the document
After the scanned image is prepared, user can attach the scanned image to the specific document by pressing "Attach Image" button. The attached image will be kept as a record with the notes attached.
Scan in an image
User can scan in a image from the original paper document by pressing the "Scan Image" button. Upon pressing the "Scan Image" button located at the bottom of the window, the scanner attached to the system will produce an exact digitized copy of the original document provided.
Document Type Pulldown Box.
Each report saved in the system has an associated type, which is typically the name of the crime described in the document. By selecting the pulldown list button at the right end of this field, the user is presented with a scrollable list of document types the system currently knows about. The user may select one from this list, at which point it is automatically placed in the field. Direct editing of the field is not possible, though new document types may be created with the New Document Type Button.
New Document Type Button
Beside the Document Type field there is a "New Type" button. Selecting this button will take the user to another window that allows them to add a new type to the list.
Attach Notes Button
Clicking this button pops up a file selection window that lets the user locate and read in a text document containing pre-typed comments for the Notes field. Provided the selected document contains valid characters for the Notes field (i.e., is actually a text file), its contents are added to the Notes field as if they had been typed from the keyboard. If the selected file is not readable as plain text, a dialog box pops up saying so and the user is placed back in the Document Archiver Editor window.
Scan Image Button
In the final complete system, selecting this button will allow the user to operate a scanner attached to the computer in order to scan in an image of the paper document. This function will not be implemented for the demonstration system.
Attach Image Button
This button causes a file selection window to pop up so that the user can select a pre-scanned document image for inclusion in the database. If the selected file is not an image format understood by the system, it will pop up a dialog box that says so, and the user will be returned to the Document Archiver Editor window. If the image is readable, the file selection box closes with no error message.
View Image button
Selecting this button leads to the image viewing window, described elsewhere. That window allows the user to view the document image that was scanned or read in using the Scan Image or Attach Image buttons. An image must be attached to every database record, since each record is meant to be an electronic representation of a paper document.
OK button
When the user has finished entering all the relevant data, they will click on the OK button to add the new document record to the database. At this point, and error checking on field contents that has not yet been performed will be done. If there is an error in any field, the filing operation will be aborted and the editing cursor will move to the first incorrect field so that the user can fix the error. A dialog box pops up to indicate what type of error was found. If the error is that there is no image attached, the error dialog box will say that an image must be scanned or attached to every new document, and that the Scan Image or Attach Image buttons can be used to accomplish this.
Help button
By hitting the Help button, help pertaining to the current window is displayed. i.e. the help changes depending on the context.
Cancel button
In case the Document Archiver decides that they don't want to document to be
entered into the system, they may press the Cancel button. This results in no
information being added.




After taking under advisement all changes requested by the customer, we have implemented their requirements. As explained by the customer, most problems had to deal with the GUI (graphical user interface), these have been properly corrected at this time. We are open to any suggestion that you may want. Please contact our group manager via e-mail for further considerations.
They are as follows:
| Document Number | 32 characters |
| Document Type | 32 characters list box Superuser defined |
| Date Document Written | 8 characters DD/MM/YYYY |
| Time Document written | 4 characters HH:MM |
| Date Document Archived | 8 characters DD/MM/YYYY |
| Time Document Archived | 4 characters HH:MM |
| Archiver's Name | 40 characters |
| Officer's Name | 40 characters |
| Case Number | 32 characters |
| Notes | 60 characters width, unlimited length |
There are three types of users in this system. Each user has unique privileges to this system based on their security levels. When data is entered, all fields will be filled except where prohibited by the users security access. While viewing documents, case notes may be appended by users with appropriate security.
Archiver This user has the ability to enter new documents, but not change them nor do any type or search on them. Note that due to time constraints, we will not have developed the scanner interface and therefore, we will use pre-scanned images that are stored on disk
Common User (Police Officer)
Is able to search and add new comments to document, but not enter new documents.
Superuser
This is the only position that has complete access to the system. The Superuser is able to do any functions that other users are able to. In addition he may also add or remove any users and their privileges as well as changing the system's properties including document access.
Note: All users have the following common data fields.
| Name | 40 characters |
| Password | 3 to 10 characters. First character Alphabetic |
| Security Level | List Box, Superuser defined |
| Comments | 60 characters width, unlimited length
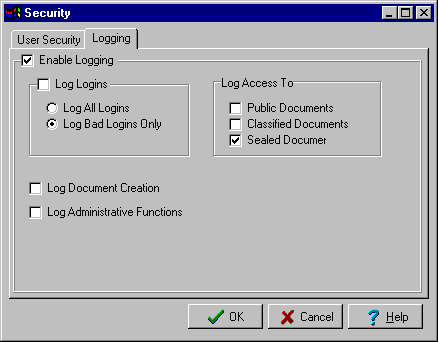
| Enable Logging | Boolean |
| Log logins | Boolean |
| Log all | Boolean Mutually exclusive |
| Log Bad | Boolean Mutually exclusiveí |
| Log Access | Boolean |
| Public Documents | Boolean |
| Classified Documents | Boolean |
| Sealed Documents | Boolean |
| Log Document Creation | Boolean |
| Log Administration Functions | Boolean |
Our systems major functions are broken up into four different areas: Archiving (adding) Documents, Searching Documents, Security, and Printing. These functions are described briefly below. It should be noted that only the Superuser has access to all the different functions.
The system's primary functions are as follows:
This allows users to add documents in to the system's database. The archiver usually performs this, but the Superusers also has this ability. It must be noted that our system will not allow documents to be removed once added.
Another feature that allows users to search through the system's database for specific documents is searching. Due to the large amount of documents our system must handle; it is very important for the customer to be able to search multiple fields as well as ranges of values and thus is implemented. All fields contained within a document may be searched. The search results will be displayed in table format so that they may be searched again. After searching, each document may be displayed, allowing the user to view case reports. Again it should be made clear that not all users have access to this function.
Since this system contains very sensitive information, security was considered one of the most important elements. It is further divided into two sub-categories:
Each user has a security level associated with them. This includes system privileges which defines what document types they have access to
Various security properties of our system are maintained such as: logging logins, logging access, logging document creation, and logging administrative functions.
Due to the need to have a hard copy, a printing facility exists.
The Police Information Gathering System includes the following features. Ability to keep track of both the closed and unsolved cases. Including information such as Case Number, Officers Name, Document Type, and Scanned image of original written document. Once entered, editing of fields is not allowed with the exception of notes, which allows adding of information.
Another important feature is the ability to search the database of documents. A complex search engine based on such things as: Author, Time, Date, Case Number, and Document Type. This search engine although complex, has a very intuitive interface. This allows for fast and efficient searches. Queries are allowed multiple values and ranges. Further refinement on search results is allowed by specifying the field that the user wishes to narrow the search on.
Since security is of utmost importance, we have implemented different user accessibility levels. These access levels limit what the user is able to do. System security is a facility to assist Superusers in keeping records of who and what gets accessed, while not preventing people from being as productive as they can be.
Information storage for the Springfield Police Department has been greatly improved. The project requires a computer system to store police handwritten documents. All documents are gathered and brought back to the headquarters to be entered and stored in the system by an archiver. This will ensure that the most updated information is available to the officers of the Springfield Police Department.
System Requirements:
When the Police Information Gathering System is complete it will become an indispensable tool for the Springfield Police Department. Its ease of use will come through the GUI that follows your existing documentation procedures. The systems functions, interfaces, screens and walkthroughs have been explained in detail. No effort has been spared in creating a dynamic system that is expandable, secure, easy to use, fast, maintainable and above all reliable.
Cyrius Overload Productions believes in following proven programming techniques. By following our strict testing regiment we will complete this project in a short time. Soon your police department will be able to continue their fight against crime with the aid of modern technology. The delivered system will meet the needs of all police officers, clerics, and management in your company.
In order to verify that the PIGS system meets the customers' needs, extensive and varied testing is required. Both the supplier and customer will need to apply appropriate testing procedures to determine the product's acceptability.
On the technical side, the PIGS development team will perform rigorous functional testing to ensure that the system correctly identifies and handles all possible error conditions, and that it correctly performs all the functions required by the customers. They will also perform integration testing to ensure that the various modules of the program interact seamlessly. The system must operate flawlessly once installed, since the customers will be relying on it heavily once they integrate it into their daily operations.
In conjuction with representatives of the Springfield Police Department, team members will perform a performance evaluation to determine how efficiently the system can be used under normal circumstances, and acceptance testing to determine if the overall product is satisfactory to the customer. It is important that the PIGS system be easily and efficiently operable in the normal everyday circumstances in which it will be used. No matter how correct and stable software is, COPS would be doing a disservice by producing software that is annoying or counterproductive to use.
Once the minimal prototype system passes its tests and is accepted by the customer representatives, final development and testing of the complete PIGS system can begin.
Finally, a user questionnaire is provided for readers of this document so that the customers' representatives can provide valuable feedback to aid the development team in refining the product.
A tentative schedule for all the testing phases is as follows. These dates represent both course deadlines and internally agreed-upon due dates (which may be subject to change due to unforseen circumstances).
The COPS programmers will be instructed to carefully plan and discuss each module before they actually begin coding it, and will be testing module operations as frequently as possible. Hopefully most bugs will be caught in this stage.
The programmers will be required to keep the team informed of their progress, and will be making functional portions of the system available to the PIGS development team before the testing deadlines. Since some members of the team do not use the development platform in their offices, they will be invited to the offices of members who do in order to participate in the testing.
Each of the various types of testing is described in more detail in the following sections.
This testing will be performed by COPS employees and will test the operation of each major module of the PIGS system. This will include testing all possible error conditions up to and including attempting to crash the program through misuse.
Since the Delphi development softare being used by COPS programmers is a high-quality product and provides automatic handling of the details of the Windows 95/NT user interface, it will for the most part be assumed that these parts of the user interface work correctly. However, if any problems are noticed they will be remedied.
User interface details that are handled by Delphi include scroll bars, buttons, pulldown menus, list boxes, dialog boxes for errors, basic editing functions for text entry fields, and low-level mouse and keyboard input. Delphi does not do all the work, however. The behind-the-scenes inner workings of the PIGS system and the actions performed by button and menu selections must be implemented by the programmers.
Note that most if not all testing will be done on the COPS group development platform, and thus will not account for system-specific error conditions. Since the Springfield Police Department will be upgrading its computer hardware to accomodate the PIGS system, this variable can be eliminated by selecting PIGS-compatible hardware and software as outlined in the system requirements section.
Functional testing mainly focuses on operations within modules while integration testing tests the interfaces between modules. However, some functions operate across module boundaries and thus cannot be tested properly until all relevant modules have been implemented. For this reason, some degree of integration testing will be done during the functional testing stages and vice versa.
The following subsections deal with aspects of the PIGS system that will be tested at a modular level.
General Functions
Much of the PIGS system user interface will follow the Windows 95/NT user interface standards. In general, the following truths apply. Any exceptions will be noted elsewhere.
Selecting a button labelled "OK" tells the system that the user has read and understood a system message or, in the case of a data entry window, has entered some information for the system to process. The system will error-check the input and either report an error using a dialog box or store the input in the appropriate place. An error dialog box generally contains a helpful message about what part of the user input is unacceptable, and an "OK" button that will close the dialog box.
Similarly, a "Cancel" button on a window tells the system that the user has either opened the current window by accident or has decided not to enter any information in the current window. Any pending input is simply ignored and the current window is closed.
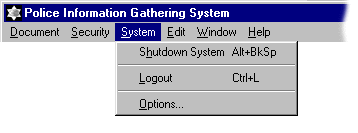
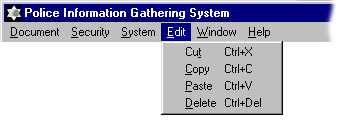
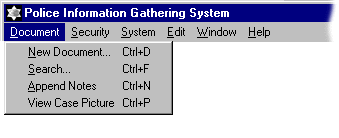
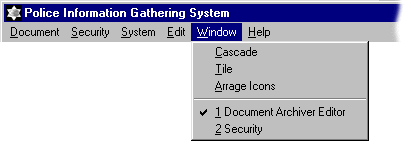
All system operations have more than one way of being activated. All actions can be performed using the keyboard, and any actions not requiring text entry can be performed using the mouse. To speed commonly-used actions, hotkeys instantly activate some menu or button functions. All different ways of initiating a system action will be tested.
When a block of information is too large to be displayed within the allotted space in a window or box, the system will automatically add vertical and/or horizontal scroll bars that can be used (with the mouse) to being different sections of data within the display area.
Since the main purpose of the PIGS system is to maintain a database, it is of course essential that information be correctly saved to and retrieved from the database. The programmers will verify this using debugging tools while they are implementing the relevant modules.
Program Activation
Little testing is required here. This is simply a matter of being able to activate the PIGS software by clocking on its icon. The software package should be self-contained in its own directory on the computer, and should not require any support software to already be running (other than the operating system).
It will also be verified that the PIGS system correctly saves any pending data and terminates cleanly when system shutdown is selected.
Main Window
This part of the program will be tested to ensure that all buttons and menu choices perform the correct actions and call the correct modules. The main window cannot be fully tested until the integration testing phase.
Similar testing of buttons and menus will be done on all other modules, when the functions related to those buttons and menus are implemented.
Login
This module must always correctly identify user names that are and are not in the user database. For users that are in the database, it must correctly match the entered password against the password recorded in the user database, and must reject logins with a mismatched password. Finally, if the user name and password are accepted, it must correctly set the system security access level for the user. All this will be tested with debugging tools and later with user interaction.
Security
The security aspect of the system mainly involves the correct identification of the user's clearance level by the Login module, and correct enabling or disabling of features based on that clearance level. Thus security is more relevant to the integration testing phase.
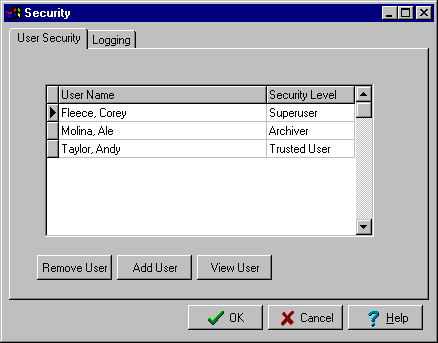
The Security window has two parts, one dealing with user maintainence and the other with logging options. These details are covered below.
User Maintainence (Security window part 1)
The Security window and module deal with adding, viewing and deleting user accounts. The security window itself dislays a list of all users and their security levels. It will be verified that the list does indeed contain all users in the user database and that the listed security levels are correct.
The system will not allow the currently logged-on user to delete him/herself. If the Delete User button is clicked while the name of the current user is highlighted in the list, a dialog box will pop up saying "You can't delete yourself!" and the action will not take place.
Add User
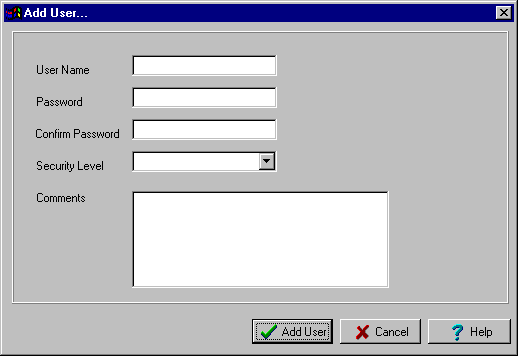
This module will be tested to ensure that it rejects user names that are already in the user database, or mismatching passwords in the two password fields. It will be confirmed that the user name, password, security level and comments are all correctly saved in the user database in the event of a successful add operation.
View/Edit User (User Information window)
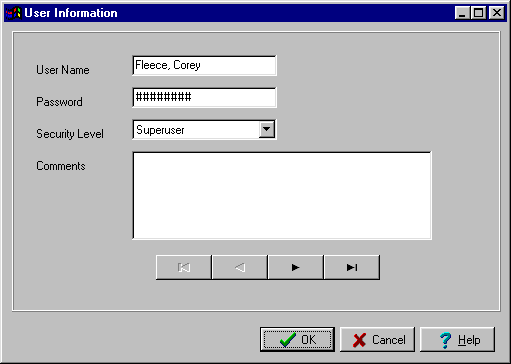
This window must correctly display the user database information of the user selected in the security window. The user name must be the one that was selected before the View User button was clicked, and the security level and comments must match up with that user name.
The user's security level and password can be changed in this window. It will be verified that if changes are made, they are correctly saved to the user database.
The user information window features four buttons that allow easy access to other users in the list (with respect to the order in which they were displayed in the security window). The leftmost is the "Top" button, which displays the first user. Similarly the rightmost is "End" and displays the last user in the list. The two middle buttons are "Back" and "Forward" and display the alphabetically previous and next users, respectively. Correct functioning of these four buttons will be tested.
Remove User
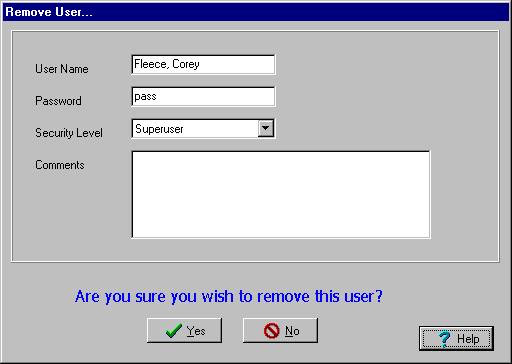
As with the user information window, this one must correctly display the selected user name and associated security level and comments. The security window (above) disallows deletion of the current user, so this potential error will not be checked here.
If the remove user operation is selected and confirmed, and only under this condition, the system must remove the entire relevant user record from the user database. That includes irreversable erasure of the user name, password, security level and comments. This action will be tested thoroughly.
Logging Menu (Security window part 2)
This menu consists of only check boxes and radio buttons, so there is not much that can go wrong. It will be verified that any options changed in this window are correctly saved to the system configuration file.
Options Menu
It will be verified that any changes made to each user's configuration options are correctly saved to the system configuration file on that user's workstation. It will be verified that invalid configuration options are rejected. As of this writing, exactly what will be in the options menu has not been identified.
Create New Document
This window must correctly create and save a new document record to the main database, provided the information entered is correctly formatted. What constitutes accepted data for this window is outlined elsewhere. Correct saving of records to the database will be verified, as will be correct identification of unacceptable data.
Create New Document Type
This is simply a one-field text entry window. If the new document type entered already exists, the system must pop up a dialog box saying so. Otherwise it must correctly add the new type to the document type list.
Attach Notes
This button will lead to a standard Windows file selection box. Windows handles all errors associates with its file selectors, but in the event that the user selects a file that cannot be read as text, a dialog box will pop up saying the file is unreadable. This will be tested with text and binary files. The system will only load plaintext notes files, and will reject word processor files.
View Image
The system must track whether or not a scanned image is attached to a given document. If there is one, clicking this button brings up the Scanned Image Viewer window.
There are no errors possible in the viewer window. It simply allows scrolling and zooming of a bitmap. When the limits of scrolling or zooming are reached, the relevant controls have no effect. The image handling module will be checked for all possible errors.
Attach Image
As with Attach Notes (above), this button leads to a Windows standard file selector. In the event that the user selects a file that is not a readable image file, a dialog box will say so. Correct operation is therefore easily tested.
Scan Image
This function will not be implemented for the demo system, and will not be tested.
Search for Document
A description of what constitutes valid input for this window appears elsewhere in this document. It will be verified that the search module correctly identifies valid and invalid input and finds all matching documents in the main database, for all combinations of search fields being used.
Search Results
It will be verified that a list window appears which will display all the documents found by the search engine, and which allows the documents in the list to be viewed in the document information window.
View Document (Document Information window)
It will be verified that all record information from a selected document is correctly displayed here, and that the View Image and Attach Notes options work correctly here as in the case of creating a new document.
Printing will only be implemented in the demo system if time permits, and may not be fully tested by the time of the presentation.
This part of the testing will be conducted to test the system as a whole with the aim to uncover errors associated with interfacing. Because the system is written in the Delphi language (a portable, visual windowing language) this testing will be aiming particularly at the system units and modules to assess their interaction as well as their appropriateness.
Test 1: Try to login with a valid and an invalid user password to check the interaction between the security unit and the system. For the valid user password the user should be able to logon successfully, and for the invalid password the access should be denied with an error message. The security unit will also be checked for logging out.
Test 2: Modify an existing document to test the interface between the system text editor and the system storage. The appended notes or images should be saved correctly in the system storage after the user finishes modifying the document.
Test 3: Add a new valid-formatted document and an invalid-formatted document to check the interaction between the system storage unit and the system checking unit. The valid document should be accepted and added whereas the invalid one should be rejected with an error message.
Test 4: Search documents with various query fields to test the interaction between the searching unit, the storage unit, the security unit and the system checking unit. If the document is found, the user should be able to access the document in case he/she has the authority. If he/she does not have the authority, the user will be informed. If the document is not found, the user should have the choice of trying again with different searching field or cancelling the search.
Test 5: Add a new account; delete an old account; modify an existing account and check the functions of these accounts accordingly. These tests are used to check the interface between the administration unit, the security unit and the system checking unit. For the new account added, the user should be able to carry out any jobs specified accordingly for that level of authority as in the system specification. For the deleted account, that account should be erased from the system account storage. And the modified account should function appropriately with the changes made to that account.
Test 6: Test the system icons on the system window to check the interaction between the user interface unit and the system.
The system's performance will be evaluated at the user's knowledge level. The expected user or users will operate the system in scenarios in which they carry out their routine, daily job-related tasks. After completion, the tester(s) will fill out a questionnaire evaluation form to give their assesment of the system's performance on such issues as how smooth the system is, how user-friendly the system is and so on. This evaluation form will be examined to eliminate any short comings from the system. The below are the typical scenarios familiar to the perspective users:
1. An officer named James Bond returns from an overseas (impossible) mission. He accidentally forgets his password and requires help from the administrator.
Tasks: The administrator can use the system to search through the system account storage to findout what Bond's password is. Then Bond can either use his old password or change it as he pleases.
2. A detective name Colombo has obtained new photos for a homocide case that he is investigating. He wants to add these photos to the case's documents. The document has the following details:
  Document number:       2349990876
  Case number:           213
  Document type:         Homicide
  Officer name:          Colombo
  Date document written: 21/07/1997
  Time document written: 12:00 am
  Archiver name:         Henry the III
Tasks: Search the system archive for the document (The user can use any of the above details as searching field). Then the new photos are scanned to attach to the text document. Colombo will have a chance to look at the new document before it is stored back in the system's archive.
3. An officer has been promoted to a higher position. For this position the officer will have more responsibilities as well as more powers. The officer needs a new level in the system's security rank.
Tasks: The administrator searches for the officer account and changes his security level. The officer will be informed about the change by the administrator.
4. When the system's archiver is adding a new document, he finds out that the image associated with the document is too vague to be visible when scanned. He want to know what he should do.
Tasks: When the archiver clicks on the help command he can search for the appropriate content in the system's help information. The help window will allow him to do that and display the information regarding to the required subject.
5. An officer has found out new information about a criminal case that he is investigating, and he want to add this information to the case's document. However, because this information needs to be confirmed so he only wants to attach it to the document in the form of the document's notes. He remember the case's number is 111.
Tasks: Search for the document with the case's number of 111, then click on the Attach Notes button to add his notes to the document.
6. There are complaints about a case completed 2 years ago, so the officer who was solving the case before is now assigned to reopen the case. Because it was 2 years ago, the officer could not remember anything about the case.
Tasks: Search for all the documents that this officer was involved with, then let the officer find the case among those documents.
7. The archiver is assigned to create a new document for a criminal case. He received all the details of the case from Ben - the officer in charge of the case. The details are as follows:
     Archiver:        Edison Johnson
     Officer:         Ben Thomas
     Date:            27/02/1997
     Time:            10:30
     Document number: 23450097
     Case number:     312
Tasks: A new document is added with the archiver's name; Ben's name and all the details above.
Please fill out the following questionnaire as part of your system evaluation session. This survey will be studied by the supplier to improve the final product as well as to eliminate any short coming of the system. For each question, please circle the appropriate answer and add any comments in ink (or in a different color if publishing your response in HTML).
User Background Information

1. Do you have experience with Windows 95?
        yes             no

2. Where do you have access to Windows 95?
        At home         At work

3. How often do you use the Windows 95 environment?
      never                        frequently
        1       2       3       4       5
                                          comments:

4. How do you feel about using the Windows 95 environment?
   very uncomfortable                         very comfortable
           1               2       3       4       5
                                              comments:

5. Do you have experience with the Windows environment?
        yes             no

6. Where do you have access to the Windows environment?
        At home         At work

7. How often do you use the Windows environment?
       never                        frequently
        1       2       3       4       5
                                              comments:

4. How do you feel about using the Windows environment?
   very uncomfortable                         very comfortable
           1               2       3       4       5
                                              comments:

System Performance Information

A/User Interface

1. How organized are the screens' layout?
     very poor                     very well
        1       2       3       4       5
                                          comments:

2. How easy to use are the screens?
     very hard                     very easy
        1       2       3       4       5
                                          comments:

3. How informative are the icons and the buttons on the screens?
     very poor                     very informative
        1       2       3       4       5
                                           comments:

4. How informative are the command choices?
     very poor                     very informative
        1       2       3       4       5
                                           comments:

5. How useful is the content of the help system?
     very poor                      very useful
        1       2       3       4       5
                                            comments:

6. How proper are the responses of the screens' icons and buttons?
     very poor                      very well
        1       2       3       4       5
                                            comments:

7. How are the screens' characters?
  hard to read                      easy to read
        1       2       3       4       5
                                             comments:

8. How are the screens' exits?
   hard to find                     easy to find
        1       2       3       4       5
                                              comments:

9. How easy to switch between sections of a screen?
       hard                            easy
        1       2       3       4       5
                                               comments:

10.How accurate and effective are the short cut commands?
      very poor                     very good
        1       2       3       4       5
                                               comments:

B/System Interaction:

1. How is the system's feed back?
  uninformative                       Informative
        1       2       3       4       5
                                                comments:

2. How are the error messages?
     uninformative                  informative
        1       2       3       4       5
                                                comments:

3. How are the system's errors?
   cripple the system                        never occur
        1               2       3       4       5
                                                 comments:

4. How easy is it to add a new document?
       hard                            easy
        1       2       3       4       5
                                                comments:

5. How easy is it to find a document?
       hard                            easy
        1       2       3       4       5
                                                comments:
6. How easy is it to modify a document?
       hard                            easy
        1       2       3       4       5
                                                comments:

7. How easy is it to scan an image?
       hard                            easy
        1       2       3       4       5
                                                comments:

8. How easy is it to view an image?
       hard                            easy
        1       2       3       4       5       comments:

9. How easy is it to add a note to a document?
       hard                            easy
        1       2       3       4       5       comments:

10. How easy and effective is it to save a document?
       hard                            easy
        1       2       3       4       5
                                                comments:

11. How easy is it to cancel an operation?
      hard                            easy
        1       2       3       4       5
                                                comments:

12. How easy and effective is the system for managing users?
      hard                            easy
        1       2       3       4       5
                                                comments:

13. How easy is it to add or modify a user's account?
      hard                            easy
        1       2       3       4       5
                                                comments:

14. How is the system's security?
     very poor                       very good
        1       2       3       4       5
                                                comments:

C/Overall Performance

1. How user-friendly is the system?
     complicated                      simple
        1       2       3       4       5
                                                comments:

2. How does this system rate to any similar system you may have used?
     unfavorably                      favorably
        1       2       3       4       5
                                                comments:

3. How would you rate this system?
     needs improvement                 excellent
        1       2       3       4       5
                                                comments:

Please give any other comments:
The acceptance test will be conducted in April so that the customer has a chance to judge whether the final product meets the required specifications.
The test will be done on a PC which will be used along with an overhead projector for demonstration. The supplier will carry out typical operations that the system will be responsible in the future. The customer will be able to see how the system deals with situations that may arise in reality. These situations cover a variety of activities including manipulating documents, checking security, adding, deleting user accounts, handling errors, searching, saving documents and so on. At the conclusion of the demonstration, the supplier will answer all the questions and concerns raised by the customer about the system. The purpose of this question period is to help the customer gain a solid knowledge about the system as well as to clear up any misunderstanding about it.
The overall outline for the acceptance test will be sumitted by the end of March. The details of different walkthroughs that will be done for the demonstration and how they will be presented are included in this submission. The customer can also expect to get a sample of the inputs fed into the system during the testing session from this document. This input sample will contain the details of the documents which will be added to the system, the name and password of the operator, the name and password of the new users added to the system, etc.
A: Customer login walkthrough
B: Customer search walkthrough
The first button from the left on the top of the search table can be used to minimize the size of the table. The second button from the left on the top of the table is the maximize button that can be used to maximize the table's size. The third button from the left on the top of the table can be used to close the table. The clear form button at the bottom of the table can be used to clear the current contents of the table. The cancel button at the bottom of the table can be used to cancel the searching. The help button can be used to get help information. When the use clicks on this help button, a help menu table will be displayed and the user can select the subject that they want to know about. In order to use these button, the users only need to click on them.
The "Document Number" field represents the document number of the document that the users want to search for. The "Case Number" field represents the case number of the document that the users want to search for. The "Date Document Written" represents the date the searching documents were written. The "Date Document Archived" field represents the date the searching documents were archived. The "Time Document Written" and "Time Document Archived" fields represent the time the searching documents were written and archived. The "Document Author" and "Document Archiver" represent the author of the searching document and the person archived the document.
C: Document Addition walkthrough
E: P.I.G.S. Window Control walkthrough
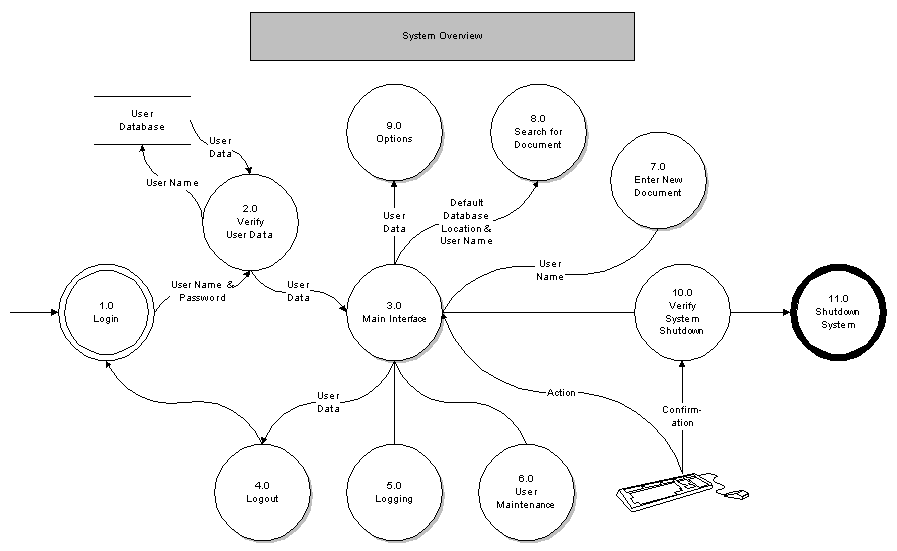
This section outlines high-level pseudocode for the various modules of the PIGS system. The reader can select the name of each section to jump to the DFD in which it appears.
1.0 Login
  Input : Nothing
  Output: User Name
          Password

  Display Login Screen
  If (Clear Button Pressed)
    Clear User Name and Password
  else
    call 2.0 Verify User Data(User Name, Password)
2.0 Verify User Data
  Input : Unverified User Name
          Unverified Password
  Output: User Data

  Use Unverified User Name from User Database to return User Data
  if (Unverified User Name found)
    if (encrypt(Unverified User Name) matches Password in User data
      call 3.0 Main Interface(UserData)
  (Login has failed so)
  increment Bad Logins
  if Bad Logins matches Bad Login Attempts
    Write bad login attempt to Log File
    reset Bad Logins
  Display Invalid User Name or Password Dialog
  call 1.0 Login
3.0 Main Interface
  3.1 Determine Visible Objects

    Input : Current User's Data
    Output: Current User's Data
            Enabled Objects

    enable Search Features, Options, Logout
    if User Access Level <= Archiver
      enable Document Creation Features
    if User Access Level = Super User
      enable User Maintence Features, Logging Features, System Shutdown.
    call 3.2 Display Main Interface(User Data, Enabled Objects)

  3.2 Display Main Interface

    Input : Current User's Data
            Enabled Ojects
    Output: Nothing

    Display Main Screen and Enabled Objects
    Wait for user input.
    if User wants to Logout
      call 4.0 Logout(Current User's Data)
    else if User wants to Adjust logging
    (note that secure objects are not visible to lower user access levels)
      call 5.0 Logging
    else if User wants to perform User Maintenance
      call 6.0 User Maintenance
    else if User wants to Enter New Document
      call 7.0 Enter New Document
    else if User wants to Search for a Document
      call 8.0 Search for Document(Location of Document Database)
    else if User wants to change thier Options
      call 9.0 Options(encrypted Password for User's Data)
    else if User wants to Shutdown the System
      call 10.0 Verify System Shutdown
4.0 Logout
  4.1 Confirm Logout

    Input : Current User's Data
    Output: Current User's Data

    Display "Are you sure you want to logout" dialog box
    if Users Response matches No
      call 3.2 Display Main Interface
    else
      call 4.2 Logout User(Current User's Data)

  4.2 Logout User

    Input : Current User's Data
    Output: Nothing

    Write Logout Data to Current User's record in User Database
    reset Current User
    call 1.0 Login
5.0 Logging
  5.1 Get Logging Options

    Input : Nothing
    Output: Logging Options

    Read Logging Options from System Options Database
    call 5.2 Display Logging Options(Logging Options)

  5.2 Display Logging Options

    Input : Current Logging Options
    Output: Nothing

    Display Current Logging Options
    Wait for User Input
    if User chooses ok and Logging Options have changed
      Write Logging Options to System Options Database
    call 3.2 Display Main Interface
6.0 User Maintenance
  6.1 Get All User Data

    Input : Nothing
    Output: All User Data

    Get All User Data from the User Database
    Call 6.2 Display User List(All User Data)

  6.2 Display User List

    Input : All User Data
    Output: Selected User Data

    Display All User Names and All Access Levels from All User Data in a grid
    Select first User
    Wait for user input
    if Remove User button pressed
      call 6.3 Remove User(Selected User Data)
    else if Add User button pressed
      call 6.4 Add User
    else if View User button press
      call 6.5 View User(Selected User Data)
    else if Cancel or Ok button Pressed,
      call 3.2 Display Main Interface

  6.3 Remove User
    6.3.1 Display User Information

      Input : Selected User Data
      Output: Selected User Data

      Display Selected User Data and wait for confirmation of deletion
      If Deletion Confirmed
        call 6.3.2 Delete User(Selected User Data)
      else
        call 6.2 Display User Data

    6.3.2 Delete User

      Input : Selected User Data
      Output: Nothing

      Delete Selected User Data from User Database

  6.4 Remove User
    6.4.1 Display User Information

      Input : Nothing
      Output: New User Data

      Display Add User form and wait for input
      If Ok Button pressed and User Data Inputted
        call 6.4.2 Validate Data(User Data)
      else
        call 6.2 Display User Data

    6.4.2 Delete User

      Input : User Data
      Output: Nothing

      Validate user data (see testing)
      if Data Valid
        write User Data to User Database
      else
        display "Invalid Data" Message
        return to calling function with focus on invalid data

  6.5 View User
    6.5.1 Display User Data

      Input : User Data
      Output: New User Data

      Display User Data in User Form and wait for input
      If Ok Button pressed and User Data Changed
        call 6.5.2 Validate Data(User Data)
      else
        call 6.2 Display User Data

    6.5.2 Validate Data

      Input : User Data
      Output: Nothing

      Validate user data (see testing)
      if Data Valid
        write User Data to User Database
      else
        display "Invalid Data" Message
        return to calling function with focus on invalid data
  7.1 Generate Document Number

    Input : User Name
    Output: Next Document Number
            User Name

    Get Last Document Number from Document Database
    Next Document Number = Increment(Last Document Number)
    call 7.2 Display Document Entry Form(Next Document Number, User Name)

  7.2 Display Document Entry Form

    Input : Next Document Number
            User Name
    Output: Document Data

    Place Next Document Number
    Display Document Entry Form
    Wait for user input
    if Ok Button Pressed
      call 7.3 Validate Document Data (New Document Data)
    else if Cancel Button Pressed
      call 3.2 Display Main Interface
    else if View Case Picture Button Pressed
      call 7.4 View Case Picture(Case Picture)
    else if Attach Notes Button Pressed
      call 7.7 Attach Notes(User Name)
      Append Notes and Stamp to Notes in New Document Data
    else if Attach Picture Button Pressed
      call 7.6 Get Picture Case Location
      Attach Case Picture
    else if Scan Case Picture Buttton Pressed
      call 7.5 Scan Case Picture
      Attach Case Picture

  7.3 Validate Document Data
    (See Testing for more information)

    Input : Document Data
    Output: Nothing

    Validate all Document Data
    Write New Document using Document Data to Document Database

  7.4 View Case Picture
    7.4.1 Display Case Picture

      Input : Case Picture
      Output: Case Picture
              Magnification

      Display Case Picture and Form
      Wait for user input
      if Zoom In Button Pressed
        call 7.4.2 Zoom Picture(Magnify 1x,Case Picture)
      else if Zoom Out Button Pressed
        call 7.4.2 Zoom Picture(Magnify 1/2x,Case Picture)
      else if Ok Button Pressed
        return to calling function

    7.4.2 Zoom Picture

      Input : Magnification
              Case Picture
      Output: Magnified Case Picture

      Magnify Case Picture by given amound
      call 7.4.1 Display Case Picture(Magnified Case Picture)

  7.5 Scan Case Picture
  (This will not be implemented for the demonstration system)

  7.6 Get Case Picture Location

    Input : Nothing
    Output: Case Picture

    Get Image Location from User
    Get Image Data from Image Location
    call 7.2 Display Document Entry Form (Image Data)

  7.7 Attach Notes
    7.7.1 Get Notes Text

      Input : User Name
      Output: Notes Text
              User Name

      Display Notes Entry form
      Wait for user input
      if Ok Button Pressed and Notes Entered
        call 7.7.2 Generate Notes Stamp(Notes Text, User Name)
      else
        call 7.2 Display Document Entry Form

    7.7.2 Generate Notes Stamp

      Input : Notes Text
              User Name
      Output: Notes and Stamp Record

      Write System Time and User Name to Stamp
      call 7.2 Display Document Entry Form(Notes and Stamp)
  8.1 Display Search Form

    Input : Document Database Location
            User Name
    Output: Search Items

    Set Document Database Location and User Name
    if Document Database Location is not Default Database Location
      enable New Seach Button
    Display cleared search form
    Wait for input from user
    if New Search Button Pressed
      call 8.1 Display Search Form(Default Database Location)
    else if Ok Button Pressed and Search Items Available
      call 8.2 Validate Search Data(Search Items)
    else if Cancel Button Pressed
      call 3.0 Main Interface

  8.2 Validate Search Data

    Input : Search Items
    Output: Search Items

    Validate Search Items (see Testing)
    if Items Valid
      call 8.3 Compose SQL Document Query(Search Items)
    else
      Display appropriate error dialog
      call 8.1 Display Search Form with focus on box containg first error

  8.3 Compose SQL Document Query
    Note that this process also adds "Return items accesible to current user's security level" to the generated SQL statement.  This will allow only approved documents to be viewed or acknowledged.

    Input : Search Items
    Output: SQL Document Query

    Parse Search Items into compound SQL Statement
    Call 8.4 Database Interface(SQL Document Query)

  8.4 Database Interface
    By setting the Database Location, we can seach a database of seach results using the same interface.

    Input : SQL Document Query
    Output: Search Progress

    Set Database Location to Chosen Document Database
    Send SQL Document Query to Chosen Document Database
    while Search In Progress
      Receive Search Progress from Chosen Document Database
      Call 8.5 Display Search Progress(Search Progress)
    Receive Search Results from Chosen Document Database
    if no Search Results returned
      Display Search Parameters Not Found dialog box
      call 8.1 Display Search Form
    else
      call 8.6 Create Results Database(Documents)

  8.6 Display Search Results

    Input : Search Results Documents
    Output: Chosen Database Location

    Select First Search Result Document
    Display grid of Partial Information from Search Results Documents
    Wait for User Input
    if Search Results Button Pressed
      call 8.1 Display Search Form(Results Database Location)
    else if View Document Button Pressed
      call 8.7 Display Single Search Result(Selected Document Number)
    else if Cancel Button Pressed
      call 8.1 Display Search Form(Default Database Location)

  8.7 Display Single Search Result
    8.7.1 Display Search Results

      Input : Document Number
      Output: Nothing

      if Result Of Search Database contains Multiple Records
        enable Database Browser Buttons
        enable Return Button
      Display form containing Given Document Number from Search Results Database
      Wait for User Input
      if View Case Button Pressed
        call 7.4 View Case Picture(Case Picture)
      else if Append Notes Button Pressed
        call 7.7 Attack Notes
      else if Print Button Pressed
        call 8.7.2 Format Document For Printing(Document)
      else if Return Button Pressed
        return to calling function
      else if Cancel Button Pressed
        call 8.1 Display Search Form(Main Document Database)

    8.7.2 Format Document For Printing

      Input : Document
      Output: Print Job

      Generate report for printer user Document
      Send report to printer
9.0 Options
  9.1 Display Options

    Input : User Data
    Output: Old Password

    Display All User Options
    wait for User Input
    if Change Password Button Pressed
      call 9.2 Enter Old Password(Old Password)
    else if Ok Button Pressed
      Write Updated User Data to User Database
    call 3.2 Display Main Interface

  9.2 Enter Old Password

    Input : Actual Old Password
    Output: Nothing

    Display Enter Old Password Form
    Wait for Old Password from User
    if encrypt(Old Password) matches Actual Old Password
      call 9.3 Enter & Confirm New Password
    else
      return to Calling Function

  9.3 Enter & Confirm New Password

    Input : Nothing
    Output: Nothing

    Display Enter & Confirm New Password Form
    wait for user input
    if First Password matches Second Password
      Write encrypt(New Password) to User Database
      call 9.1 Display Options(encrypt(New Password))
  Input : Nothing
  Output: Nothing

  If System Shutdown should be Verified
    Display Confirm System Shutdown Form
    Wait for User Input
    if Shutdown not confirmed
      call 3.2 Display Main Interface
  call 11.0 Shudown System
11.0 Shutdown System
  Input: Nothing
  Output: Nothing

  Close all databases
  Shutdown system.
Overall system structure chart
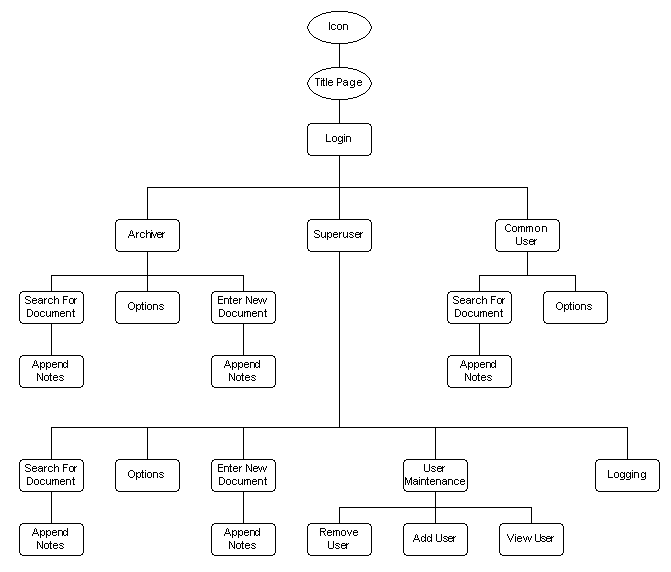
Links to the relevant pseudocode sections can be found below each diagram.


Editing:
|
Web Design:
|
Skeleton Program:
|
Screen Shot Feedback:
|
Login:
|
User Security:
|
Remove User:
|
Add User:
|
User Information:
|
Logging Security:
|
Search Engine:
|
Search Results:
|
Document Information:
|
Enter New Note:
|
Document Archiver Editor Window:
|
Enter New Document Type:
|
P.I.G.S Main Screen:
|
Main Menu:
|
Scanned Image Editor:
|
Overall Design Document Reorganization
|
Glossary
|
Testing section:
|
Implementation section:
|
Corrections:
|
Management section:
|


Appendix III: Screen Shots
Screen Shots