
Cyrius Overload Productions
Presents

Police Information Gathering System
Overall Design Document


The Police Information Gathering System we propose will implement a graphical user interface type system targeted for the Windows 95/NT operating systems. Operation of the Police Information Gathering System will be intuitive to existing staff as it will emulate existing police documentation procedures as closely as possible. It is hoped that this will help minimize any learning curve that is associated with the implementation of any new system. Although the staff at Cyrius Overload Productions will always be on hand for training personnel in the use of any of their systems.
The Police Information Gathering System fulfills the following requirements:
A key advantage of the Police Information Gathering System is that it will consolidate the police departments case documentation into one central location. This will keep reliable management of all information across the entire breadth of the system. All staff will be informed with the latest data, allowing them to spend more time performing real productive work rather than just following administrative duties.
The Police Information Gathering System will enable administrators to have complete confidence in their case documentation resulting in more efficient use of department resources.
It is hoped that the proposed Police Information Gathering System will remain in use for many years. Features will exist which allow the creation of new document types. Hence, the system will remain useful as will be flexible enough to evolve with new department procedures.
Any suggestions, comments or expressions of likes and dislikes are, as always, welcomed. A detailed and complete system will be forthcoming in response to these comments, and we hope that the system fullfils all your present and future requirements.
We look forward to any final amendments you would propose.
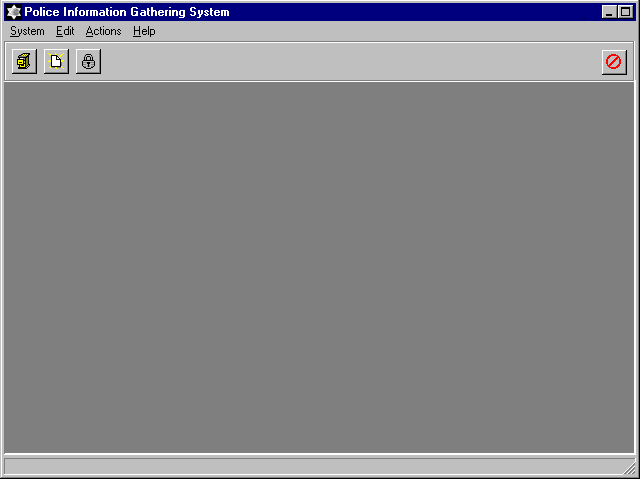
This screen is displayed once a user has logged in. It serves as the parent for all other windows within the Police Information Gathering System. It is composed of five major components:
This displays the name of the application and contains the windows buttons (maximize, minimize, etc.). Note that this bar does not contain an exit button (the windows button, resembling an 'x', that is used to exit the application. This is because the application is meant to be exited by the Superuser only (via the Shutdown System command in the 2.1.2.1.1 System Menu ).

This menu contains all the major commands for the Police Information Gathering System. A main menu topic can be selected by holding the Alt key down while pressing the underlined character. Once a menu is selected, pressing the underlined character causes the choice to be selected.
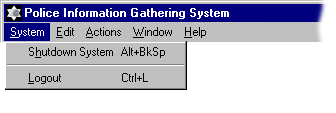
This menu contains all commands which affect system execution.
Closes the Police Information Gathering System. This command will only be visible to super users, since other users shouldn't be able to shutdown the system.
Logs the current user out of the system. The main interface screen is then hidden and the login box is re-displayed. Note that the logout button on the toolbar also performs this operation.
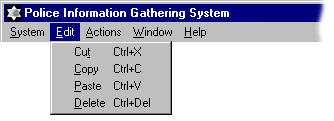
This menu contains all commands to manipulate text. It is the standard windows Edit menu.
Cuts selected text to the clipboard, where it can be retrieved by the paste command.
Copies the selected text to the clipboard, where it can be retrieved by the paste command.
Retrieves text from the clipboard and inserts it at the current cursor position.
Deletes selected text. Once deleted, text can not be retrieved.
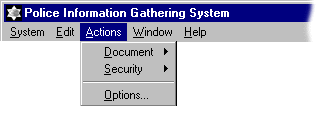
This menu provides access to all core system operations. The operations contained in this category will change according to the user access level (i.e. the menu will only show commands pertaining to the user's level). Superusers will be able to see all choices discussed below. Archivers will only see the Document submenu, while all other users will only see commands to search and append notes.
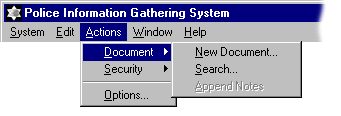
This submenu provides access to all operations involving documents.
Creates a new document and displays the archiving window to allow for document entry. This is equivalent to pressing the Archiving button on the toolbar. This choice is visible to Archivers and Superusers only.
Displays the search window, which allows a multiple parameter searching for a document. This is equivalent to pressing the Search button on the toolbar. This command is visible to all users.
Appends new notes to a document. All levels of users can see this command, but it is only enabled when a document is displayed in the currently open window.
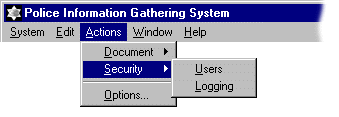
This submenu contains all commands dealing with security. This submenu can only be seen by Superusers. On choosing any item within this group, the security window is displayed, with the appropriate tab selected. The security window can also be activated by pressing the Security button on the toolbar.
Displays the security window with the Users tab selected. This window allows users to be added, deleted or modified.
Displays the security window with the Logging tab selected. This window contains logging configuration.
This displays a window which allows configuration of system options. The options window will be designed at a later stage. This is only visible by Superusers, as it involves system configuration.
 This menu provides options available to and information about currently open windows.
Cascades all currently open windows, one on top of the other.
Tiles the currently open windows, so that all space within the main form is taken up and all windows are displayed.
Organizes the icons of minimized windows.
2.1.2.4.4 Currently Open Windows
The names of currently open windows are displayed below the separator bar. (In the above example, the Search, Document Archiver Editor and Security windows are all open). By typing the associated number or clicking the window name, the desired window becomes active.

This menu displays all information regarding access to online help. Note that context sensitive help can also be initiated at any time by pressing a help button or hitting F1 (function key 1).
Displays an index of topics contained within the online help.
Shows a dialog box containing copyright and production information about the Police Information Gathering System.

These icons are for frequently used functions. The toolbar allows quick access to the major operations within the Police Information Gathering System. When a button is clicked, its associated action is performed. Each button will have it's own 'Tool Tip'. These tips briefly explain what the button does, and are displayed when the mouse pointer rests over the button for some period of time. The buttons that are displayed will vary with the current users' access. The logout and search buttons will be visible by all users. Superusers and Archivers will also see the Archiving button. Only Superusers will see the security button.
Displays a blank search window. This form can then be filled to search for a document or a range of documents. The search form can also be displayed by selecting Action then Document then Search from the main menu.
Creates a new document and displays the archiving window to allow for document entry. This is equivalent to choosing Actions then Documents then New Document from the main menu. This button is visible by Archivers and Superusers only.
This button can only be seen by Superusers. When the security button is pressed, the security window is displayed, with the User tab selected. The security window can also be activated by selecting Actions then Security and either Users or Logging.
This button will log the user out of the system, terminating their session and redisplaying the System Login dialog box. This may also be accomplished by choosing Logout from the System menu on the Main Menu.
When windows are displayed (i.e. when the search button is pressed), they will appear within the dark grey client area. If a window is minimized, it's icon will appear at the bottom of the client area. Should windows extend beyond the edges, scroll bars will appear, making the client area virtually limitless in size, regardless of the physical display size.
Concise information will appear in the status bar when needed. For example, when the mouse is over the Search button on the toolbar, the status window will contain "Search for an Existing Document". This provides easy navigation of the system and quick learning of all features.
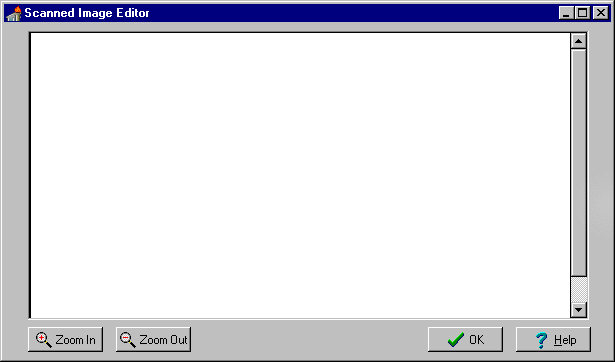
The scanned image viewer screen is used to display the images stored in the systems archive. Any user with access to PIGS may use this screen. The user may zoom in or out of the image, and also scroll through the image. The image is displayed as its actual size (100% Zoom), this means each single pixel in the scanned document will be represented by one pixel on the screen. The different levels of zooming are 25%,50%,100%,200%,400%.
The 100% zoom is the actual full screen image of the document. A 200% zoom will enlarge to document to twice its size allowing you to view only 25 percent of the full page at one time. The 400% zoom will further enlarge to document to allow viewing fine details such as signatures. Once the document is zoomed to 400% the Zoom In button will be disabled.
Due to scanned images being very large in both physical size and display size zooming out will decrease the document size. A document in 50% zoom mode will shrink to a half the size allowing a broader picture. As well a 25% zoom mode will allow even a greater overall picture.
When the OK button is depressed the scanned image viewer closes.
Increases the window size to take up the whole screen.
Restores a maximized window to it's original size.
Reduces a window to a small icon.
Closes a window. This is equivalent to pressing the Cancel button in most cases.
Used to scroll around a box when the contents are larger than the physical size of the box (i.e. a zoomed in view of a document in a small window). The boxes within the scroll bars can be clicked and dragged to move the item within the box.
By hitting the Help button, help pertaining to the current window is displayed. i.e. the help changes depending on the context.
By hitting F1 (function key 1) or selecting Help Topics from the main menu, the general help is displayed. This includes an overview of the entire system as well as an indexed list of commands for which help is available.
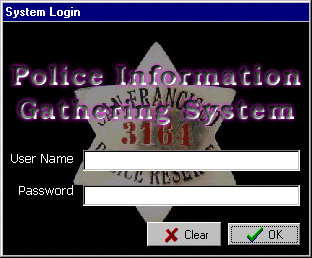
A system login is required for a user who wishes to enter the Police Gathering Information System. A successful login to the system requires a valid username and password. Each security level has a different main menu, and in order for the system to load the correct main menu the system will require this information to associate with a security level.
The user name is the actual name of the user, for example if the name of the user logging in is Joe Smith, the user name is "Joe Smith".
A valid password is one that is 3-10 alphanumeric characters. The first character must be alphabetic.
This button clears the User Name and Password boxes.
Upon clicking this button an attempt to access the system with current name and password will be made. The system will verify that the user name and password entered was correct. If the user name was not contained in the database a failed login dialog box will be displayed. Similarly, a dialog box will be displayed if the User Name field is blank. If the attempt was unsuccessful due to the user entering in an invalid password, it will be recorded in a login file, and a failed attempt will occur. Otherwise, if both user name and password are valid, the user is granted access into the system.
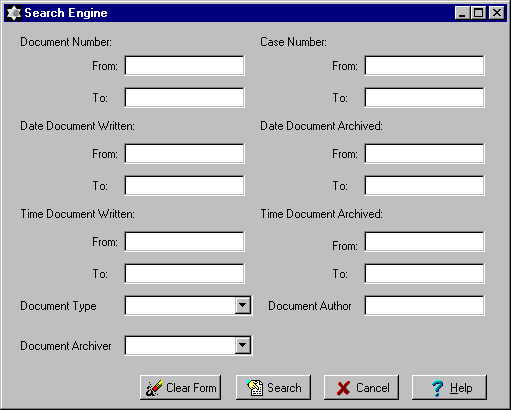
The search engine is the first stage in finding a document. If the user does not have a specific document in mind, the user may perform a search on any document information, except for information contained in the scanned image or appended notes. Documents that are found using this search engine will be displayed in the Seach Results table for the user to choose from.
Searches for a document number, the user must enter the number, making sure that the string entered is composed of numbers. If the user wants to search for a specific number then the user just has to enter the number. i.e.: 1234221 If the user wants to search for a range of documents then the user must choose the range button and enter the starting number in the "From" filed and the ending number in the "To" field.
i.e.: From: 213 TO: 555
When searching for a Document Number it must be noted that any other field will not aid in the search, since when Document number is used for search it is the primary and only key required for the search. Therefore all other fields will be disabled. If there are no documents which do not meet the search criteria, the appropriate dialog will be displayed.
Error Checking:
When an incorrect character is entered (non-numeric), a dialog box will display an error message informing the user of the error. At this point the user has the choice to re-enter the document number. For the range search if the number entered in the "From" box is greater than the one entered in the "To" box the search will return the document number in the "From" box.
This field may be used along with one or more fields to narrow the findings of the search with the exception of 4.1.1.1 Document Number. The required input for this field is the author's name and/or last name. i.e.: Molina, Alejandro. If the user does not know the complete name or last name then they may use the "*" option to do the search (i.e.: aleja*). This will return all the documents which contain aleja+any combination of characters. If no documents are found using Document Author the search will display nothing based on the documents author.
Error Checking:
When an incorrect character is entered (non-alphabetic) a dialog box will display the error "Alphabetic character expected, press OK to continue". At this point the user has the choice to re-enter the name, enter a new name or to fill out any of the other fields of the search.
This field may be used along with one or more fields to narrow the findings of the search with the exception of 4.1.1.1 Document Number. The input for this field may vary depending on the users choice to search for a specific date or a range of dates when the document was written. If the user wishes to specify the year to search for, but not the month nor the day the user may enter *1997 in the From date field. The wildcard "*" key will allow the user to make the search fast and simple in case they don't know the specific date.
i.e.: 01/01/96
The output for this will be all documents made in January 1, 1996, unless other fields are chosen for the search in which case the search will be narrowed down. There is a second option in case a user wants to search for a range of days, years or months, then the user may enter in to the range and fill the "From" and "To" fields. At this point the user may still use the wildcard "*" to search for unknown specific dates.
i.e.: From 02/12/1992 TO */11/1997
The output for this search are all the documents written between December 2, 1992 to November 30, 1997, unless other fields are chosen for the search in which case the search results will be narrowed.
Error Checking:
When an incorrect character is entered (non-numeric) a dialog box will display the error "Invalid date: Numeric character expected, press OK to continue". At this point the user has the choice to re-enter the date(s), enter a new date or to fill out any of the other fields of the search leaving this one blank. If the user happens to enter a greater date in the "From" field that in the "To" field then the search will return only documents made on the date written in the "From field".
For this field the user must enter both the "From" and the "to" time, this will allow for fast and concise results.
i.e.: From 1:00 PM To 3:00 PM
This search will output all the documents ever entered in to the system within the specified time entered, unless the user uses other fields to narrow down their search criteria.
Error Checking:
When an incorrect character is entered (non-numeric) a dialog box will display the error "Invalid time: Numeric character expected, press OK to continue". At this point the user has the choice to re-enter the time, enter a new time or to fill out any of the other fields of the search leaving this one blank. If the user happens to enter a greater time in the "From" field that in the "To" field then the search will return only documents made on the time specified in the "From field". 4.1.1.4 Document Type
The document type field is displayed with a drop down menu from which the user may choose the specific document type to search for.
In the case number field the user may enter a specific case number to search for, or by using the wildcard "*" the user may widen their search.
i.e. : 1234
This will output a listing of all documents pertaining to this case number. 12* will output all documents pertaining to all the case numbers from 120 to the last case number's documents.
Error checking:
When an incorrect character is entered (non-numeric) a dialog box will display the error "Invalid Case Number: Numeric character expected, press OK to continue". At this point the user has the choice to re-enter the case number, enter a new case number or to the user may fill out any of the other fields of the search leaving this one blank.
The document Archiver field is displayed with a drop down menu from which the user may choose one of the names shown for the document archiver.
4.1.1.7 Date Document Archived
This field may be used along with one or more fields to narrow the findings of the search with the exception of 4.1.1.1 Document Number. The input for this field may vary depending on the users choice to search for a specific date(s) or a range of date when the document was archived. If the user wishes to specify the year to search for, but not the month nor the day the user may enter *1997 in the date field. The wildcard "*" key will allow the user to make the search fast and simple in case they don't know the specific date.
i.e.: 01/01/96
The output for this will be all documents archived in January 1, 1996, unless other fields are chosen for the search in which case the search will be narrowed down. There is a second option in case a user wants to search for a range of days, years or months, then the user may enter in to the range and fill the "From" and "To" fields. At this point the user may still use the wildcard "*" to search for unknown specific dates.
i.e.: From 02/12/92 TO */11/1997
The output for this search are all the documents written between December 2, 1992 to November 30, 1997, unless other fields are chosen for the search in which case the search results will be narrowed.
Error Checking:
When an incorrect character is entered (non-numeric) a dialog box will display the error "Invalid Date: Numeric character expected, press OK to continue". At this point the user has the choice to re-enter the date(s), enter a new date or to fill out any of the other fields of the search leaving this one blank. If the user happens to enter a greater date in the "From" field that in the "To" field then the search will return only documents made on the date written in the "From field".
4.1.1.8 Time Document Archived
For this field the user must enter both the "From" and the "To" time, this will allow for fast and concise results. i.e.: From 1:00pm To 3:00 PM. This search will output all the documents ever archived in to the system within the specified time entered, unless the user uses other fields to narrow down their search criteria.
Error Checking:
When an incorrect character is entered (non-numeric) a dialog box will display the error "Invalid time: Numeric character expected, press OK to continue". At this point the user has the choice to re-enter the time, enter a new time or to fill out any of the other fields of the search leaving this one blank. If the user happens to enter a greater time in the "From" field that in the "To" field then the search will return only documents archived on the time specified in the "From field".
The clear form button is used to clear all the contents of the form at once. The user may either tab to the button and then press the "enter" key or point and click with the mouse.
When pressed, the search button will start the search. The search button may be pressed by using the tab key in the keyboard until the button is highlighted or by pointing and clicking with the mouse. A dialog box containing a Cancel button and progress bar is then displayed showing the progress of the search. If at any point in time while the search is going on the user decides to cancel it, all the user has to do is to click on the cancel button. 4.1.1.11 Cancel Button
The cancel button is used to stop any type of ongoing process, when desired. To activate it the user may tab, until it is highlighted or the user may point and click with the mouse. The user is then return to the 4.1 P.I.G.S. Main Screen.
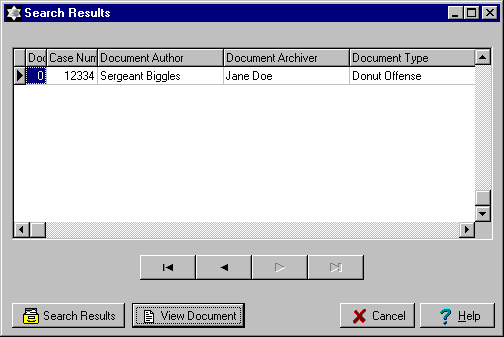
This displays the matched-document(s) that were made by the search process in 4.1.1 Search Entry Screen . This window will only be displayed when there is a successful search made by the user. An unsuccessful search will prompt the user with a dialog box. Entered data which matches at least one of the criteria from the document information will be display in tabulated form.
The document number is the first column header in the table. It references the document in the list. Either highlighting the document with a mouse click, or entering in the item number will choose a document in the list.
The case number column displays the case number associated with the item in the list.
This column will display the author of the original document.
This column displays the archiver who entered the document into the system.
The Document Type column displays the document type that the item in the list is associated with.
4.1.2.6 First Document Button This button will highlight the first document in the table. If the first document is already highlighted, or there is only one document in the list this button will be disabled.
4.1.2.7 Previous Document Button
This button will select the previous document to the current document. If the first document is already selected, or there is only one document in the list this button will be disabled.
This button will select the next document to the current document. If the last document is already selected, or there is only one document in the list this button will be disabled.
This button will select the last document in the list. If the last document is already selected, or there is only one document in the list this button will be disabled.
4.1.2.10 Search Results Button
This function button will allow the search engine (See 4.1.1 Search Entry Screen ) do a further search of the existing table of documents. If new search criteria is entered, only a search will be done on the existing items in the list.
If a document is highlighted this button will be active to the user. If the user activates this button the document information will appear.
The cancel button will return the user to a new search engine form, where the user will be able to begin a new search.
 This displays specific information about one document. It also allows the user to append notes and view the original scanned case.
Activating this button will display 4.1 Scanned Image Editor window. This window displays the original scanned image that the archiver scanned into the system. Scanned images cannot be edited.
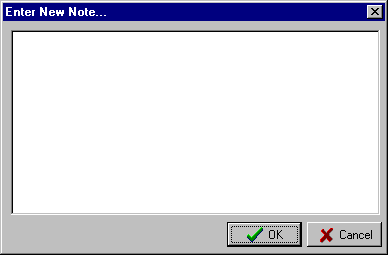
This button will allow the user to add additional information to a document by bringing up the Enter New Note dialog. A memo number, the current user, date, and time will be will be assigned to each newly appended note.
This button displays the first document from the search table. If there is only one search result or you are at the top of the table this button will be disabled.
4.1.3.4 Previous Document Button
Clicking this button displays the previous document from the search table. 4.1.3.5 Next Document Button
The next document button will display the document which follows the current document from the search table.
Clicking this button displays the last document from the search table. If there is only one search result or you are at the bottom of the table then this button will be disabled.
Pressing this button will return the user to 4.1.2 Search Results window. The current document will remain active.
Displays the unique number for each document.
Displays the case number for the active document.
Displays the document type associated with the current document (i.e. Homicide).
Displays the name of the officer (last,first name) who created the original document.
4.1.3.12 Date Document Written
Displays the date(DD/MM/YYYY) that the offence occurred.
4.1.3.13 Time Document Written
Displays the time(HH:MM in 24-hour format) of the offence.
Displays the archivers name(last,first name) who entered the document into the system.
4.1.3.15 Date Document Archived
Displays the date(DD/MM/YYYY) when the document was archived into the system.
4.1.3.16 Time Document Archived
Displays the time(HH:MM in 24-hour format) the document was archived into the system.
This pull down box is used to display a list of notes pertaining to the document. Users highlight the specific note they wish to view. The associated note then appears in the Notes Dialog Box.
Displays the specific text of the note made by officers pertaining to the active document.
4.2.1 Document Archiver Edit Window
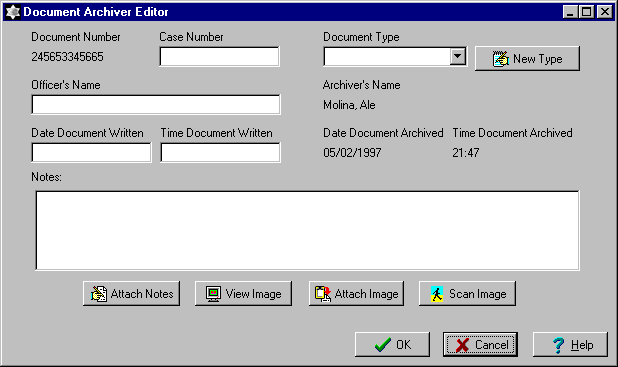 This window appears to any user cleared to add documents to the system when they select the Add Document operation. It is the window in which all the key fields of the document database record are entered. There are some parts of the record which appear on the screen but can not be edited:
Each police case has a unique identifying code associated with it, and this code is entered in the Case Number field. The system allows for the possibility that there may be more than one report filed for each case, and so the case number need not be unique in the system. The case numbers may also be alphanumeric rather than just numbers. The legal characters for this field are digits, upper and lowercase letters and the dash ('-') character. For reasons of searching efficiency, the system must impose a fixed maximum length of 32 characters in this field. There is also a minimum length of 1, because this field must not be empty. If the user tries to type an invalid character in the field or tries to type more than 32 characters, the system simply beeps and ignores the keypress. If the user tries to add the document to the database by clicking the OK button (described below) without having a valid case number in this field, the system displays a dialog box saying "Document must have a Case Number" and places the editing cursor in this field when the user clicks the OK button on the dialog box.
4.2.1.2 Document Type Pulldown Box.
Each report saved in the system has an associated type, which is typically the name of the crime described in the document. By selecting the pulldown list button at the right end of this field, the user is presented with a scrollable list of document types the system currently knows about. The user may select one from this list, at which point it is automatically placed in the field. Direct editing of the field is not possible, though new document types may be created with the New Document Type Button.
4.2.1.3 New Document Type Button
Beside the Document Type field there is a "New Type" button. Selecting this button will take the user to another window that allows them to add a new type to the list.
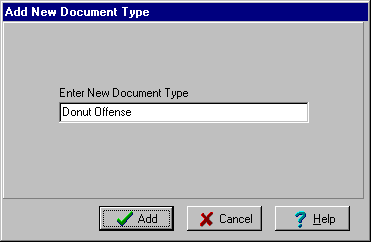
In this field the user types the name of the officer who filed the paper report that is being transcribed into the system. This field must not be left blank. The maximum length allowed is 40 characters. Only alphabetic characters are allowed. Little error checking is done on this field, other than that it must be non-blank like the Case Number field (above). As above, if the user tries to type more than the maximum number of characters, the system simply beeps and ignores the extra input.
This fields is used to record the date the officer (whose name is in the Officer's Name field) wrote the original paper document. This is a text entry field, but a specific format must be used so that the system can convert the data to its internal representation of dates. The Date Document Written field must be filled in the form DD/MM/YYYY, where DD is the day as a number (1 to 29, 30 or 31 depending on the month), MM is the month from 1 to 12 (for January to December), and YYYY is the year (i.e. 97). Valid characters for this field are the digits 0 to 9 and the slash ('/') character. An invalid date is one that is in the future or one that did not exist. For example, the date 16/09/3001 is in the future (as of this writing) and 29/02/1997 is non-existent because February has no 29th day in 1997. In the event of an invalid date being entered, a dialog box pops up saying so, and when the user selects "OK" to close the dialog box, the editing cursor is automatically placed in the offending field. Also, a date that is typed in some way that the system cannot understand it is considered invalid. i.e. 1//1996 would be an invalid date because the month number is missing. 4.2.1.6 Time Document Written
This fields is used to record the time the officer (whose name is in the Officer's Name field) wrote the original paper document. This is a text entry field, but a specific format must be used so that the system can convert the data to its internal representation of time. The Time Document Written field must be filled in the form HH:MM where HH is the hour from 0 to 24 and MM is the minute from 0 to 59. Valid characters for this field are the digits and the colon (':') character. In the event of an invalid time being entered, a dialog box pops up saying so, and when the user selects "OK" to close the dialog box, the editing cursor is automatically placed in the offending field. An invalid time is one that is not in the range of 0:00 to 23:59. Also, a time that is typed in some way that the system cannot understand it is considered invalid. For example, if the user typed 1:2:59 in the Time field, the system would not know how to interpret it because it does not record seconds.
This is a free-form text entry area where the document archiver can enter and comments that are attached to the paper crime report. The Notes field has a fixed width of 60 characters, but no maximum length. If there is more text than will fit in the box (as there usually will be), the system automatically adds a scroll bar to the box and the text will be automatically wrapped. Comments can always be added to the Notes field in the future by users with appropriate security clearance. However, once the record is saved to the database the newly entered notes become read-only. That is to say, users can add to the notes but may not modify previously entered notes. The system automatically adds a line in the Notes field which shows the date and time at which a new block of notes was entered. The ENTER, TAB and ESC keys behave differently when editing the Notes field. The ENTER key inserts a blank line and moves the cursor to the start of that line, and the ESC key leaves the comment editing mode without cancelling what was typed. Rather than moving to the next field or button, the TAB key performs indentation as in a text editor. No error checking is done on this field. All printable characters as well as formatting codes like tabs and carriage returns are valid.
Clicking this button pops up a file selection window that lets the user locate and read in a text document containing pre-typed comments for the Notes field. Provided the selected document contains valid characters for the Notes field (i.e., is actually a text file), its contents are added to the Notes field as if they had been typed from the keyboard. If the selected file is not readable as plain text, a dialog box pops up saying so and the user is placed back in the Document Archiver Editor window.
In the final complete system, selecting this button will allow the user to operate a scanner attached to the computer in order to scan in an image of the paper document. This function will not be implemented for the demonstration system.
This button causes a file selection window to pop up so that the user can select a pre-scanned document image for inclusion in the database. If the selected file is not an image format understood by the system, it will pop up a dialog box that says so, and the user will be returned to the Document Archiver Editor window. If the image is readable, the file selection box closes with no error message.
Selecting this button leads to the image viewing window, described elsewhere. That window allows the user to view the document image that was scanned or read in using the Scan Image or Attach Image buttons. An image must be attached to every database record, since each record is meant to be an electronic representation of a paper document. See 4.2 Scanned Image Viewer 4.2.1.12 OK button.
When the user has finished entering all the relevant data, he or she will click on the OK button to add the new document record to the database. At this point, and error checking on field contents that has not yet been performed will be done. If there is an error in any field, the filing operation will be aborted and the editing cursor will move to the first incorrect field so that the user can fix the error. A dialog box pops up to indicate what type of error was found. If the error is that there is no image attached, the error dialog box will say that an image must be scanned or attached to every new document, and that the Scan Image or Attach Image buttons can be used to accomplish this.
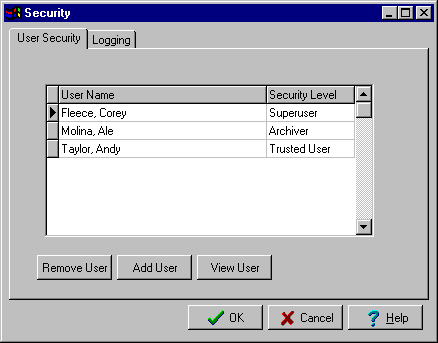
The User Security Screen is an information screen designed for the superuser to add, remove, modify and view current users of the system.
The main user list contains three columns, the first of which designates the currently selected user. The second field contains the names of all the users that currently hold accounts on the system. This list of users is in alphabetical by the last name of the user. The third field contains the users security level. A user may be selected by clicking on the appropriate row.

Removing a user from the PIGS database is done by a superuser through the Remove User form. The user to be deleted is selected in the main user list. Upon pressing the Remove User button, the information of the user to be deleted is displayed in a dialog box and the Superuser is asked for confirmation of deletion.
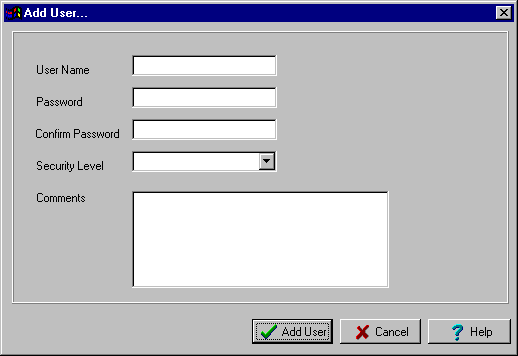
This window allows a superuser to create a new user account. The new account permits a person who currently does not have access to the system . The security level of the new user is determined by the Superuser.The new account is created with a user name that must be unique, a security level that can only be changed by the Superuser, a comment field that can only be viewed by the Superuser, and a password that is told to the user so that they may log on. When the new user logs on for the first time, he or she is immediately prompted to enter a new password. Pressing ESC in any field will clear the field in text entry mode. This amounts to a field-level cancel operation. The contents of all fields can be revised until either the Close/Cancel or Add User operation is selected.
In this text field, the Superuser enters the unique user name of the new user. This user name is the actual name of the person. In the case that there may be more than one person with the same name, a middle name or portion thereof may be used to authenticate the user name. There are system-imposed restrictions on the format of the login name. It has a maximum length of 40 characters, a minimum is not explicitly imposed because most people have names longer than one letter, though creation of users with no name will not be permitted.. Case is ignored when dealing with user names, and they are stored in lowercase within the system. The only valid characters for this field are the upper and lowercase letters, the digits 0 to 9 and the blank character.If the person entering the name tries to type a name that is too long or tries to type an invalid character, the system will not accept the input and prompt the superuser of the error and return to the offending field. The help screen for this window will have a note describing what characters are valid for this field.If the Superuser moves to another field or closes the windows by hitting the Add User button (described below), the system checks to see if the login name that has been entered is unique. If it is, the requested action proceeds. If not, a dialog box will appear containing the message "User Name is already in use! Please re-enter." and will have a single "OK" button. When the OK button is clicked, the Superuser will be back to editing the User Name field.
This text entry field is where the Superuser types the initial password that the new user will use. The password must be 3-10 alphanumeric characters. The first character must be alphabetic. The password is case-sensitive, and may contain any printable non-control characters (i.e. letters, digits and symbols but not carriage returns). When the password is being typed, only asterisks are displayed - one for each character typed. This is a security feature to help prevent anyone nearby from seeing the password. The error checking on this field is done in conjunction with the checking on the Confirm Password field, and will be described below. If the person at the keyboard tries to enter a password that is too short, however, a dialog box pops up saying "Password is too short". This box has an OK button which, when clicked, returns the Superuser to editing the password. Similarly, if a password is too long a warning dialog will inform the user that the password will be truncated. The password entered here should be known only to the Superuser at the time it is entered, and should be generated by that person using some scheme known to nobody else. Once the new user account has been successfully created, the Superuser can tell the new user what the password and login name are. The new user will then log in using that information, and change his or her password to something unknown to anyone else.
4.3.1.3.3 Confirm Password Field.
Since only asterisks are displayed when the password is being typed in the Password field, it is hard to be sure it is typed correctly. The Confirm Password field eliminates this problem. Here the Superuser retypes the same password, with the same valid characters and same display of asterisks as above. If the two passwords to not match exactly, the system displays an error dialog box saying "Passwords do not match" with an OK button. When the Superuser clicks on the OK button the system returns to editing this field.
4.3.1.3.4 Security Level Select Box.
This field is used to set the security access level of the new user. At the right end of the field is a button which, when clicked, expands to a list of valid security levels. The Superuser may then use the mouse or the cursor keys to select from the list. Typing directly into this field is not allowed by the system.
This is a multi-line, freeform text area that can optionally be used to record comments about the new user. Only people with Superuser security levels will be able to see and modify this field. When this field is active for editing, comments can be typed as in a word processor and the mouse can be used to move the cursor. The ENTER and ESC keys behave differently when editing this field than in other cases. Pressing ENTER inserts a new blank line and positions the cursor at the start of that line. Pressing ESC leaves comment-editing mode and allows the Superuser to select operation in the Add User window (this can also be done directly using the mouse). If the Superuser wished to completely discard what has been typed in the comments, he or she must either manually delete the text or cancel the entire Add User operation.
Clicking the mouse on this button or Tabbing to it and pressing ENTER will cause the system to create a new user record in the user database with the information provided in the Add User window. It should be noted that if error checking has not yet been performed on the User Name, Password or Confirm Password fields, it will be done when the Add User button is activated. If there is an error, the Superuser will be informed as described in the rel evant sections above, and the Add User operation will not take place until the errors have all been corrected. Control now returns to the user Secutiry Window where the newly created user will now be displayed in the main user list.
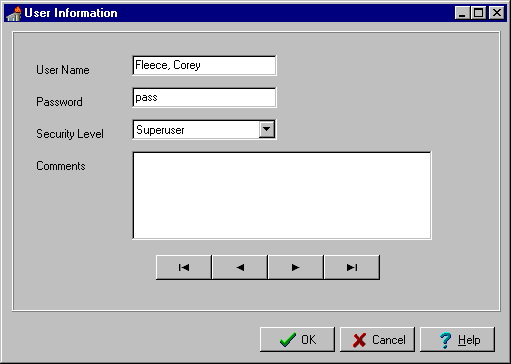
The User Information Window is displayed after the superuser choose the View User button on the 4.3.1 User Security window. The purpose of the this menu is to allow a superuser to view and to modify information of any user in the database.
User names can be modified by clicking on the field and typing in any changes that are desirable. The user name field is limited to 40 characters and the user must be present in the database. Changing a user name requires validation by the system to insure that the new user name is not already on the system. See 4.3.1.3.1 User Name Field for user name requirements.
Passwords can be modified by clicking on the field and typing in changes. Upon entering a password a dialog will confirm the new password. See 4.3.1.3.2 Password Field for password requirements.
The Security level field different from the others, it contains a drop down box, which has a static list of valid access levels that the user can choose from.
Comments of any kind can be created or modified and are stored as part of the user's information.
This button displays the first user in the database. If there is only one user or you are at the beginning of the database this button will be disabled.
Clicking this button displays the previous user from the database. If the current user is at the beginning of the data base this button will be disabled.
The next user button will display the user which follows the current user in the database. In the case that the user is at the end of the data base this button will be disabled.
Clicking this button displays the last user in the database. If there is only one user or you are at the end of the database then this button will be disabled.
Returns the superuser to 4.3.1 User Security dialog.
Quits the security program without saving any of the information changed in any of the user security features of this window
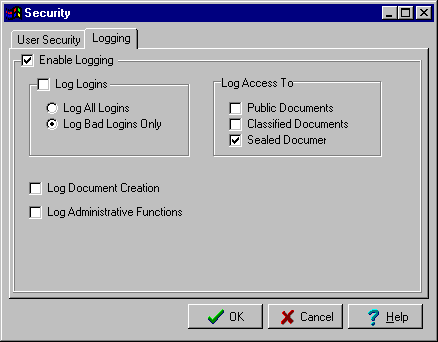 The logging information allows the superuser(s) to keep track of who is accessing what information, and when it is being accessed from the system. This logging information is only allowed to be changed by the super users. Also the super user is the only
user allowed to view the log files. The log files contain information depending on which options are chosen in the logging security screen.
The logging information allows the superuser(s) to keep track of who is accessing what information, and when it is being accessed from the system. This logging information is only allowed to be changed by the super users. Also the super user is the only
user allowed to view the log files. The log files contain information depending on which options are chosen in the logging security screen.4.3.2.1 Enable Logging Check Box
By clicking on this box, the system will know to set the appropriate flag which will allow information to be written to a log file that only the Super User can access. If this box is not clicked, no login information will be recorded to a log file and all other options on this form will be disabled.
By clicking on this box, the System will direct the user login information to be written to the log file. If this box is not clicked, no login information is recorded about users that are trying to get onto the Police Information Gathering System.
4.3.2.3 Log All Logins Radio Button
By clicking this box, the system will record all user logins to a log file that is readable by the Super User. This is a radio button, only one can be selected at a time (i.e. The button toggles back and forth.)
4.3.2.4 Log Bad Logins Only Radio Button
By clicking this box, the system will record all user logins that failed to have the correct password. This information will be recorded to a log file. This is a radio button, only one can be selected at a time. (i.e. The button toggles back and forth.)
4.3.2.5 Public Documents Check Box
By checking this box, this sets a flag to show whenever Public Documents are looked at. The information written to a log file will consist of who is accessing the document, day and time the document was accessed, and what document was accessed.
4.3.2.6 Classified Documents Check Box
By checking this box, this sets a flag to show that whenever Classified Documents are looked at. The information written to a log file will consist of who is accessing the document, day and time the document was accessed, and what document was accessed.
4.3.2.7 Sealed Documents Check Box
By checking this box, enables the system to show that whenever Sealed Documents are looked at, there is information written to a log file recording that the sealed document had been accessed. The information written to a log file consists of who accessed the document, time and day the document was accessed, and what document was accessed.
4.3.2.8 Log Document Creation Check Box
Whenever an archiver or superuser adds a new document to the system, information is recorded to a log file. The information will consist of Document Author, time archive, date archived, and document number.
4.3.2.9 Log Administrative Functions Check Box
By clicking on this box, Whenever administrative functions are performed on a document, information is recorded into a log file. Administrative functions will consist of viewing documents, appending notes to documents, adding users to the system, removing of users from the system, changing the level of security of a user.
By choosing this button, the superuser is confirming that the selected options are to be used in logging the system actions. The superuser is then returned 4.1 P.I.G.S Main Screen .
After this is clicked, all the old information is going to be displayed in the boxes, not saving any of the new information and reloading the old. The superuser is then returned 4.1 P.I.G.S Main Screen .
See 4.2 Common Users .
See 4.3 Archivers .
Editing:
Web Design:
Skeleton Program:
Screen Shots:
Screen Shot Feedback:
Login:
User Security:
Remove User:
Add User:
User Information:
Logging Security:
Search Engine:
Search Results:
Document Information:
Enter New Note:
Document Archiver Editor Window:
Enter New Document Type:
P.I.G.S Main Screen:
Main Menu:
Toolbar:
Scanned Image Editor: