|
|
- Login Interface
- Main Menu
- Product Interface
- Orders Interface
- Inventory Interface
- Personnel Interface
- Security Interface
- Cashier's Window
- Stores Interface
- Glossary
- Credits
|
|
 When the system starts up, the user is presented with a window with fields
for entering his or her Employee ID number and Password. When these are
filled, the user then clicks on OK to get into the system, or cancel to
clear the fields. When the password is entered, asterisks are displayed
instead of the entered characters.
An incorrectly entered Employee ID or Password results in a dialogue box
being displayed which reads "Invalid ID number or Password", and then we
return to the Login Interface. On a correct entry of ID and Password, the
user is presented with the Main Menu.
 If the user clicks on OK with a blank password field, the Change Password
Interface is displayed. This interface has a field for the entry of the old
password (for security), the new password and verification of the new password.
If an employee forgets his or her password, a manager can clear his or her
password so that a new one can then be entered.
|
|
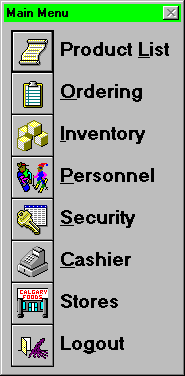 The Main Menu is a list of eight buttons which, when clicked on, display
interfaces for all of the different parts of GUIDOs.
- Product List
- Press to bring up the Products Interface.
- Ordering
- Press to bring up the Orders Interface.
- Inventory
- Press to bring up the Inventory Interface.
- Personnel
- Press to bring up the Personnel Interface.
- Security
- Press to bring up the Security Interface.
This button is greyed out for users with insufficient security.
- Stores
- Press to bring up the Stores Interface.
- Logout
- Press to exit the Main Menu. GUIDOs Login Interface is displayed. The system can now be accessed by a different employee of Calgary Foods.
|
|
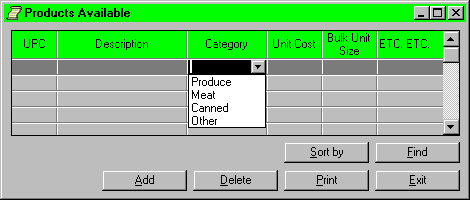 This window can be accessed by any managers, stockers or personnel people,
who log on to the system. However, each person will be given access
according to their security level to each specific button in the window.
(i.e stockers can not add product, so the ADD button will be greyed
out when a stocker logs on to the system.)
The table of products list will include UPC, description, category and cost per unit.
Under the window, there are six buttons. Each button will be greyed out if the user does not have the proper security level.
- ADD
- Press to add new product at the end of the table.
- DELETE
- The user first needs to highlight the product, then press the DELETE
button to delete the product. After the user presses the DELETE button,
a confirmation box will pop up on the screen to confirm the request.
- Conformation Box
- This box asks the user if this is the correct product to be deleted. This box will contain UPC and description of the product that is to be deleted. Press the DELETE button to delete the product, or CANCEL to exit the request.
- UPDATE
- First the user must select a field to change by clicking on it, which
then takes the user to edit mode in that field. After the user is done
changing the information the update button is pressed to save the new
information. If an error is detected in the input an error message will
appear and ask the user to re-enter the information.
- SORT BY
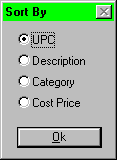
- Sorting the table to a specific order according to the user's will.
- SORT BY window
- There are two ways to sort the table, by UPC or by category. The user can choose one of these two choices then press OK to sort, or press CANCEL to exit the request.
- Print the table in the current order. This button will link to the
system print manager. It can be accessed by any store managers, stocker
or personnel.
- EXIT
- Returns to the Main Menu.
|
|
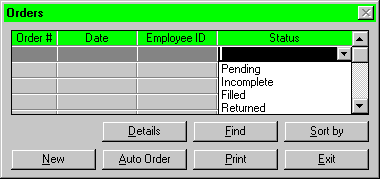 Clicking the Orders button on the main menu will bring up the orders screen.
This consists of a table which contains all of the orders currently in the
system as well as some buttons for manipulating orders. Any employee can
enter the orders screen, but only those with security access can modify
or create orders. Anybody without proper security will find all the
buttons except for SEARCH, SORT BY, PRINT and EXIT greyed out.
The table will have 5 columns - order number, date ordered, time ordered, employee number and status. The order number is what the table is initially sorted by, with the highest number (most recent order) first. Employee number is used to tell who made the order. The status of the order can be one of the following: pending (an order that has been sent to the warehouse), filled (an order that has been filled by the warehouse and sent to the store), complete (the store receives the complete order), and incomplete (part of the order is missing or damaged).
The buttons beneath the table consist of the following:
- NEW
- Used to create a new order. Brings up the NEW ORDER screen
The NEW ORDERS screen is set up as follows:
The current date and time are displayed in the upper left hand corner. The upper right hand corner displays the employee ID, the order number and the store ID. Each of these are set automatically.
On the left hand side of the screen is a table which displays the groceries database. This is the list of all possible products which can be ordered. However, the list only displays products in those categories which the user has access to order (hence, the meat manager will not even have the option of ordering fruit - only all the products that fall under his domain will be listed). This table will have 2 columns - UPC and product description. Immediately below this table is a FIND button which allows the user to quickly locate items in the list by searching on either the UPC or the description.
To the right of the groceries table is the table which holds the actual order being made. In between the two are left and right arrows. To add an item to the order, you select it from the groceries list and press the right arrow button. The item will then be copied to the new order table. The new order table has 2 columns - UPC and quantity. After making a product selection, you can edit the quantity box to fill in the quantity desired.
Finally, below the new order table is a SUBMIT button. When the order is done, the user clicks this button to save the order. This adds the order to the orders database and updates the big orders table on the previous screen. After the order has been submitted, the NEW ORDERS window disappears.
- UPDATE
- After the status of an order has been changed (by highlighting the order,
then editing the status field), this button updates the database.
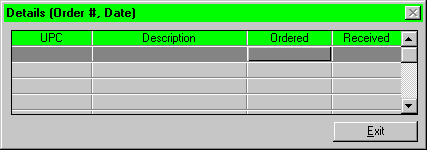
- DETAILS
-
This brings up a window which displays information about a highlighted
order. Information includes the UPC, description, and the number ordered
and number received of every component of the order. This window also has
three buttons in it:
- UPDATE
-
This updates the Orders database after changing the number received to
match what was actually received from the warehouse. If an order is
given a status of complete then all of the numbers in the number
received column will automatically equal the numbers in the
corresponding number ordered column. However, if an order is
incomplete, the details screen automatically pops up and the user
should manually enter how many of each item was received.
-
This prints the details of that order.
- EXIT
- This returns the user to the Orders Interface screen.
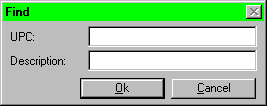
- FIND
-
This button allows the user to find a certain order or orders satisfying
the search criteria.
- SORT BY
-
This button allows the user to sort the table of orders based on the
contents of any column in the table.
- This button will print out the highlighted orders from the table.
- EXIT
- Returns to the main menu.

The NEW ORDERS screen is set up as follows. The current date and time are displayed in the upper left hand corner. The upper right hand corner displays the employee ID, the order number and the store ID. Each of these are set automatically.
On the left hand side of the screen is a table which displays the groceries database. This is the list of all possible products which can be ordered. However, the list only displays products in those categories which the user has access to order (hence, the meat manager will not even have the option of ordering fruit - only all the products that fall under his domain will be listed). This table will have 2 columns - UPC and product description. Immediately below this table is a SEARCH button which allows the user to quickly locate items in the list by searching on either the UPC or the description.
To the right of the groceries table is the table which holds the actual order being made. In between the two are left and right arrows. To add an item to the order, you select it from the groceries list and press the right arrow button. The item will then be copied to the new order table. The new order table has 2 columns - UPC and quantity. After making a product selection, you can edit the quantity box to fill in the quantity desired.
Finally, below the new order table is a SUBMIT button. When the order is done, the user clicks this button to save the order. This adds the order to the orders database and updates the big orders table on the previous screen. After the order has been submitted, the NEW ORDERS window disappears.
|
|
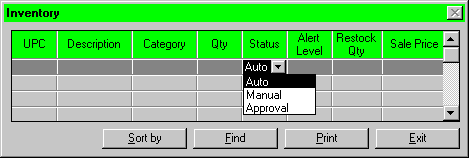 The inventory screen is used primarily for viewing the current inventory.
When it is accessed a scrolling table will appear before the user containing
all the information available for any particular inventory item. The fields
that will display per item include:
- UPC
- The Universal Product Code is used to identify the item
ex. 0-66343-00990-2 - Description
- A short description of the item
ex. Old Dutch Jalapeno Chips - Category
- The category that the item is specified to
ex. Snack food - Quantity
- The number in stock for an item in the store
ex. 100 - Sale Price
- The price/unit that the grocery store is selling it for
ex. $0.75 - Alert Level
- The level in which reordering occurs
- Target Restock Quantity
- The amount of stock to reorder at
The user can use the scroll bar on the right of the table to scan through the inventory. He/she may also click upon any field other than UPC and change the contents of that field. For example one could alter the Sale Price for a sale. But these changes will not affect the database until the UPDATE button is pressed. The screen also includes a number of other buttons listed below:
- FIND
- Upon selection of this button a pop-up window will apprear with two
boxes prompting the user to enter either a UPC code and/or a Description
of the product they want to searched for. The user then hits OK to process
this request and the table then searches to the specified product (if
found) and highlights it on the table. The user can also hit CANCEL to
exit the request.
- UPDATE
- This button has privilege restrictions in that it can be inaccessible
to certain access levels (see Security Window). When a user makes changes
to any field in the database the update button will save those changes to
the master database when it is possible. Some security levels also have
higher priority on updating the master database so this operation may have
wait for other updates to complete.
- The Print button will display a common print options box. After
choosing the destination for the print job and pressing OK, a print out
will be produced in a simple format displaying all the information that
is seen in the table.

- SORT BY
- Sort will display a pop-up window that will prompt the user for the
field at which to sort by. There are six buttons. The first four are the
possible fields and the user can choose one and only one of either UPC,
Category, or Sale Price. The next two fields are for either ascending or
descending sort. One and only one of these must be chosen as well for a
proper sort. When the SORT button in this menu is pressed then the sort
will occur and the results displayed on the table.
- EXIT
- This button simply returns you to the Main Menu.

|
|
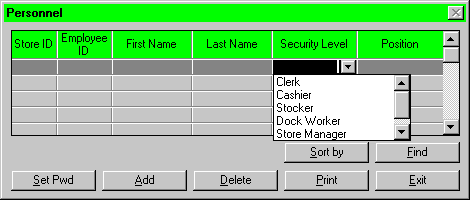 The personnel screen displays information on employee. The following
information is displayed in table form of each employee: first name,
last name, ID number, security level, position, and store ID. A scroll
bar is displayed on the right side if there are more employees than can
be seen on the actual screen. Below the table information is a row of
buttons to perform certain functions. They are:
- ADD
- When pressed a blank line will appear in the table above so a new
employee can be added. If an error is detected in the input an error
message will appear and ask the user to re-enter the information. Then
the update button must be pressed to save the new employee information.
- DELETE
- First the user must highlight one of the employees to delete, by
clicking on one of the lines in the table and then press the delete key.
A confirmation dialogue box will appear to make sure the selected employee
should be deleted.
- UPDATE
- First the user must select a field to change by clicking on it, which
then takes the user to edit mode in that field. After the user is done
changing the information the update button is pressed to save the new
information. If an error is detected in the input an error message will
appear and ask the user to re-enter the information.
- FIND
- When pressed a dialogue box, containing an ok or cancel button, will
appear with fields to enter the employee's name. If the ok button is
pressed the employee information will appear in the table. If the cancel
button is pressed the dialogue box is removed and no action is performed.
If the employee does not exist a message will appear to tell the user that
the employee was not found.
- SORT BY
- When pressed a dialogue box containg the list of all the employee
information fields with radio buttons next to each appears. The user then
clicks one of the buttons to sort on that field, or the cancel button to
do nothing.
- The Print button will display a common print options box. After
choosing the destination for the print job and pressing OK, a print out
will be produced in a simple format displaying all the information that
is seen in the table.
- CLEAR PASSWORD
- First an employee must be highlighted by clicking the employee then
a dialogue box appears asking the user to confirm that this employee's
password is to be deleted. If the ok button is pressed the password is
cleared, and if the cancel button is pressed no action is taken and the
dialogue box is removed.
- EXIT
- When pressed returns to the Main Menu.
If at anytime by pressing one of the buttons is an inapropriate action a beep will sound to indicate to the user that the function selected can not be preformed. For example pressing the delete button before a employee is hightlighted.
|
|
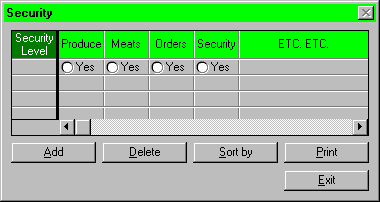
After pressing the Security button on the main menu, this screen will appear. The form displays the security levels currently available in the system. Employees can be assigned a security level within the Personnel form.
Along with a list of current security levels, there are several buttons which allow the user with access (usually a manager) to add new levels, delete old, or even sort or print the security levels listed.
Editing is performed directly on the table, by selecting the record and then editing the proper field. The security level itself must be unique and if not an error message will be displayed.
Each Security level consists of a collection of predefined accesses. The user can change the access ability of any of the security levels to his or her preference, which allows great flexibility in the security hierarchy in the system.
Accesses allow users to "access" particular sections of the system. If an employee is not allowed to order canned goods (for some reason or other) they can be given a security level where that access is disabled.
|
|
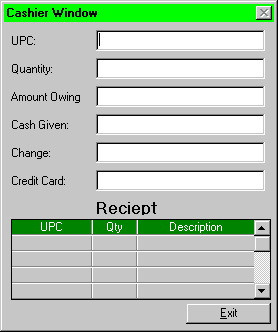
To simulate a series of purchases, we have constructed this crude interface to replace the till for the purpose of demonstration. The "cashier" types in the UPC of an item into the appropriate box, hits return, and then enters a quantity into it's box. When the "cashier" hits return after typing in the quantity, the amount owing is automatically adjusted in that box, and the purchase is added to the receipt.
The top part of the form entailing the input of the UPC and Quantity is then reset, and the cursor is made active in the UPC entry box, awaiting another transaction. Once the purchases are completed, the "cashier" can (by using the mouse), enter the cash given by the customer, whereupon the amount owing will be adjusted accordingly, and the calculated change will be output into the indicated box if necessary. The credit card # entry box is extraneous, but added to complete the simulation.
The receipt is a form generated to show the purchases made, and the subsequent changes that will be reflected in the database by these purchases. The receipt lists the UPC of the items, the QUANTITY purchased, the item and it's description. As well, the "cashier" can click on the fields to modify an entry. A modification will result in the amount owing and change being updated accordingly. The cashier can click on the UPC field of an entry in the receipt and delete it, thereby cancelling that particular purchase.
|
|

The Store's Window contains a list of store information with the ability to add, delete, update and print the information about a store. Within the list there are five fields which include store id, store name, store address, store manager and the managers phone number. Below the list are five buttons:
- ADD
- This button allows the user to add a store. When the user clicks on
the ADD button, a cursor will appear at the bottom of the current list
in the store id field. The user then enters the information for each
field by using the tab or arrow keys to move between each field.
- DELETE
- If the user wishes to delete a store, then that person must scroll
to the store he or she wants to delete, highlight it, and click on the
DELETE button. A message will then appear to confirm the users decision
to delete a store.
- UPDATE
- The user clicks on the UPDATE button to apply the addition,
modification, or deletion of stores to the actual database.
- If the user wants to print a listing of all the stores and information
then the user simply clicks on the PRINT button and a report is then sent
to the printer.
- EXIT
- When the user is finished editing the stores and wishes to return to the Main Menu then he or she clicks on the EXIT button.
If the user wishes to edit a store's information then the user must scroll to the store he or she wants to edit then click on it to highlight it. The user then makes any changes to that line of information and clicks on the UPDATE button to make the changes final. If during the editing process incorrect or incomplete data is entered, an appropriate error message window will be displayed.
|
|
- Field
- A field refers to a particular column of information.
Ex. Category and UPC are both fields. - Greyed Out
- Greyed out refers to a button to which a user doesn't have the security level to access, and is therefore rendered inactive.
|
|
- Login & Password Interface: Zac
- Main Menu: Zac
- Product Interface: Ben
- Inventory Interface: Joe
- Personnel Interface: Pat
- Security Interface: Tom
- Cashier Interface: Terry
- Screen Shots: Tom
- Amalgamation of Interfaces & 'HTML'izing: Zac
