Postal Code
As an option the user may also choose to modify publication subscriptions for that customer. To subscribe to a new publication the user selects a publication from the Publication List and copies it to the Subscription List. To unsubscribe an existing subscription the user selects a subscription from the Subscription List and copies it to the Publication List. As well the user can alter the current Delivery Status and the contents of the Notes text box. Note: in order for a customer to begin or continue to receive delivery of a subscription the Delivery status must be set to active.
To save any modifications the user selects the "Save" button from the button bar. All information within the fields is saved to the data base and the user is returned to the Search screen. To return to the Search screen without saving any information the user selects "Cancel" from the button bar.
Suspend delivery to a customer
Customers not wanting delivery for a specified period of time can contact the delivery service and request a suspension of delivery. From the Edit screen, the user changes the Delivery Status from active to suspended. As an option, the user can also enter the from and to dates of the suspension. The system automatically switches the users Delivery Status to active when the desired to date is reached. If no dates are placed in the date fields the Delivery Status is deemed to be suspended indefinitely.
Searching for a customer
Figure 1.3
To search for a customer or customers the user enters, within the Customer Information section of the Customer Search Screen (see Figure 1.3), information into one or several of the fields. As this information is entered the list of customers in the Customers List box is reduced to include only those that match the search criteria. If a search is successful, the Customers List box lists at least one customer. An empty Customers List box signifies a failed search.
To begin a new search for a customer or customers the user selects the "New Search" button. To modify an existing search the user can select any of the available fields and replace the existing information with new information.
Upon completion of a successful search, the user can edit the customer information by clicking the "Edit" radio button, as outlined above in "Editing customer information".
Modes and Buttons
New
Available only from the search mode. Enter this mode by selecting the "New" radio button from the button bar. The Customer Information fields are cleared and the Customers List is reset. The user can then enter available information for that new customer. The user must select "Save" or "Cancel" before returning to search mode.
Edit
Available only from search mode. Enter this mode by selecting the "Edit" radio button from the button bar. Any information within the fields, from the most recent search, can be modified by the user. The user must select "Save" or "Cancel" before returning to search mode.
Search
This is the default mode for the customer screen. When in this mode the user can select a customer from the Customers List or enter information in the Customer Information fields to reduce the size of the Customers List. The user can then select a customer from the Customers List provided it is not empty.
Delete
This button is available in the edit or search mode only. When "Delete" is selected, the system asks for confirmation to delete the current customer. The user is given the option to delete the customer from the database or to cancel.
Save
This button is active in new and edit modes only. When "Save" is selected the information which is currently displayed on the screen is saved to the database and the system returns to search mode.
Cancel
This button is active in new and edit modes. When "Cancel" is selected the information which has been entered or changed is ignored by the system and the program returns to search mode without modifying the database.
Help
This button is active at all times. When "Help" is selected a help window appears on the screen. The Help feature describes system usage. Note: The help facility is not implemented in this system.
Quit
This button is active at all times. Quit exits the program. If changes have been made but not saved the user is asked for confirmation to exit with or without saving, otherwise it exits the program.
New Search
This button is only active in search mode. When "New Search" is selected, all the fields in the Customer Information section are cleared and the Customers List is reset.
Subscribe
This button is active in new and edit modes only. It adds a currently selected item from the Publications List to the customer's Subscription List.
Unsubscribe
This button is active in new and edit modes only. It removes a currently selected item from the Subscription List.
Description of data fields
- Surname - the last name of the customer (e.g., Smith)
- Given name - the first name of the customer(e.g., John)
- Address - the Street address of the customer (e.g., 3715 Centre Street N, Apt B)
- City - the city the customer lives in, may be selected from a list of cities the company serves (e.g., Calgary)
- Province - the province the customer lives in, may be selected from a list of provinces the company serves( e.g., Alberta)
- Postal Code - a six digit form fill in (e.g., T2N 1A4)
- Route Name - the name of the route the customer is assigned to, maybe selected from a list of all routes
- Phone number - the customer's home phone number including area code (e.g., (403) 280-2763)
- Customers List - a listbox containing the names of customers according to the search criteria, in alphabetical order
- Publication List - a listbox containing the name of all publications offered and their cost
- Subscription List - a listbox containing the name and expiry date of all the customer's subscriptions
- Delivery Status - radio buttons which allow selection of Active or Suspended. >From - the date a suspension of delivery starts. To -The date a suspension of delivery ends (may be indefinite).
- Notes - a text entry box which can be used for miscellaneous notes the user may want to add about a customer.
[Return to Table of Contents]
Overview
When the user selects the Publication tab, the Publications Search screen appears (see figure 2.3).Note that the user must be in Search mode to select a new tab. The "Search" radio button is highlighted to indicate that the program is in search mode. The Publications Search screen is divided in two sections, Publication Information and Publication List. The Publication Information section contains 7 fields:
- Publication Name
- Publisher Name
- Distributor Name
- Distributor Phone
- Publication Type
- Publication Frequency
- Key Words
The Publication List section contains a list box which displays publications found in a search of the data base. Located below the Publications List box is an additional button, "New Search". When the button is pushed, all the fields in the Customer Information section are cleared and the Publication List is reset.
At the top of the screen we find the button bar. This bar contains a total of eight buttons, three circular and five rectangular. The three circular buttons indicate the current mode (New, Edit, or Search) and allow the user to change to any one of the modes. Of the five rectangular buttons only three are available for use in the Publications Search Screen. They are "Delete", "Help", and "Quit". The two greyed-out buttons, "Save" and "Cancel", are not used in this screen.
In addition to the Publications Search Screen there are two other screens that pertain to the Publications section. They are Publications New Screen (see Figure 2.1) and Publications Edit Screen (see Figure 2.2).
Both Publications New Screen and Publications Edit Screen contains 9 fields:
- Publication Name
- Publisher Name
- Distributor Name
- Distributor Phone
- Publication Type
- Publication Frequency
- Key Words
- Number of subscriptions
- Publication Description
As before, we find the button bar at the top of the screen. This bar contains a total of eight buttons, three circular and five rectangular. When the program is in new mode the "New" radio button is highlighted and the remaining circular buttons (Edit and Search) are greyed-out. Of the five rectangular buttons, only four, "Save", "Cancel", "Help", and "Quit", are options available to the user.
Similarly, when the program is in edit mode the "Edit" radio button is highlighted and the remaining circular buttons (New and Search) are greyed-out. The five rectangular buttons "Delete", "Save", "Cancel", "Help", and "Quit" are options available to the user.
Functions
Adding a new publication
Figure 2.1
To add a new publication, the user selects the "New" radio button from the button bar. The Customers New Screen (see Figure 2.1) then appears. The user enters, in the Publication Information section fields, all of the following information:
- Publication Name
- Publisher Name
- Distributor Name
- Distributor Phone
- Publication Type (e.g., Newspaper, Magazine)
- Publication Frequency (e.g., Daily, Weekly, Monthly)
- Key words (e.g., Automotive, trucks, Calgary)
- Number of Subscribers (default is zero)
- Publication Description
If the user does not completely enter all of the above stated information and tries to save the publication into the data base, then an error message appears informing the user that all information has not been entered correctly. The user is then given the option to enter the missing fields or to cancel the operation.
To save the new publication information, the user selects the "Save" button from the button bar. All information within the fields is saved to the data base and the user is returned to the Search screen. To return to the Search screen without saving any information the user selects "Cancel" from the button bar.
NOTE: Any mistakes that are not corrected here can be addressed by the edit function described below.
Deleting a publication
To delete a publication from the data base the user is offered two options. A publication can be deleted from the Search screen or the Edit screen. To delete a publication from the Search screen the user selects a publication from the Publication List box and then clicks on the "Delete" button. To delete a publication from the Edit screen the user simply clicks the "Delete" button. When the delete function is used all publication information in the data base is removed. In both cases the user ends up in the Search screen.
Editing publication information
Figure 2.2
To edit publication information the user selects, from within the Publications Search screen, the "Edit" radio button from the button bar. The user then edits any of the following fields:
- Publication Name
- Publisher Name
- Distributor Name
- Distributor Phone
- Publication Type
- Publication Frequency
- Key Words
- Number of subscriptions
- Publication Description
To save any modifications the user selects the "Save" button from the button bar. All information within the fields is saved to the data base and the user is returned to the Search screen. To return to the Search screen without saving any information the user selects "Cancel" from the button bar.
Search for a publication
Figure 2.3
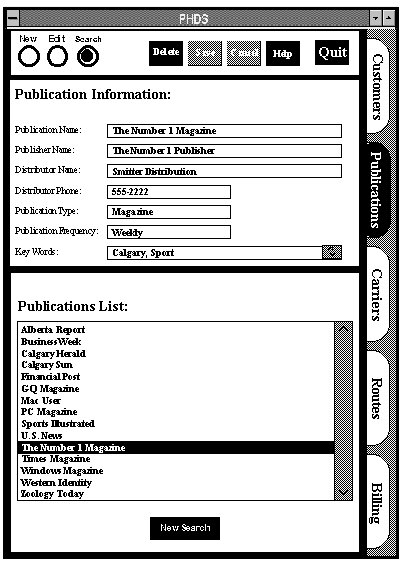
To search for a publication or publications the user enters, within the Publication Information section of the Publications Search Screen (see Figure 1.3), information into one or several of the fields. As this information is entered the list of publications in the Publication List box is reduced to include only those that match the search criteria. If a search is successful, the Publication List box lists at least one customer. An empty Publications List box signifies a failed search.
To begin a new search for a publication or publications the user selects the "New Search" button. To modify an existing search the user can select any of the available fields and replace the existing information with new information.
Upon completion of a successful search, the user can edit the publication information by clicking the "Edit" button, as outlined above in "Editing publication information".
Modes and Buttons
New
The "New" function allows the user to add a new publication to the database and is available only from the search mode. Enter this mode by selecting the "New" radio button from the button bar. The Publication Information fields are cleared and the Publications List is reset. The user can then enter available information for that new publication. The user must select "Save" or "Cancel" before returning to search mode.
Edit
The "Edit" function allows the user to modify publication data and is available only from search mode. Enter this mode by selecting the "Edit" radio button from the button bar. Any information within the fields, from the most recent search, can be modified by the user. The user must select "Save" or "Cancel" before returning to search mode.
Search
The search mode is used to locate information on a particular publication record in the database. This is the default mode publication screen. When in this mode the user can select a publication from the Publications List or enter information in the Publication Information fields to reduce the size of the Publications List. The user can then select a publication from the Publications List provided it is not empty.
Delete
The "Delete" function allows the user to remove a publication from the database. This button is available in the edit or search mode only. When "Delete" is selected, the system asks for confirmation to delete the current publication. The user is given the option to delete the publication from the database or to cancel.
Save
This button is active in new and edit modes only. When "Save" is selected the information which is currently displayed on the screen is saved to the database and the system returns to search mode.
Cancel
This button is active in new and edit modes. When "Cancel" is selected the information which has been entered or changed is ignored by the system and the program returns to search mode without modifying the database.
Help
This button is active at all times. When "Help" is selected a help window appears on the screen. The Help feature describes system usage. Note: The help facility is not implemented in this system.
Quit
The "Quit" function allows the user to exit the program. This button is active at all times. If changes have been made but not saved the user is asked for confirmation to exit with or without saving, otherwise the program is exited.
New Search
The "New Search" function allows the user to perform a new search for a publication. This is only active in search mode. When "New Search" is selected, all the fields in the Publication Information section are cleared and the Publications List is reset.
Description of Data Fields
- Publication Name - name of publication that is delivered by company e.g., National Geographic
- Publisher Name - name of publisher of publication e.g., The Benjamin/Cummings Publishing Company
- Distributor Name - name of company that distributes the publication, e.g., Joe�s Distribution
- Distributor Phone - phone number of company that distributes the publication e.g. (403) 555-1234
Publication Type - type of publication e.g., newspaper, magazine
- Publication Frequency - frequency that publication is distributed and delivered e.g., weekly, monthly, daily, etc.
- Key Words - word that describes information in or written about in the publication e.g., Monster Trucks, Dogs, Computers
- Publications List - A listbox containing the names of publication
according to the search criteria, in alphabetical order
- Number of Subscriptions - number of people in delivery area that
receive a publication e.g., 5004, 100, 4, 60000
- Publication Description - description of what information is contained in or written about in the publication e.g., cats and their care/health, computers and how to get them to work for you
[Return to Table of Contents]
Overview
To initiate the Carrier Interface the user selects the Carriers tab, the default screen that appears is the Carrier Search screen (see Figure 3.3). The "Carriers" tab becomes highlighted indicating that the user is in the Carriers interface. Note that a new tab can only be selected from search mode. The "Search" radio button, located on the button bar, is highlighted to indicate that the program is in search mode. The search screen is divided into two sections, Carrier Information and Carriers List. The Carrier Information section contains eight fields, which include Carrier Number, Surname, Given Name, Address, City, Province, Postal Code, and Phone Number. It is important to point out that the Province field uses a pull down menu to list the available provinces. The user is required to make a single selection from the listed provinces by double clicking on the desired province. The selected province then appears in the field. The Province field will not be editable from within the Carriers interface meaning that the user must use the pull down menu to make a selection, the user cannot add their own provinces. Provinces are hard coded into the program and can only be changed by the programming staff. The pull down menu is active within all of the Carrier interface screens.
The Carriers List section contains a list box which displays carriers found in a search of the data base. Located below the Carriers List box is an additional button, "New Search". When the button is pushed, all the fields in the Carrier Information section are cleared and the Carriers List is reset, hence allowing the user to perform a new search.
At the top of the screen we find the button bar. This bar contains a total of eight buttons, three circular and five rectangular. The three circular buttons indicate the current mode (New, Edit, or Search) and allow the user to change to any one of the modes. Of the five rectangular buttons only three are available for use in the Carrier Search Screen. They are "Delete", "Help", and "Quit". The two greyed-out buttons, "Save" and "Cancel", are not used in this screen.
In addition to the Carrier Search Screen there are two other screens that pertain to the Carriers section. They are Carrier New Screen (see Figure 3.1) and Carrier Edit Screen (see Figure 3.2).
Both Carrier New Screen and Carrier Edit Screen are broken into two subsections, Carrier Information and Route Information. The Carrier Information section contains eight fields, which include Carrier Number, Surname, Given Name, Address, City, Province, Postal Code, and Phone Number. The Route Information section contains a listing of available routes, Routes List, and those routes, Carrier Routes, to which a carrier has been assigned.
As before, we find the button bar at the top of the screen. This bar contains a total of eight buttons, three circular and five rectangular. When the program is in Carrier new mode the "New" radio button is highlighted and the remaining circular buttons (Edit and Search) are greyed-out. Of the five rectangular buttons, only four, "Save", "Cancel", "Help", and "Quit", are options available to the user.
Similarly, when the program is in Carrier edit mode the "Edit" radio button is highlighted and the remaining circular buttons (New and Search) are greyed-out. The five rectangular buttons "Delete", "Save", "Cancel", "Help", and "Quit" are options available to the user.
Functions
Adding a new carrier
Figure 3.1
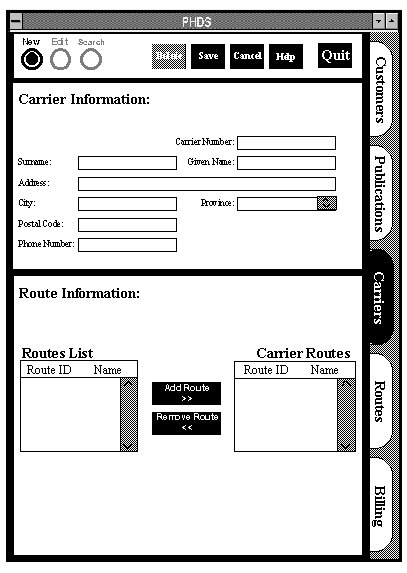
To add a new carrier the user selects the "New" radio button from the button bar. The Carrier New Screen (see Figure 3.1) then appears. The user then enters, in the Carrier Information section fields, all of the following information, for the exception of Carrier Number which is not editable:
- Surname
- Given Name
- Address
- City
- Province (pull down menu)
- Postal Code
- Phone Number
If the user does not completely enter all of the above stated information and tries to save the carrier into the data base, an error message appears informing the user that all information has not been entered correctly. The user is then given the option to enter the missing fields or to cancel the operation.
A carrier can be assigned to one or more delivery route(s). As an option the user may choose to assign a route or routes to that new carrier. This is done by selecting a route from the Routes List and copying it the Carrier Routes by using the "Add Route" button. To remove a route or routes from a carrier, the user selects a carrier route, from Carrier Routes, and removes it by using the "Remove Route" button.
To save the new carrier information the user selects the "Save" button from the button bar. All information within the fields is saved to the data base and the user is returned to the Search screen. To return to the Search screen without saving any information the user selects "Cancel" from the button bar.
Deleting a carrier
A carrier can only be deleted when there are no routes assigned to that carrier. If the user wishes to delete a carrier and that carrier still maintains a list of routes, these routes may be removed in the edit mode discussed below. This is done to ensure that no delivery routes are without a carrier. Note: an error message will be displayed if an attempt is made to delete a carrier who still has assigned routes.
To delete a carrier from the data base the user is offered two options. A carrier can be deleted from the Search screen or the Edit screen. To delete a carrier from the Search screen the user selects a carrier from the Carriers List box and then clicks on the "Delete" button. To delete a carrier from the Edit screen the user simply clicks the "Delete" button. When the delete function is used all carrier information in the data base is removed. In both cases the user ends up in the Search screen.
Editing carrier information
Figure 3.2
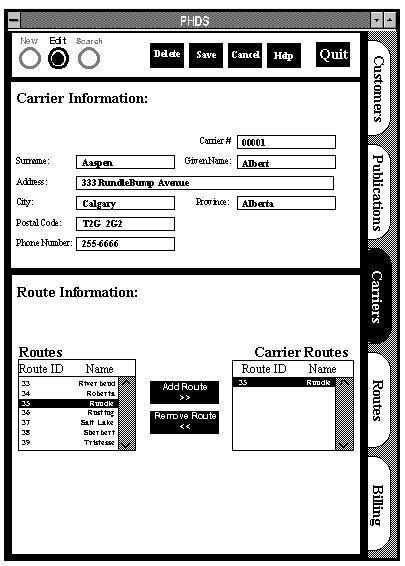
To edit carrier information the user selects, from within the Search screen, the "Edit" radio button from the button bar. The Carrier Edit Screen (see Figure 3.2) then appears. The user then edits, in the Carrier Information section, any of the following fields, except for the carrier number which is not editable:
- Surname
- Given Name
- Address
- City
- Province (pull down menu)
- Postal Code
- Phone Number
As an option the user may also choose to modify carrier routes for that carrier. To add a new route to a carrier's routes list the user selects a route from the Routes List and copies it to the Carrier Routes by selecting the "Add Route" button. To remove a route from a carrier's routes list the user selects a route from the Carrier Routes and copies it to the Routes List by selecting the "Remove Route" button. To save any modifications the user selects the "Save" button from the button bar. All information within the fields is saved to the data base and the user is returned to the Search screen. To return to the Search screen without saving any information the user selects "Cancel" from the button bar.
Searching for a carrier
Figure 3.3
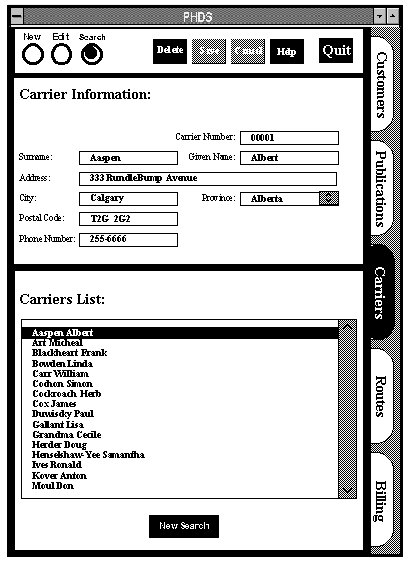
To search for a carrier or carriers the user enters, within the Carrier Information section of the Carrier Search Screen (see Figure 3.3), information into one or several of the fields. As this information is entered the list of carriers in the Carriers List box is reduced to include only those that match the search criteria. If a search is successful, the Carriers List box will list at least one carrier. An empty Carriers List box signifies a failed search.
To begin a new search for a carrier or carriers the user selects the "New Search" button. To modify an existing search the user can select any of the available fields and replace the existing information with new information.
Upon completion of a successful search, the user can edit the carrier information by clicking the "Edit" radio button, as outlined above in "Editing carrier information".
Modes and Buttons
New
Available only from the search mode. Enter this mode by selecting the "New" radio button from the button bar. The Carrier Information fields are cleared and the Carriers List is reset. The user can then enter available information for that new carrier. The user must select "Save" or "Cancel" before returning to search mode.
Edit
Available only from search mode. Enter this mode by selecting the "Edit" radio button from the button bar. Any information within the fields, from the most recent search, can be modified by the user. The user must select "Save" or "Cancel" before returning to search mode.
Search
This is the default mode for the carrier screen. When in this mode the user can select a carrier from the Carriers List or enter information in the Carrier Information fields to reduce the size of the Carriers List. The user can then select a carrier from the Carriers List provided it is not empty.
Delete
This button is available in the edit or search mode only. When "Delete" is selected, the system asks for confirmation to delete the current carrier. The user is given the option to delete the carrier from the database or to cancel. Note that to delete a carrier all of that carrier's routes must have been removed. An error message will be displayed if an attempt is made to delete a carrier who still has assigned routes.
Save
This button is active in new and edit modes only. When "Save" is selected the information which is currently displayed on the screen is saved to the database and the system returns to search mode.
Cancel
This button is active in new and edit modes. When "Cancel" is selected the information which has been entered or changed is ignored by the system and the program returns to search mode without modifying the database.
Help
This button is active at all times. When "Help" is selected a help window appears on the screen. The Help feature describes system usage. Note: The help facility is not implemented in this system.
Quit
This button is active at all times. Quit exits the program. If changes have been made but not saved the user is asked for confirmation to exit with or without saving, otherwise it exits the program.
New Search
This button is only active in search mode. When "New Search" is selected, all the fields in the Carrier Information section are cleared and the Carriers List is reset.
Add Route
This button is only active in new and edit modes. The currently selected item from the Routes List is added to the Carrier Routes list.
Remove Route
This button is only active in new and edit modes. The currently selected item is removed from the Carrier Routes list.
Description of data fields
- Carrier Number - the number assigned to that carrier, (e.g. 10334)
- Surname - the last name of the carrier (e.g., Smith)
- Given name - the first name of the carrier (e.g., John)
- Address - the Street address of the carrier (e.g., 3715 Centre Street N, Apt B)
- City - the city the carrier lives in, may be selected from a list of cities the company serves (e.g., Calgary)
- Province - the province the carrier lives in, may be selected from a list of provinces the company serves( e.g., Alberta)
- Postal code - A six digit form fill in (e.g., T2N 1A4)
- Phone number - The carrier's home phone number including area code (e.g., (403) 280-2763)
[Return to Table of Contents]
Overview
To initiate the Routes Interface the user selects the Routes tab, the default screen that appears is the Route Search screen (see Figure 4.3). The "Routes" tab becomes highlighted indicating that the user is in the Routes interface. The "Search" radio button, located on the button bar, is highlighted to indicate that the program is in search mode. Note that a new tab can only be selected from within search mode.
The search screen is divided into two sections, Route Information
and Routes List. The Route Information section contains four fields, which include Route Number, Route Name, Carrier Name, and Carrier Number. It is important to point out that the Carrier Name and Carrier Number fields use pull down menus to list the available carrier names and numbers respectively. For the Carrier Name field, the user is required to make a single selection from the listed carrier names by double clicking on the desired carrier. The selected carrier name then appears in the field. Similarly for the Carrier Number field, the user is required to make a single selection from the listed carrier numbers by double clicking on the desired carrier. The selected carrier number then appears in the field. These fields are not be editable from within the Routes interface, meaning that the user must use the pull down menus to make a selection, the user cannot add their own carrier names or numbers. Both Carrier Name and Carrier number can be added to or deleted from the pull down menu by way of the Carrier interface discussed above. The pull down menus are active within all of the Routes interface screens.
The Routes List section contains a list box which displays routes found in a search of the data base. Located below the Routes List box is an additional button, "New Search". When the button is pushed, all the fields in the Routes Information section are cleared and the Routes List is reset, hence allowing the user to perform a new search.
At the top of the screen we find the button bar. This bar contains a total of nine buttons, four circular and five rectangular. The four circular buttons indicate the current mode (New, Edit, Search, or Print) and allow the user to change to any one of the modes. Of the five rectangular buttons only three are available for use in the Route Search Screen. They are "Delete", "Help", and "Quit". The two greyed-out buttons, "Save" and "Cancel", are not used in this screen.
In addition to the Routes Search Screen there are three other screens that pertain to the Routes section. They are Routes New Screen (see Figure 4.1), Routes Edit Screen (see Figure 4.2), and Routes Print Screen (see Figure 4.4).
Both Routes New Screen and Routes Edit Screen are broken into two subsections, Route Information and Route Lists. The Route Information section contains four fields, which include Route Number, Route Name, Carrier Name, and Carrier Number. The Route Description section contains a single field, Number of Customers, and three list boxes, Customer List, Postal Codes List, and Delivery List. The Number of Customers displays the total number of customers assigned to that route. The Customer List listbox displays the customers assigned to that route, the Postal Codes List listbox displays the postal codes assigned to that route, and the Delivery List listbox displays all the publications and their quantity to be delivered to the route.
As before, we find the button bar at the top of the screen. This bar contains a total of nine buttons, four circular and five rectangular. When the program is in Routes new mode the "New" radio button is highlighted and the remaining circular buttons (Edit, Search, and Print) are greyed-out. Of the five rectangular buttons, only four, "Save", "Cancel", "Help", and "Quit", are options available to the user.
Similarly, when the program is in Routes edit mode the "Edit" radio button is highlighted and the remaining circular buttons (New, Search, and Print) are greyed-out. The five rectangular buttons "Delete", "Save", "Cancel", "Help", and "Quit" are options available to the user.
The Routes interface introduces one additional screen, the Routes Print Screen. When the program in the Routes print mode the "Print" radio button is highlighted and the remaining circular button (New, Edit, and Search) are greyed�out. Of the five rectangular buttons, only three, "Cancel", "Help", and "Quit", are options available to the user. The Routes Print screen is divided into two subsections, Route Information and Select Routes. The Route Information section contains four fields, which include Route Number, Route Name, Carrier Name, and Carrier Number. The Select Routes section contains a Select Routes listbox which display a complete list of all route numbers and names in the database. Below the listbox are two buttons, "Print All" and "Print".
Functions
Adding a new route
Figure 4.1
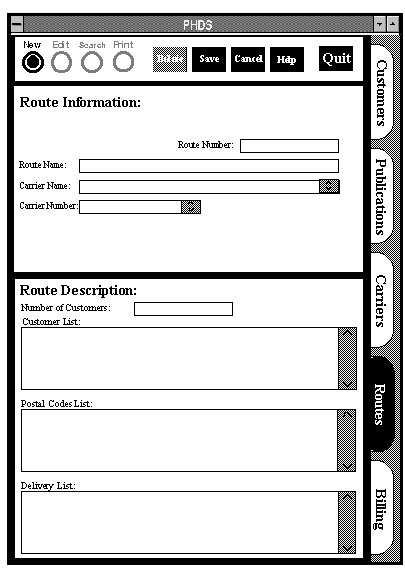
To add a new route the user selects the "New" radio button from the button bar. The Routes New Screen (see Figure 4.1) then appears. The user then enters, in the Route Information section fields, all of the following information, for the exception of Route Number which is not editable:
- Route Name
- Carrier Name (pull down menu )
- Carrier Number (pull down menu)
If the user does not completely enter all of the above stated information and tries to save the route into the data base, an error message appears informing the user that all information has not been entered correctly. The user is then given the option to enter the missing fields or to cancel the operation. Only one carrier can be assigned to one route.
All fields and list boxes in the Route Description section are not editable. The system assigns customers, postal codes, and delivery items when a customer is assigned to a route.
To save the new route information the user selects the "Save" button from the button bar. All information within the fields is saved to the data base and the user is returned to the Search screen. To return to the Search screen without saving any information the user selects "Cancel" from the button bar.
Deleting a route
A route can only be deleted when there is no carrier assigned to that route. If the user wishes to delete a route and that route still maintains a carrier, the carrier may be removed in the search or edit mode of the Carriers interface.
To delete a route from the data base the user is offered two options. A route can be deleted from the Search or Edit screen. To delete a route from the Search screen the user selects a route from the Routes List box and then clicks on the "Delete" button. To delete a carrier from the Edit screen the user simply clicks the "Delete" button. When the delete function is used all carrier information in the data base is removed. In both cases the user ends up in the Search screen.
Editing route information
Figure 4.2
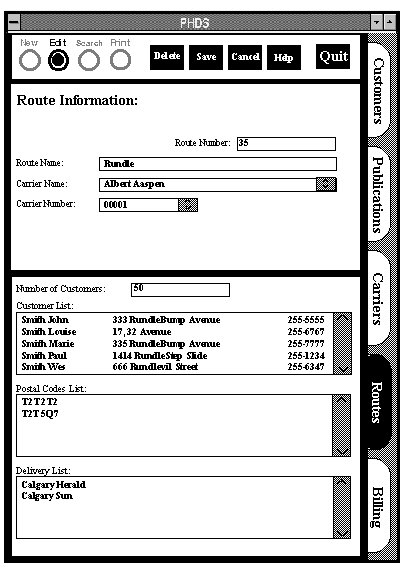
To edit route information the user selects, from within the Search screen, the "Edit" radio button from the button bar. The Routes Edit Screen (see Figure 3.2) then appears. The user then edits, in the Carrier Information section, any of the following fields, except for the carrier number which is not editable:
- Route Name
- Carrier Name
- Carrier Number
All fields and list boxes in the Route Description section are not editable. The system assigns customers, postal codes, and delivery items when a customer is assigned to a route.
To save any modifications the user selects the "Save" button from the button bar. All information within the fields is saved to the data base and the user is returned to the Search screen. To return to the Search screen without saving any information the user selects "Cancel" from the button bar.
Searching for a route
Figure 4.3
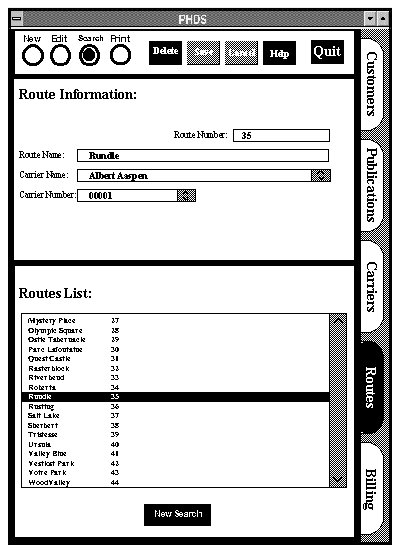
To search for a route or routes the user enters, within the Route Information section of the Routes Search Screen (see Figure 4.3), information into one or several of the fields. As this information is entered the list of carriers in the Routes List box is reduced to include only those that match the search criteria. If a search is successful, the Routes List box will list at least one route. An empty Routes List box signifies a failed search.
To begin a new search for a route or routes the user selects the "New Search" button. To modify an existing search the user can select any of the available fields and replace the existing information with new information.
Upon completion of a successful search, the user can edit the route information by clicking the "Edit" radio button, as outlined above in "Editing route information".
Generating a Printout
Figure 4.4
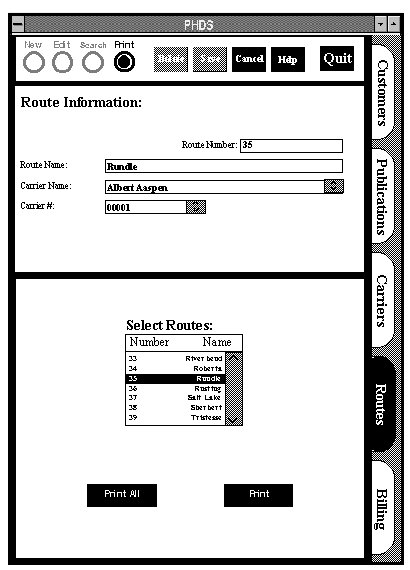
A printout which contains route name, carrier name, carrier address, carrier phone number, route household addresses and status, and the publication(s) received by each household is generated and given to the carrier before he or she makes the deliveries. The user can print either a single route, a subset of routes, or the entire set of routes which may be selected from the Select Routes listbox. To enter print mode the user selects the "Print" radio button from the button bar. The user then selects one or more routes from the listbox, or clicks on the "Print All" button to print all the routes in the database. The user then clicks the "Print" button to generate a printout. The user can terminate a print job by selecting the "Cancel" button from the button bar. Upon completion or cancellation of a print job system will then return the user to search mode.
Modes and Buttons
New
Available only from the search mode. Enter this mode by selecting the "New" radio button from the button bar. The Route Information fields are cleared and the Routes List is reset. The user can then enter available information for that new route. The user must select "Save" or "Cancel" before returning to search mode.
Edit
Available only from search mode. Enter this mode by selecting the "Edit" radio button from the button bar. Any information within the fields, from the most recent search, can be modified by the user. The user must select "Save" or "Cancel" before returning to search mode. As before the user cannot edit any information in the Route Description section.
Search
This is the default mode for the carrier screen. When in this mode the user can select a route from the Routes List or enter information in the Route Information fields to reduce the size of the Routes List. The user can then select a route from the Routes List provided it is not empty.
Delete
This button is available in the edit or search mode only. When "Delete" is selected, the system asks for confirmation to delete the current route. The user is given the option to delete the route from the database or to cancel. Note that to delete a route the route's carrier must have been removed. An error message will be displayed if an attempt is made to delete a route which still has an assigned carrier.
Save
This button is active in new and edit modes only. When "Save" is selected the information which is currently displayed on the screen is saved to the database and the system returns to search mode.
Cancel
This button is active in new, edit, and print modes. In the case of new and edit mode, when "Cancel" is selected the information which has been entered or changed is ignored by the system and the program returns to search mode without modifying the database. In the case of print mode the current print operation is terminated and the program returns to the search mode without printing.
Help
This button is active at all times. When "Help" is selected a help window appears on the screen. The Help feature describes system usage. Note: The help facility is not implemented in this system.
Quit
This button is active at all times. Quit exits the program. If changes have been made but not saved the user is asked for confirmation to exit with or without saving, otherwise it exits the program.
New Search
This button is only active in search mode. When "New Search" is selected, all the fields in the Route Information section are cleared and the Routes List is reset.
Print Mode
The "Print" radio button will take the user to the print screen. On this screen they may select one or more routes to be printed. The user must then press either "Print" or "Cancel", which will bring the user back to search mode.
Print
The "Print" button, when pressed, will generate a printout or printouts which contain the Route Name, Carrier Name, Carrier Address, Carrier Phone Number, Route Customer Addresses and status, and the publication(s) received by each customer for each route selected.
Print All
This button allows the user to print all of the routes in the select routes list box, as described in the Print button above.
Description of data fields
- Route Number - this data field contains a unique identifier for each different route
- Route Name - this data field contains the name of the route, up to 20 characters
- Carrier Name - this data field contains the ?last? name of the carrier who delivers to the onscreen route
- Carrier Number - this data field uniquely identifies the carrier assigned to the route
- Routes List - listbox that contains a list of routes according to the search criteria
- Number of Customers - this field contains the number of customers that are on the current route
- Customer List - list box that lists all the of the customers on the route
- Postal Codes List- list box that lists all the postal codes on the route
- Delivery List - list box that lists all the publications and their quantity to be delivered to the route
- Select Routes - list box which lists all routes by number and name
[Return to Table of Contents]
Overview
The Billing system is responsible for periodically updating household accounts. This function should be performed at the end of every week, and additionally at the end of each month.
This system will allow the user to display, print, or update billing information for a household or all households with a balance outstanding for subscriptions. When the billing system is started, it will ask the user if they want to generate a new set of bills for all households with an outstanding balance or find an individual household's bill, and either display or generate it.
If the user selects generate bills the system prints off a bill for
each household which has an outstanding balance and returns the user to the main screen. Once a household is selected, the user will be able to view and edit the household's billing information (i.e., update their record of outstanding balance for a payment received). They can then print this household's bill out if they choose.
Note: We have not gone into details of the billing system at this time because as noted in the management plan, the billing system will not be implemented in this version.
Overview
The system will be able to produce a variety of summary reports on request from the user. All reports can be viewed on the screen or be printed out. Summary reports contain the following information:
- A list of total balance outstanding and number of subscribers, listed by publication, with grand totals at the bottom
- A daily report for each publication, with the number of subscription sales and their value, listed by route, with totals at the bottom
- A daily report with the number of subscription sales and their value, listed by publication, with totals at the bottom. Note: We have not gone into details of the summary reports system at this time because as noted in the management plan, the summary reports system will not be implemented in this version.
[Return to Table of Contents]
The new management plan takes into consideration all suggestions concerning the system and previous functional specifications. All changes have been incorporated into the revised system. The most important change being the elimination of the Customer Number. We a more than willing to discuss any more changes that you may desire, please send mail with any concerns to our project manager.
The following is the information structure used in the system. It lists field names, their sizes, and expected contents for each of the major sections.
Customers
- Surname - 20 alphabetic characters (herein referred to as characters)
- Given Name - 20 characters
- Address (street, house number, apartment number, etc.) - 50 characters
- City - 20 characters
- Province - hard coded, each province and territory is listed, pull down menu
- Postal Code - predefined format in Access
- Route Name - 20 characters, pull down menu
- Phone number - 10 character phone number (XXX) XXX-XXXX
- Customer List - list box containing a listing of all customers in the system that meet the search criteria
- Subscription List - list box that describes, alphabetically, what newspapers or magazines the household is currently subscribed to , contains two fields, Name of publication and Expiry Date
- Publication List - list box that describes publication name and it cost, contains two fields, Name and Cost
- Delivery Status - whether the household is active or suspended for a specific time period, or indefinitely involves two radio buttons, Active and Suspend, and two date fields, From and To, predefined date format in Access
- Notes - a text box for a notes section to store comments concerning a customer
Publications
- Publication Name, Publisher Name, Distributor Name - 30 characters
- Distributor Phone Number - 10 digits phone number
- Publication Type - 20 characters
- Publication Frequency - 20 characters,
- Daily delivery, able to specify which days.(e.g.,. Fri, Sat, Sun or Mon and Sat)
- Weekly delivery, able to specify which day
- Bi�weekly delivery, able to specify which day or dates
- Monthly delivery, able to specify date of delivery
- Irregular, able to specify a number of specific dates
- Number of Subscriptions - integer
- Keywords - text box contains keywords identifying the contents of the publication, pull down menu
- Publication Description - text box, a brief summary of the publication, originally entered by the user o Publications List - list box, contains a list of publications, listed alphabetically, according to the search criteria
Carriers
- Carrier Number - integer
- Surname - 20 alphabetic characters (herein referred to as characters)
- Given Name - 20 characters
- Address (street, house number, apartment number, etc.) - 50 characters
- City - 20 characters
- Province - hard coded, each province and territory is listed, pull down menu
- Postal Code - predefined format in Access
- Phone number - 10 character phone number (XXX) XXX-XXXX
- Carriers List - list box containing a listing of all carriers, alphabetically, in the system that met the search criteria
- Routes List - list box that lists all the routes, by Route ID and Name
- Carrier Routes - list box that lists all the routes, by Route ID and Name, for a carrier
Routes
- Route Number - integer
- Route Name - name of route, 20 characters
- Carrier Name - name of carrier, 40 characters, pull down menu
- Carrier Number - integer, pull down menu
- Routes List - list box, contains list of all routes according to search criteria
- Number of Customers - integer, internal calculation from data
- Customers List - list box, contains a list of customers on a route
- Postal Codes List - list box, contains a list of postal codes on a route
- Delivery List - list box, contains a list of types publications to be delivered on a route
Functions
There are eight major functions characteristic of each interface
screen. They include New, Delete, Edit, Search, Help, Quit, Save, and Cancel . These functions are described below in their generic format since all major sections will involve all of them. A more in depth description of their function per section is described above in the specifications and the interface descriptions. All data base updates will be cross referenced with the other affected data bases (e.g., adding a household, results in a route taking on a new household and an increment to a product's total delivery). This will ensure that all data bases will remain current in the event of any changes.
New
- will permit the addition of any new "entity" such as a customer or a publication
- corresponds only to the desired fields pertaining to that section
Edit
- will permit the modification of any existing "entity" such as a customer or a publication
- corresponds only to the desired fields pertaining to a section
Search
- will perform a search corresponding to the search keys provided by the user
- searches will differ by section, as per described above
Delete
- will permit the deletion of any existing "entity" such as a customer or a publication
- corresponds only to the desired fields pertaining to a section
Save
Cancel
- cancel current mode selected
Quit
Help
- online help manual
- Note: This will not be implemented as part of the system, it is simply an addition that can be implemented in the future
Project features
The Newspaper Delivery system will include the following features. It will keep track of all the customers of the newspaper, recording such information as the name, address, phone number, status, and money owed by the customer with the option to edit and search customers individually. Editing specific customer information fields is possible, as well as adding and deleting all information for a customer. Publications will also be listed along with their relevant information, giving the user the ability to edit information fields, add or delete publications as well as search for selected publications. The system will also keep track of carriers that will deliver the publications to the customers. The user will be able to add or delete carriers as well as edit their personal information.
Customers will be linked to carriers through routes, which list items such as the name of the route and the number of customers on that route and be defined by a list of postal codes (even though a customer may be placed on a route though its postal code is not on that list). Through the routes, the system will allow the user to view the total number of deliveries per day to each individual route, as well as show all the customers on a route. It will also be able to make print�outs per route or for an entire set of routes or a sub-set of selected routes.
In the future billing customers may also be a part of the Publication Home Delivery System. It will list all the subscriptions, with totals and late charges and any transactions left owing. Any customer's bill can be generated at request. When payments are received, it will update the outstanding balance of a customer. A summary sheet will also be available that will list the total money owed and the total number of subscriptions. Daily reports will also be available that will show the number of copies of each publication sold and their total monetary value.
There are many different implementation options for a database system of this nature. We have chosen the PC platform as it is the most economical and widely used system available.
The system requires an IBM compatible personal computer with the following minimum requirements: 486DX processor, 16 megabytes of memory, an SVGA monitor, 200 megabytes of free hard drive space, a tape drive for backup, a line printer, and a commercial quality laser printer. It also must have at least MSDOS 6.0 and Microsoft Windows 3.1 installed. The database program will be programmed using Microsoft Access. This options seems to make the most sense since many organizations already posses some or all of this hardware and have other uses for it such as running modern word processors, spreadsheets, etc. In addition, upgrades could be made relatively cheap and quickly.
In the future the system may need to handle access by management, accounting, mail�room supervisors, region managers, distributor supervisors, etc. As well it may be desired to maintain a portable system which may be ported to affiliates in large urban centres (e.g., New York). Perhaps a file server, some workstation, some terminals and some network software could be added in for a future deliverable. Also a most plausible enhancement in the future would be multi-level access, so that accountants are not deleting carriers for example.
We would like to point out that a few assumptions have been made with regard to some missing information. Our assumptions are based on suggestions that would make the programming easier, in the case of missing fields, to making the system conform to current industry, such as the recommendation of the hardware and software platforms. As not all the assumptions are flagged, please be sure to review the functional specifications thoroughly and decide if our proposed system meets or even exceeds your requirements.
Team Structure
The team structure was created with efficiency and high communication as the priorities. First of all, to avoid the problems that are often associated with larger groups it was decided that three smaller groups would be created. Each of these groups would represent one of the major aspects of the project which are: interface, documentation, and programming. The members for the teams were picked so that each of members strong points would be used to the greatest potential. However with the evolution of the project, the interface and programming teams became more as one so it was decided that the teams would be redivided, resulting in two groups. These new teams are as follows:
Documentation
- Blair Whitford
- Janice Webster
- Guy Gravel
- Ian Mayhood
- Mike Ksenak
- Henry Wong
Implementation
- Dave Neufeld
- Steve Thompson
- Andy Lum
- Michael Boonstra
- Sean O'Rourke
Presentations
- Blair Whitford
- Dave Neufeld
- Janice Webster
The implementation team is responsible for creating the user friendly GUI between the users and the program, as well as write the program in the selected programming language. The documentation team is responsible for the writing of most of the documentation, such as the user manual, as well as editing and typesetting any documents that are to be placed on the Web. Note that all of the groups will interact with each other in that all members may be required to assist other groups if needed. As well all groups will participate in creating the documents.
To manage and coordinate the different needs of the teams a Product
Manager was appointed and in order for there to be enough communication throughout the teams, a representative from each team was chosen. Meeting would be held with the team representatives and the product manager in order to make certain that everyone is keeping up to the schedule, there are no misunderstanding ambiguities with the project, and to make sure that any concerns and problems conceding the entire project are dealt with and solved. The selections for these positions is as follows:
Project Manager
Assistant Project Manager
Documentation
Programming
In order to keep everyone informed of the current events, a secretarial and document manager position were assigned. The secretary is responsible for writing the minutes of the meetings and the document manager is in charge of posting this information along with all the other pertinent information, on the World Wide Web. These positions are filled by Ian Mayhood (document manager), and Sean O'Rourke (Secretary).
Every one of the team members will be involved with some aspect of the testing. Which aspect they will be involved in will be determined by the individuals strengths but not necessarily by which sub�team they are in.
Minimal System
The minimal system that will be implemented is separated into five major subject components: customers, publications, subscription, routes, and carriers. Each one of these parts will contain functions that will allow the user to add, edit and delete their perspective data. This data and the rules for its entry are covered in the previous paragraphs. There will also be various functions that allow the user to view the data of one of the subjects by individual record, and by a group of records. As well, there are more specific functions. Each of these specialized functions have been described in detail in each of the sections the four major sections of the system.
Due to perceived time constraints this proposed system will not contain a billing system. After much discussion it was determined that the billing system was too complex to be created as scheduled. An enhancement that may be added in the future is to add a partial billing system. This would not include anything as specific as a list of payments for a particular invoice, but more likely would include enough functionality for it to work along side a separated billing system. Some the functions covered in this system would include summary showing total Money owed and total number of subscribers by publication, daily summary information showing how many copies of each publication were sold that day, ability to generate bills for customers, and ability to update balances when a payment for an invoice is received.
Summary
This system when completed will be user friendly to help employees
complete their everyday work, tasks, and projects. A graphical windows interface will guide the users through the sections of the system and keep the newspaper service running smoothly. All system functions, modes, interface screens have been described in detail above. All efforts have been made to make this system easy to use and maintain. Logical flow is emphasized so that tasks seem to follow a logical order. We have stressed the importance of code modularity to ease the integration of any future additions and to ensure that all sections work smoothly together.
Due to time constraints the billing system is not implemented within the current system However our advanced design will permit the integration of a future billing system companioned with a summary reports system hence making the finished system completely usable.
We believe good programming techniques, and meticulous attention to
data base manipulation will make our system both efficient, and
reliable so everyone can meet their goals, and get their jobs done.
We are confident that the delivered system will meet the requirements of all users, management staff of your company. Info Systems Inc. will be around for many years to come and will gladly assist in any modifications to the system as a result of future technology.
[Return to Table of Contents]
Introduction
To ensure the home publication delivery system meets all functional
specifications, and the logic of the programming is solid, extensive testing will be performed on the software.
The process of testing will look at the program from the inside out. This form of testing, (called unit testing) will focus on each unit of the software one at a time. Basic concepts have been desk checked on paper for logic, function, input/output and discussed in group meetings before implementation began. Because the system is being created in Access, this kind of testing is not possible as each parts of the program are dependent on other areas and can not be tested individually. Therefore the desk testing is important to ensure that each unit of the program will work correctly when combined with the other units in Access.
Other important holistic areas that will be looked at are functional, logical, and input/output testing of the entire program. It is important that all functions work correctly in all parts of the system, and the logical flow of the system is intuitive so any input given to the system by the user provides the expected output from the program.
Assuming that all goes well in the unit and the integration testing of the system, the overall performance of the system will be evaluated using walkthroughs of every day and special tasks on a test group of users. If the performance tests are successful, the final test of acceptance from Customer Group 7 will be done. If approval is received from Customer Group 7 then the system will be released for implementation.
The schedule for testing/deadlines is as follows:
- All functional testing due dates for the different sections are:
- Customer section, March 9
- Publication section, March 10
- Carrier section, March 11
- Routes section, March 12
- All the integration tests are due by March 13
- Performance Evaluations will be done from March 15 to March 20
- Acceptance test will be held on April 2
Monitoring, and summarizing will take place in small groups done by the testers during after each test in written documents and pre-created questionnaires. All responses and outcomes will be discussed with the entire team. Problems will be caught early and rectified by further testing and system corrections as decided by Supplier Group 7 team.
The items mentioned in the schedule of the test plan will now be discussed in detail.
Functional Testing
The testing procedure that will be used for the individual modules, will involve manually testing all the possible actions that the user could perform. Due to the fact that there aren't a large number of possible actions that a user can take, it isn't a difficult task to manually try to recreate as many events possible. This will include various types of error checking and attempts to crash the program.
However, since these tests do not rely on other modules being finished, integration testing will be handled separately, and certain actions will not yet be tested due to their dependence on other sections.
Note that only functionality will be tested within this system. Any errors that occur in the windows environment external to the program have not been accounted for.
The following tests are generic to each module, since the modules have been created to behave in the same manner, therefore they have been grouped together under one section. The reactions to each of the following events happen in the exact same manner in every section.
This screen should start in the default search mode. If new is selected, the bottom part of the screen should change to give more information on that section and all the fields must be cleared. At this point the edit and search modes should no longer respond until the on screen information is either saved, deleted, or canceled. Any attempts to select any of these buttons should fail, and nothing should happened. When the save button is pressed, while the screen is blank or has any required fields blank, then a help box appears that informs the user that there is still information that must be supplied. It will also list this information in the help box to show which fields need completing, then you can either cancel the operation of finish entering the information. Pressing the Delete or the Cancel button at any time cleared the fields and returned the screen to the search mode.
While the program is an any mode but the search mode, pressing any of the tabs along the side will cause a help box to appear telling the user that he must first either save or cancel the information on the screen before he can change sections. The same thing happens when the quit button is pressed while there is any unsaved information on the screen.
Depressing a button several times should have no effect.
If an invalid description is entered into any of the fields, a help box should open and state that the input is invalid. It should explicitly state what the field requires and the form in which it should be entered. Any further attempts or other invalid entries should respond in the same manner. Attempting to overflow any field should not work, and the extra characters should be discarded.
The fields which contain information that must be selected using a listbox, should be impervious to keyboard input and should ignore it. Any attempts to select multiple entries or otherwise cause any errors should fail.
On a lower level, the entered information is should be correctly stored in the database in the proper section(s).
When a new entry is made using the new mode, and when the required fields are filled in, the information is should be correctly stored in the database. This should also happen in edit mode, any corrections should be properly stored into the database.
However, when any changes have been canceled, the information should not be saved to the database, and the old information should remain intact.
When an entry is deleted with the delete function, it should be erased from the database, without affecting any other entries. This should work properly in both search and edit modes.
During searching, the program should respond well to all possible scenarios. If the search term is not in the database, then the search listbox should be empty. If there is only one instance of a search term then it should highlight the proper entry. If there are multiple entries that match the search term then it should list all the matches in the listbox. Searching should work properly with every field in each section.
When a entry from the search listbox is selected, the proper information should appear in all the fields.
The New Search button should clear all the fields of the screen as well as the listbox.
The following test deal with specific sections of the program that have unique testing opportunities.
Customers Interface
In the Delivery Information section, the Publication and Subscription list boxes can not yet be tested.
The Delivery Status radio buttons should work properly, one should always be selected, and they should never both selected. When Active is selected, the from and to fields should not be adjustable. When suspend is selected, there should be no problems in entering the from and to dates.
We should verify that the Notes listbox has no problems. It should scroll up and down correctly and any input may be entered.
Publications Interface
The Number of Subscriptions field cannot yet be tested.
The Description of Publication field however should be tested so that it works the way it should.
Carriers Interface
Nothing separate can be tested here yet, as there is a co�dependence to route information.
Routes Interface
Nothing separate can be tested here yet, as this screen co�depends to the customer and carrier information.
Billing Interface
This section will not be implemented.
Integration Testing
This part of the testing checks to see if there are any problems with how the system's different functions interact with each other. In this particular system, most of the integrated functions have already been specified within the language (ACCESS) and it is assumed that they dealt with, without any errors. However a few test will be performed in order to assess that they are handled appropriately.
Test 1:
Change a customer's route from the customer screen, then check the route screen and then verify that the customer's route has been updated properly. (i.e. the customer should no longer be a member of his former route but should belong to the one that he was most recently changed to).
Test 2:
Delete a customer from the database via the customer screen, then check the route screen to verify that the customer is no longer a member of his former route.
Test 3:
Add a subscription for a customer via the customer screen, that is not currently being delivered to that customer's route. Then verify that route screen shows that the latter is updated for that particular route.
Test 4:
Edit information on a publication (e.g. the name of the publication) via the publication screen and verify that the information is updated when it appears on the customer's information screen.
Test 5:
Delete a publication via the publication screen, and verify that all of the customers that were subscribing to that publication are updated.
Performance Evaluation
Scenarios to test the systems ease of use and what not. Here are listed typical scenarios that any user should be able to do. A scenario will be given to a user of whom has little or no knowledge of the system but has a good understanding of the magazine/paper distributing business. After they have completed a task they will fill out a questionnaire related to the use of system. After the a collection of questionnaires have been filled out, they will be studied so that short comings of the system may be found and rectified.
{set up criteria: Jane will be in the database however there will be more then one Jane smith in it. Ronald won't be in the database.}
1. Jane Smith and Ronald Duncan have decided that they want to subscribe to the Calgary Herald. They both want to have the paper delivered daily for the year of 1996. Both Jane and Ronald have received subscriptions through the company before but neither are sure if they are still in the database.
Jane's address:
	234 Bedington Green NW
	Calgary AB
	R4W 0I0
	ph# 234-9085
Duncan's address:
	2320 Oak Ridge Place SW
	Calgary AB
	D0G 1A1
	ph# 485-3576
Tasks: Find Jane and Duncan in the database and add them to it if they are already in it. Subscribe them both to the Calgary Herald for the duration they requested.
2. Edward White subscribes to the New York Times. Unfortunately, he is the only one with any subscription in his area of Shawnessy. Currently, he on the McKenzie Lake route. However Frank Ellis, who works at the delivery company, has offered to deliver the paper to Edward.
Edwards's address:
	4 Shawnessy Crescent SE
	Calgary AB
	T4N 4F1
	ph# 542-2389
Frank's address:
	354 53 ST. SE
	Calgary AB
	G9D 0I3
	ph# 456-9987
Tasks: Add Frank to the Carrier's database. Make a new route for the Shawnessy area and make Frank the carrier for it. And change the route which Edward has been previously assigned.
3. "Wire Talk", a new biweekly magazine published by "Church Hill Press" has just come out and it has been decided that will be added to the publications database. ACOM is the distributor and can be reached at 604-342-3489.
Tasks: Add "Wire Talk" to the Publications database and subscribe Edwards (with data as prescribe above) to the magazine.
User Questionnaire
To the readers of this document, in order to determine your satisfaction/dissatisfaction with our product please take a few moment to fill out the following questionnaire. Please circle the appropriate numeral and add any relevant comments. You responses and comments will be used to determine what, if any, types of improvements are required.
Background Information

1. How often have you used the Windows environment?
         never			      frequently
	  1	2	3	4	5	   comments:

2. Generally, how do you feel about this environment?
       hard to use			     easy to use
	  1	2	3	4	5	   comments:

System Information

The overall layout of the screens are:
         cluttered			   well organized
	  1	2	3	4	5	   comments:

The affordances(how objects are used) are:
        unintuitive			         clear
	  1	2	3	4	5	   comments:

The actions of the buttons are:
       not obvious		       obvious
	  1	2	3	4	5	   comments:

Feedback is:
       uninformative		     informative
	  1	2	3	4	5	   comments:

Errors:
   crippled the system		    never occurred
	  1	2	3	4	5	   comments:

Exits are:
       hard to find			    clearly marked
	  1	2	3	4	5	   comments:

The characters on the screen are:
      hard to read			    easy to read
	  1	2	3	4	5	   comments:

Switching between sections using the tabs is:
    counter intuitive		       intuitive
	  1	2	3	4	5	   comments:

Adding a new object to the database is:
           hard			         easy
	  1	2	3	4	5	   comments:

Editing an object in the database is:
           hard			         easy
	  1	2	3	4	5	   comments:

Searching for an object in the database is:
	hard			         easy
	  1	2	3	4	5	   comments:

Deleting an object in the database is:
	hard			         easy
	  1	2	3	4	5	   comments:

Saving an object in the database is:
	hard			         easy
	  1	2	3	4	5	   comments:

Canceling an operation in the database is:
	hard			         easy
	  1	2	3	4	5	   comments:

Overall, performing tasks is:
       complicated			        simple
	  1	2	3	4	5	   comments:

The online help system is:
         useless			      excellent
	  1	2	3	4	5	   comments:
Overall, how does this system rate to any similar
 systems you may have used (if applicable):
      unfavourably		     favourably
	  1	2	3	4	5	   comments:

Overall how would you rate this system?
      needs improvement			      excellent
	  1	2	3	4	5	   comments:

Please add any additional comments about the system:
Acceptance Test
The acceptance test will be held on April second. This test involves an oral presentation with the customer group. It will determine whether or not the final project meets the criteria expected by the customer group. There will be a brief introduction containing a broad explanation of the entire system. There will be a PC present to run the system, along with an overhead adapter for it so that the system may be easily viewed by everyone. The presentation will then cover specific examples of tasks that would be typically implemented by the system. At the conclusion of the demonstration there will be a question period where questions and concerns about the system will be dealt with.
The overall outline for the presentation will be completed as of March 25. This outline will cover all the different walkthroughs that will be done for the demonstration and how they will be presented. The system will also have to have sample input entered in to it for the demonstration.
Pseudocode
Below is a brief description of the pseudocode that is required for the system. Note that since the system is to be developed in ACCESS, there is very little "code" required. The majority of the code required will be for the buttons.
Tabs
when one of the tabs is pressed:
- check if the current screen is in a critical mode (i.e. changes have been made but have not been saved)
- if it is in a critical mode do nothing
- if it is not in a critical mode change the screen
- if the tab that has been pressed is the same as the current screen then don't do anything
- switch to the screen whom's tab has been pressed
- default to the search screen
- de�activate the Delete, Save and Cancel buttons
Customer
"Customer Screen" Toggle Buttons
New
- increment the (internal) customer number
- display the delivery information screen at the bottom of the screen (note: if not in search mode will already be there)
- clear all of the fields
- default the Active/Suspend toggle buttons so that Active is selected
- lock the "to" and "from" fields (by the Active/Suspend toggle buttons) so that they can't be edited
- de-activate all the buttons except for Save, Cancel and Help
- put the program (i.e. ACCESS) into edit mode so that the fields may be edited
- display the new toggle button as being toggled
Edit
- display the delivery information screen at the bottom of the screen (note: if not in search mode will already be there)
- de-activate all the buttons except for Save, Cancel and Help
- load the fields of a specific record of a customer into their corresponding location on the screen
- put the program (i.e. ACCESS) into edit mode so that the fields may be edited
- display the edit toggle button as being toggled Search
- clear all of the fields
- change the bottom half of the screen so that it displays the search information for the customers
- display the search toggle button as being toggled
"Customer Screen" Buttons
Delete
- prompt the user to make sure they want to perform this action
- if the response is positive then
- remove the current customer record from the database
- clear all of the fields
- change the bottom half of the screen so that it displays the search information for the customers
- display the search toggle button as being toggled
- if the response is negative return back to previous screen
Save
- write the current record to the database
- clear all of the fields
- change the bottom half of the screen so that it displays the search information for the customers
- display the search toggle button as being toggled
Cancel
- do not save the changes that were made to the current record
- clear all of the fields
- change the bottom half of the screen so that it displays the search information for the customers
- display the search toggle button as being toggled
Help
- display a window containing pertinent information about the current screen
- give the option to go back to the last screen (ie. quit help) Quit
- prompt the user to make sure that he actual wants to quit
- if the response is positive then exit PHDS and return to the operation system
- if the response is negative return to the previous screen
"Customer Delivery Information" Buttons
Subscribe
- Check to see if any record has been highlighted in the publication table
- if no record is highlighted then don't do anything
- if a record is highlighted then
- add the record to the customers database
- display the pertinent information in the subscription table
Unsubscribe
- Check to see if any record has been highlighted in the subscription table
- if no record is highlighted then don't do anything
- if a record is highlighted then
- remove the record from the customers database
- fix the display in the subscription table so that the former record is no longer showing
"Customer Delivery Information" Toggle Buttons
Active
- erase any information currently in the to and from fields
- change the Active/Suspend toggle buttons so that Active is selected
- lock the "to" and "from" fields (by the Active/Suspend toggle buttons) so that they can't be edited
Suspend
- unlock the "to" and "from" fields (by the Active/Suspend toggle buttons) so that they can be edited
- change the Active/Suspend toggle buttons so that Suspend is selected
�
Publication Screen
"Publication Screen" Toggle Buttons
New
- display the "Publication Description" screen at the bottom of the screen (note: if not in search mode it will already be there)
- clear all of the fields
- de-activate all the buttons except for Save, Cancel and Help
- put the program (i.e. ACCESS) into edit mode so that the fields may be edited
- display the new toggle button as being toggled
Edit
- display the delivery information screen at the bottom of the screen (note: if not in search mode will already be there)
- de-activate all the buttons except for Save, Cancel and Help
- load the fields of a specific record of a publication into their corresponding location on the screen
- put the program (i.e. ACCESS) into edit mode so that the fields may be edited
- display the edit toggle button as being toggled
Search
- clear all of the fields
- change the bottom half of the screen so that it displays the search information for the publications
- display the search toggle button as being toggled
"Publication Information" Screen Buttons
Delete
- prompt the user to make sure they want to perform this action
- if the response is positive then
- remove the current publication record from the database
- unsubscribe all of the customers currently subscribing to that particular publication
- clear all of the fields
- change the bottom half of the screen so that it displays the search information for the customers
- display the search toggle button as being toggled
- if the response is negative return back to previous screen
Save
- write the current record to the database
- clear all of the fields
- change the bottom half of the screen so that it displays the search information for the customers
- display the search toggle button as being toggled
Cancel
- do not save the changes that were made to the current record
- clear all of the fields
- change the bottom half of the screen so that it displays the search information for the publications
- display the search toggle button as being toggled
Help
- display a window containing pertinent information about the current screen
- give the option to go back to the last screen (i.e. quit help)
Quit
- prompt the user to make sure that he actual wants to quit
- if the response is positive then exit PHDS and return to the operation system
- if the response is negative return to the previous screen
Carrier Screen
"Carrier Screen" Toggle Buttons
New
- increment the (internal) carrier number
- display the route information screen at the bottom of the screen (note: if not in search mode it will already be there)
- clear all of the fields
- de-activate all the buttons except for Save, Cancel and Help
- put the program (i.e. ACCESS) into edit mode so that the fields may be edited
- display the new toggle button as being toggled
Edit
- display the route information screen at the bottom of the screen (note: if not in search mode it will already be there)
- de-activate all the buttons except for Save, Cancel and Help
- load the fields of a specific record of a carrier into their corresponding location on the screen
- put the program (i.e. ACCESS) into edit mode so that the fields may be edited
- display the edit toggle button as being toggled Search
- clear all of the fields
- change the bottom half of the screen so that it displays the search information for the carriers
- display the search toggle button as being toggled
"Carrier Screen" Buttons
Delete
- prompt the user to make sure they want to perform this action
- if the response is positive then
- remove the current carrier record from the database
- clear all of the fields
- change the bottom half of the screen so that it displays the search information for the customers
- display the search toggle button as being toggled
- if the response is negative return back to previous screen
Save
- write the current record to the database
- clear all of the fields
- change the bottom half of the screen so that it displays the search information for the customers
- display the search toggle button as being toggled
Cancel
- do not save the changes that were made to the current record
- clear all of the fields
- change the bottom half of the screen so that it displays the search information for the customers
- display the search toggle button as being toggled
Help
- display a window containing pertinent information about the current screen
- give the option to go back to the last screen (i.e. quit help)
Quit
- prompt the user to make sure that he actual wants to quit
- if the response is positive then exit PHDS and return to the operation system
- if the response is negative return to the previous screen
"Carrier Delivery Information" Buttons
Add Route
- Check to see if any record has been highlighted in the routes table
- if no record is highlighted then don't do anything
- if a record is highlighted then
- add the record to the carriers database
- display the pertinent information in the carrier routes table
Remove Route
- Check to see if any record has been highlighted in the routes table
- if no record is highlighted then don't do anything
- if a record is highlighted then
- remove the record from the carriers database
- fix the display in the subscription table so that the former record is no longer showing
Routes Screen
"Route Screen" Toggle Buttons
New
- increment the (internal) carrier route
- display the "customers in route information" screen at the bottom of the screen (note: if not in search mode it will already be there)
- clear all of the fields
- de-activate all the buttons except for Save, Cancel and Help
- put the program (i.e. ACCESS) into edit mode so that the fields may be edited
- display the new toggle button as being toggled
Edit
- display the route information screen at the bottom of the screen (note: if not in search mode it will already be there)
- de-activate all the buttons except for Save, Cancel and Help
- load the fields of a specific record of a route into their corresponding location on the screen
- put the program (i.e. ACCESS) into edit mode so that the fields may be edited
- display the edit toggle button as being toggled
Search
- clear all of the fields
- change the bottom half of the screen so that it displays the search information for the routes
- display the search toggle button as being toggled
"Route Screen" Buttons
Delete
- prompt the user to make sure they want to perform this action
- if the response is positive then
- verify that all of their aren't any customer assigned to that route
- if their are customers still assigned to that route then return to the previous screen
- if their aren't customers assigned to that route then
- remove the current route record from the database
- clear all of the fields
- change the bottom half of the screen so that it displays the search information for the customers
- display the search toggle button as being toggled
- if the response is negative return back to previous screen
Save
- write the current record to the database
- clear all of the fields
- change the bottom half of the screen so that it displays the search information for the customers
- display the search toggle button as being toggled
Cancel
- do not save the changes that were made to the current record
- clear all of the fields
- change the bottom half of the screen so that it displays the search information for the customers
- display the search toggle button as being toggled
Help
- display a window containing pertinent information about the current screen
- give the option to go back to the last screen (i.e. quit help)
Quit
- prompt the user to make sure that he actual wants to quit
- if the response is positive then exit PHDS and return to the operation system
- if the response is negative return to the previous screen
Walkthroughs
Customer Search Walkthrough
- Select customer tab on the right side of the screen. The default screen that appears is the customer search screen. The "Customers" tab becomes highlighted indicating that the user is in the Customers interface. The "Search" radio button, located on the button bar, is highlighted to indicate that the program is in search mode. The search screen is divided into Customer Information section and Customers List section.
- Information of a customer can be searched by entering data into one or more fields in the Customer Information section. Enter "Smith" in the surname field in the Customer Information section. If the search is successful, the listbox in the Customers List section will contain name, address, and postal code of all the customers that share the surname. Otherwise, the Customer List will be empty. Entering incorrect data type in data fields will cause error messages. Data in the surname, give name, and city fields are alphabetic characters. Data in the address, postal code are alphanumeric. The phone number field should contain no alphabets. The province and route fields are pull-down menus. No data can be entered but selected from the pull-down menus in those two fields. Enter "John" in the given name field in the Customer Information section. Now if John Smith is one of the customers, the customer list in the Customer List section is shortened and only contains records of customer(s) with that name. A specific customer's information can be displayed by highlighting a customer record in the Customer List using the mouse. The highlighted customer's information is shown in the Customer Information Section.
- A new search for another customer can be done by clicking the New Search button below the customer listbox. All the fields in the Customer Information section are cleared and the Customers List is reset.
Publication Edit Walkthrough
- Select the Publications tab on the right side of the screen. The default mode in the Publications interface is Search mode. The search mode screen consists of Publication Information section and Publications List section. A publication record has to be searched and retrieved before any modifications can be made to that record.
- Information of a publication can be searched by entering data into one or more fields in the Publication Information section. Entering incorrect data type in data fields will cause error messages. Data in the publication name, publisher name, distributor name, publication type, publication frequency, and description fields are alphabetic characters. Data in the address, postal code are alphanumeric. The distributor phone number and number of subscriptions fields should contain no alphabets. The key words field is a pull-down menu. No data can be entered but selected from the pull-down menu in that field. Enter "Byte" in the Publication Name field in the Publication Information section. As this information is entered the list of publications in the Publication List listbox contains only the those that match the search criteria. If the search for "Byte" magazine is successful, the listbox in the Publications List section will show the name the name of the magazine and all the information of that magazine will display in the Publication Information section. The Publication List will be empty if the search is unsuccessful.
- A new search for another publication can be done by clicking the New Search button below the publication listbox. All the fields in the Publication Information section are cleared and the Publications List is reset.
- Once an existing publication's record is displayed in the Publication Information section, data in all the fields in that section can be edited by selecting the Edit radio button on the button bar. The Edit mode screen is divided into Publication Information section and Publication Description section. Publication Information section remains the same as in search mode with the exception that modification to data in each field is allowed. Instead of the Publications List listbox, the Publication Description is displayed in the bottom half of the edit screen. It contains the number of subscriptions and description of a publication.
- Use the mouse or the tab key to move the data field where modification is needed. Delete old data and type in new information. Select the Save button to save any modifications made to the database and the program returns to search mode. Click the Cancel button to return to the search screen without saving any changes.
Routes Printout Walkthrough
- Select the Routes tab on the right side of the screen. The default mode in the Routes interface is search mode Select the Print radio button on the button bar to enter print mode. The screen is divided into Route Information section and Select Routes section.
- In the Select Routes section a scrollable listbox contains the route number and the route carrier of all the routes. There are two buttons, the Print All button and the Print button, below the listbox.
- Click the Cancel button to return back to the search mode without generating any printouts.
- If you wish to generate printout which contains the route name, carrier name, carrier address, carrier phone number, route customer address, status, and publication(s) received by each customer of a particular route, highlight the desired route number in the Select Routes listbox and click the Print button.
- If printouts of multiple routes are needed, hold the shift key and select the route numbers in the Select Routes listbox. Then click the Print button to generate printouts.
- Getting printouts of all routes can be done more efficiently by simply clicking the Print All button.
Appendix A contains the DFD and ERD diagrams that were used to design the system. Also included in this appendix is a data dictionary that lists all the major components of the DFD and ERD diagrams.
Context Diagram

Data Flow Diagram

Entity Relationship Diagram

Data Dictionary
address = street + house + postal code
* non-key attribute of object "Customers" and key
* attribute of "Carriers"

apartment number = string
* used to define "house"
* 7 characters long

balance = integer
* non-key attribute of "Customers"
* if negative: credit balance to customer
* if positive: balance owing by customer

carrier = carrier info
* data flow in DFD

Carriers = @name + @address + phone number + route info
* object; represents the carriers currently in system

customer number = integer
* key attribute of the object "Customers"
* n-digit integer specific to each customer

customer info = Customers
* data flow in DFD; corresponds to an instance of the
* object "Customers"

customer = customer info
* data flow in DFD

date = days + months
* used to define "date suspend"

date suspend = date
* used to define "status"
* date to which deliveries are suspended

days = integer
* used to define "period suspend" and "date"

description = string
* non-key attribute of "Publications"
* brief description of publication

first name = string
* used to define "name"
* 15 characters long

frequency of delivery = [ daily | weekly | biweekly | monthly | irregular ]
* non-key attribute of "Publications"
* irregular - specific dates for delivery

house number = string
* used to define "house"
* 7 characters long

house = [house number | apartment number]
* used to define the attribute "address"
* 7 characters long

Customers = @customer number + name + address + phone number + status +
subscription + balance + notes + route info
* object; represents the Customers in the system

key descriptor = string
* non-key attribute of "Publications"
* key-word for the publication

last name = string
* used to define "name"
* 20 characters long

list of customer = {Customers}
* non-key attribute of "Routes"
* list of Customers on route

months = integer
* used to define "period suspend" and "date"
* two digit representation of the months of the year

name = first name + last name
* non-key attribute of "Customers" and "Route"; key
* attribute of "Carriers"

note = string
* non-key attribute of "Customers"
* used for special instructions

number of customer = integer
* non-key attribute of "Routes"
* number of customer on route

number of subscriber = integer
* non-key attribute of "Publications"
* 7 digit integer

period suspend = [ days | months ]
* used to define "suspend"
* length of time deliveries are suspended for

phone number = string
* non-key attribute of "Customers" and "Carriers",
* also used to define "supplier"
* string of digits in this format: (XXX) XXX-XXXX

postal code = string
* non-key attribute to "Routes", also used to define the
* attribute "address"
* 6 characters

price scheme =
* non-key attribute of "Publications"
* user defined schemes

publication = publication info
* data flow in DFD

publication info = Publications
* data flow in DFD; corresponds to an instance of the
* object "Publications"

publication name = string
* key attribute of the object "Publications"
* 30 characters

Publications = @publication name + publisher + supplier + price scheme + type +
frequency of delivery + description + key descriptor + number of
subscriber
* object; represents the publications available

publisher = string
* non-key attribute of "Publications"
* 30 characters

range = {postal code}
* non-key attribute of "Routes"
* list of postal codes covered by route

route = route info
* data flow in DFD

route number = integer
* key attribute of "Route", also used to define "route
* info"

route name = string
* non-key attribute of "Route", also used to define
* "route info"
* 5 to 15 characters long

route info = Route
* data flow in DFD; corresponds to an instance of the
* object "Route"
carrier info = Carrier
* data flow in DFD; corresponds to an instance of the
* object "Carrier"

route info = route name + route number
* non-key attribute of "Customers" and "Carriers"
* route to which the customer or carrier belongs

Routes = @route number + route name + range + number of customer + name
+ list of customer
* object; represents routes in system, name refers to
* name of carrier responsible for route

status = [suspend | not suspend]
* non-key attribute of "Customers"
* used to determine if deliveries should be made to
* a customer

street = string
* used to define the attribute "address"
* 15 characters long

subscription = {publication title}
* non-key attribute of "Customers"
* a list of publications subscribed by the customer

supplier = supplier name + phone number
* non-key attribute of "Publications"

supplier name = string
* used to define "supplier"
* 30 characters

suspend = [ date suspend | period suspend ]
* used to define "status"

type = [ "m" | "n" ]
* non-key attribute of "Publications"
* type of publication, "m" - magazine, "n" - newspaper
[Return to Table of Contents]
Appendix B contains the complete set of interface screen shown in the document. They are shown here for quick reference.
Figure 1.1 - Customer new screen
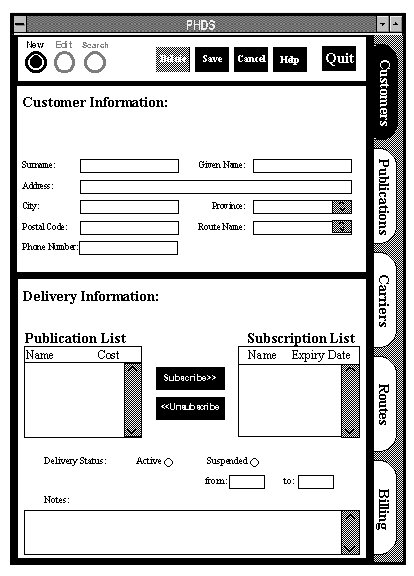
Figure 1.2 - Customer edit screen

Figure 1.3 - Customer search screen
Figure 2.1 - Publication new screen
Figure 2.2 - Publication edit screen
Figure 2.3 - Publication search screen
Figure 3.1 - Carrier new screen
Figure 3.2 - Carrier edit screen
Figure 3.3 - Carrier search screen
Figure 4.1 - Route new screen
Figure 4.2 - Route edit screen
Figure 4.3 - Route print screen
Figure 4.4 - Route print screen
Glossary of Terms
The following is a list of terms taken from the document. Each term provides an explanation as to its definition.
Active - an item that is currently in use or that can be selected
Button Bar - a row (or column) of buttons
Button - a polygonal shaped object that can be selected with a mouse click to perform a function
Click/Mouse Click - pressing and releasing the left mouse button while the mouse pointer is over the desired area of a screen (usually a button)
Context Diagram - shows the possible data interaction between the program user and the program itself
Data Flow Diagram - shows the flow of data from one function to another within a system
Data Dictionary - a list of definitions of words used in the entity relationship diagram and the data flow diagram
Double Click - rapidly pressing and releasing the left mouse button while the mouse pointer is over the desired area of a screen (usually a button)
Editable Field - an area that may or may not contain data that can be edited
Entity Relationship Data - show the relationship between databases in a system
Field - an area that may or may not contain data
Greyed-Out - an item (e.g. button) that is inactive
Inactive - an item that is not currently in use or that cannot be selected
List Box - a box which contains a list of related items that can be selected using a mouse click
Menu Bar - a horizontal bar containing names of options that can be selected with a mouse click
Modes - different options/functions that can be selected or deselected with a mouse click
Pull Down Menu - a list of tasks or functions that is displayed when an option is chosen from a menu bar
Radio Button - a round button that can be selected by a mouse click to perform a function
Screen Shot - a picture of an instance of what is displayed on a monitor
Scroll Bar - appears on the right and/or button of a window to indicate the contents of a window is larger than the display area; contains two scroll arrow which is used to view the unseen contents; a scroll box indicates the relative position of the current display to the entire content
Tab - a label that extends out from the current window that can be selected to change to a different function
Text Box - a box/field which may or may not contain text that can or cannot be edited