Reference Manual
3.1 Main Selection
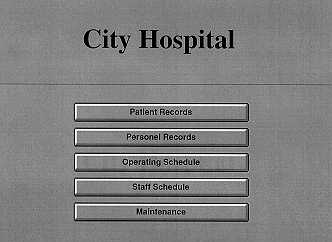
- Maintenance screens: deals primarily with managing the physical layout
of the hospital. Allows you to do the following functions.
- Operating Schedule: enables the user to schedule patient operations and
schedules staff for surgical procedures. Allows you to do the following
functions:
- "Add/New" - to add a new operation to the system
- "Cancel" - to return from a chosen selection
- "Close" - to close the screen
- "Delete" - to delete the operation information
- "Save" - to save the information to the data base
- Patient Records: manages the patient data maintained by the HMS system.
It allows you to do the following functions:
- "Add/New" - to add a new patient to the system
- "Cancel" - to return from a chosen selection
- "Close" - to close the screen
- "Delete" - to delete the patient's information
- "Operating" - to check the patient's operating schedule
- "Save" - to save the information to the data base
- Personnel Records: manages the hostpital staff data maintained by
the HMS system. Maintains basic personal and scheduling information
for hostpital staff members. Allows you to do the following functions:
- "Add/New" - to add a new staff member to the system
- "Cancel" - to return from a chosen selection
- "Close" - to close the screen
- "Delete" - to delete the staff member's information
- "Operating" - to check the staff member's operating schedule
- "Save" - to save the information to the data base
- "Shift" - to check the staff member's shift schedule
- Staff Schedule: enables the user to manipulate staff work schedules
for various wards in the hospital. Allows you to do the following
functions:
- "Add/New" - to add new information for a particular shift to the system
- "Cancel" - to return from a chosen selection
- "Close" - to close the screen
- "Delete" - to delete the shift information
- "Save" - to save the information to the data base
- There is no close or exit button as it is assumed that this system will
always be running.
3.2 Patient Information
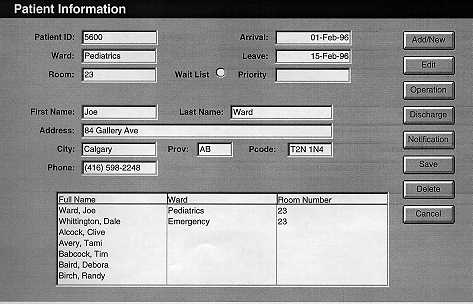
- Label Parts:
- There are fields in which to enter the patient's ID number, the ward that they
are admitted to, the room that they are assigned to, their admission date,
their expected leave date, if they are on the waiting list or not, their first
name and last name, address, city, province, postal code,and phone number.
-
There is also a list box where the patient information, for example what room
they are in, can be viewed.
- Add/New:
- By clicking on the Add/New button you will get a blank screen in which to add
the new patient's information. To get to the individual fields one should use
the tab button.
- If there is a room available then they are immediately admitted to the
hospital, otherwise they are put on the waiting list.
- Cancel:
- The Cancel button allows you to return from a chosen selection without
saving any data.
- Discharge:
- The Discharge button allows you to discharge a patient from the hospital.
The Patient records are retained on the database, with an "inactive" tag.
- Edit:
- To modify the patient's information hit the Edit button and then correct the
relevant information.
- Notification:
- this is a future enhancement.
- Operation:
- The Operation button allows you to view a patient's operation appointments.
A patient can be selected via browsing.
- Save:
- To save the patient's information hit the Save button. This will add the
information to the data base.
- Error Messages:
- A message will come up asking if you want to delete any information
after hitting the delete button.
- A message will come asking if you are sure that you want to save the
information after hitting the save button.
- Browse:
- The default mode for the Patient screen is browsing. There is
no specific browse button. To browse the Patient database enter
information in any one of the fields. It will actively search the
database for the patient(s) with that particular information
pertaining to that field. The patient(s) that match that information
will appear in the list box on the bottom of the screen. To narrow the
search just enter in more fields. To perform an action on a specific
patient you must click on the patient in the list box.
- Wait List:
- When browsing, selecting the Wait List button will display those
patients who are on the waiting list.
3.3 Staff information
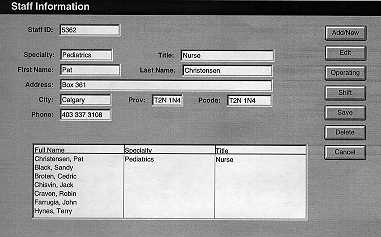
- Label Parts:
- There are fields in which to enter the staff member's ID number, their
specialty, their title (Doctor, Supervising or Regular Nurse), their first and
last names, their address, city, prov, pcode, and phone number.
- Add/New:
- By clicking on the Add/New button you will get a blank screen in which to add
the new staff member's information. To get to the individual fields one should
use the tab button.
- Cancel:
- The Cancel button allows you to return from a chosen selection without
saving any data.
- Edit:
- To modify the staff member's information hit the Edit button and then correct
the relevant information.
- Operating:
- The Operating button allows you to view staff member's operation schedule.
A staff member can be selected via browsing.
- Save:
- To save the staff member's information hit the Save button. This will add the
information to the data base.
- Shift:
- The Shift button allows you to view staff member's shift schedule.
A staff member can be selected via browsing.
- Terminate:
- The Terminate button allows you to terminate a staff member from the hospital.
The staff records are retained on the database, with an "inactive" tag.
- Error Messages:
- A message will come up asking you if you want to delete any information
after hitting the delete button.
-
A message box will come up asking you to verify the ward schedule
information. It will state if an extra doctor is needed on a particular ward
for a particular shift etc.
- Browse:
- The default mode for the Staff screen is browsing. There is
no specific browse button. To browse the Staff database enter
information in any one of the fields. It will actively search the
database for the staff members with that particular information
pertaining to that field. The staff members that match that information
will appear in the list box on the bottom of the screen. To narrow the
search just enter in more fields. To perform an action on a specific
patient you must click on the staff member in the list box.
3.4 Operating Room Schedule
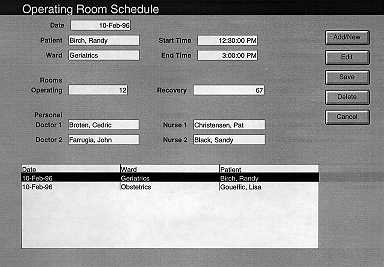
- Label Parts:
- There are fields in which to add the date, operation number, start time of the
operation, and expected end time of the operation, and the patient to be
operated on.
-
There are list boxes that will allow the user to choose the ward that the
patient is coming from, the operating room number, the recovery room number,
the two Doctors available to perform the operation, and the two nurses that are
available to assist the Doctors.
-
There is also a scroll box where the O/R schedule can be viewed.
- Add/New:
- By clicking on the Add/New button you will get a blank screen in which
to add the new operation to the schedule.
- Cancel:
- The Cancel button allows you to return from a chosen selection without
saving any data.
- Delete:
- The Delete button allows you to remove an O/R schedule from the database.
An O/R schedule is selected via browsing. You will be asked to confirm
deletion. Answer yes will carry out deletion and no will cancel the deletion.
- Edit:
- To modify the patient's information hit the Edit button and then correct the
relevant information. 'Save' to make permenent. 'Cancel' to Undo.
- Save:
- The Save button allows you to save any changes that you have made to
the O/R schedule record.
- Error Messages:
- A message will come up asking if you want to delete any information
after hitting the delete button.
-
A message will come asking if you are sure that you want to save the
information after hitting the save button.
- Browse:
- The default mode for the O/R schedule screen is browsing. There is
no specific browse button. To browse the O/R schedule database enter
information in any one of the fields. It will actively search the
database for the O/R schedule with that particular information
pertaining to that field. The O/R schedule that matches that information
will appear in the list box on the bottom of the screen. To narrow the
search just enter in more fields. To perform an action on a specific
patient you must click on the O/R schedule in the list box.
3½ Shift Schedule
Customer Comment
Should the above heading be:
3.5 Shift Schedule
instead of
3½ Shift Schedule.
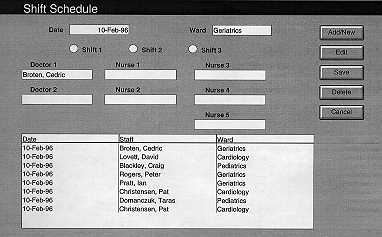
- Label Parts:
- There are fields in which to enter the information for date.
-
There are radial buttons to pick the particular shift to schedule (Shift 1, 2
or 3). By clicking on any of these shift buttons, you will select that
particular field to be part of our search.
-
There are list boxes from which to choose the ward to work in, and the Doctors
and Nurses that are available to work during a particular shift.
- Add/New:
- By clicking on the Add/New button you will get a blank screen in which
to add the new shift to the shift schedule.
- Cancel:
- The Cancel button allows you to return from a chosen selection without
saving any data.
- Delete:
- The Delete button allows you to remove an shift schedule from the database.
A shift schedule is selected via browsing. You will be asked to confirm
deletion. Answer 'yes' will carry out deletion and 'no' will cancel the
deletion.
- Edit:
- To modify the shift information hit the Edit button and then correct the
relevant information. 'Save' to make permenent. 'Cancel' to Undo.
- Save:
- The Save button allows you to save any changes that you have made to
the shift schedule record.
- Error Messages:
- A message will come up asking if you want to delete any information
after hitting the delete button.
-
A message box will come up asking you to verify the ward schedule
information. It will state if an extra doctor is needed on a particular ward
for a particular shift etc.
- Browse:
- The default mode for the Shift schedule screen is browsing. There is
no specific browse button. To browse the Shift schedule database enter
information in any one of the fields. It will actively search the
database for the Shift schedule with that particular information
pertaining to that field. The Shift schedule that matches that information
will appear in the list box on the bottom of the screen. To narrow the
search just enter in more fields. To perform an action on a specific
patient you must click on the Shift schedule in the list box.
Next Section
Previous Section
Back to the User Manual titlepage
Back to the main page
Last Modified Mar. 19, 1996 by Howell Cobb