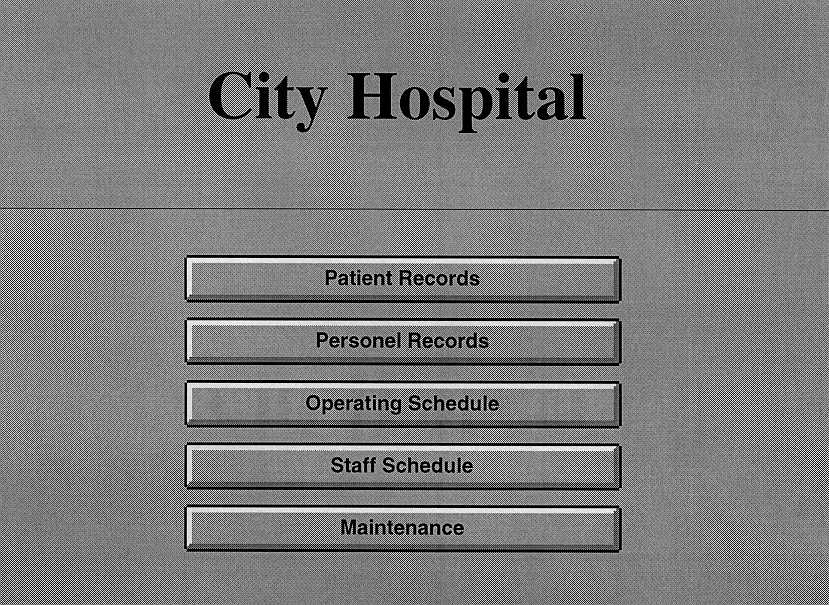
Figure 1
This function allows new patients to be admitted to the hospital, or patients added to the wait list.
Click on the Patient Records button on the City Hospital screen (Fig. 1).
Figure 1
The Patient Information screen will appear with all patients displayed in patient list box (Fig. 2).
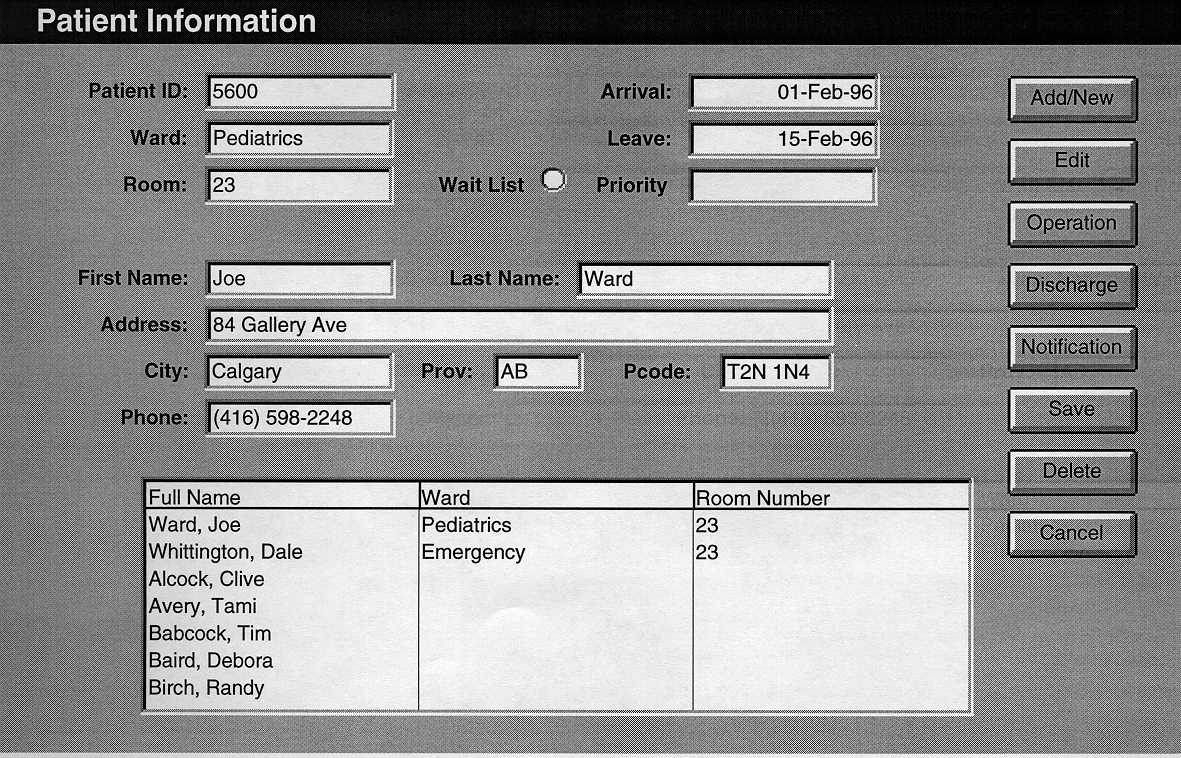
Figure 2
Click on the Add/New button. The patient information fields will be cleared. The cursor should be positioned at the arrival field.
Each field can be reached by a number of methods: by using the Tab key to advance to the next field, using the return key to advance to the next field, using the left and right arrow keys to toggle fields or by pointing at a field width the mouse, and clicking on that field. We will be using the Tab method in our dialogue.
Click on the Save button to save the patient information you have entered. A confirmation box will appear on your screen.
Click on the OK button. The new patient will appear in the list box.
If you made a mistake in entering the patient information, you can cancel by clicking on the Cancel button. Repeat steps 2 through 4 to add a new patient.
Often, a staff member will need to view a patient's file.
Click on the Patient Records button on the City Hospital screen (Fig. 1).
The Patient Information screen will appear with all patients displayed in patient list box (Fig. 2).
Move the Last Name field, either by pressing the Tab key, or by clicking on the Last Name field with mouse. Type in the name Ward. Notice that the list box on the lower half of the screen now displays only patients with the name Ward. Using the mouse, click on the line containing Joe Ward. This patient's information will be displayed.
Occasionally, patient information changes. For instance, if Joe Ward moves while he is on the waiting list, the hospital would need to record this information so that a two week notification can be sent to the correct address.
Click on the Patient Records button on the City Hospital screen (Fig. 1).
The Patient Information screen will appear with all patients displayed in patient list box (Fig. 2).
Move the Last Name field, either by pressing the Tab key, or by clicking on the Last Name field with mouse. Type in the name Ward. Notice that the list box on the lower half of the screen now displays only patients with the name Ward. Using the mouse, click on the line containing Joe Ward. This patient's information will be displayed.
Click on the Edit button. The cursor should be positioned at the arrival field.
Press the Tab key until the cursor is on the Address field, or, using the mouse, click on the Address field. Type in Joe's new address which he has kindly forwarded to the hospital: 45 Osprey Orchard.
Click on the Save button to change Joe Ward's address permanently. A confirmation box will be displayed. Click on the OK button.
If you made a mistake in entering the patient information, you can cancel by clicking on the Cancel button. Repeat steps 2 through 5 to change the patient information.
Patients are generally added to the waiting list only if there are no rooms currently available. A patient can also be placed on the waiting list if there are rooms available, to schedule a procedure for a more convenient time.
Click on the Patient Records button on the City Hospital screen (Fig. 1).
The Patient Information screen will appear with all patients displayed in patient list box (Fig. 2).
Click on the Add/New button. The patient information fields will be cleared. The cursor should be positioned at the arrival field.
Each field can be reached by two methods: by using the Tab key to advance to the next field, or by pointing at a field with the mouse, and clicking on that field. We will be using the Tab method.
Click on the Save button to save the patient information you have entered. A confirmation box will be displayed. Click on the OK button. The new patient will appear in the list box.
If you made a mistake in entering the patient information, you can cancel by clicking on the Cancel button. Repeat steps 2 through 4 to add a new patient.
A patient, who is already on record, comes to the hospital, to schedule a procedure to be performed at some convenient future time.
Click on the Patient Records button on the City Hospital screen. (Fig. 1)
The Patient Information screen will appear with all patients displayed in patient list box. (Fig. 2)
Move the Last Name field, either by pressing the Tab key, or by clicking on the Last Name field with mouse. Type in the name Ward. Notice that the list box on the lower half of the screen now displays only patients with the name Ward. Using the mouse, click on the line containing Joe Ward. This patient's information will be displayed.
Click on the Edit button. The cursor should be positioned at the arrival field.
Press the Tab key until the cursor is on the Wait radio button, or, using the mouse, click on the Wait radio button. Click on the radio button. The priority field will become blank.
Note that if there are no rooms available in the ward, you will not be able to take the patient off the waiting list.
Press the Shift and Tab keys at the same time to get to the Room field.
To select a room, click and hold on the arrow to the right of the ward field. A list of available rooms for the Pediatrics ward will appear. Scroll through the list until a suitable room appears. Click on that line. The Drop down list will disappear, and room you have selected will appear in the Room field.
Click on the Save button to save the changes to Joe Ward's patient record.
A confirmation box will be displayed. Click on the OK button.
If you made a mistake in entering the patient information, you can cancel by clicking on the Cancel button. Repeat steps 2 through 6 to change the patient information.
A patient comes to the hospital to be admitted, but is already on the wait list. Or, a patient dies or no longer requires the procedure and needs to be removed from the wait list.
Click on the Patient Records button on the City Hospital screen. (Fig. 1)
The Patient Information screen will appear with all patients displayed in patient list box. (Fig. 2)
Move the Last Name field, either by pressing the Tab key, or by clicking on the Last Name field with mouse. Type in the name Ward. Notice that the list box on the lower half of the screen now displays only patients with the name Ward. Using the mouse, click on the line containing Joe Ward. This patient's information will be displayed.
Click on the Edit button. The cursor should be positioned at the arrival field.
Press the Tab key until the cursor is on the Wait radio button, or, using the mouse, click on the Wait radio button. Click on the radio button. The priority field will become blank.
Note that if there are no rooms available in the ward, you will not be able to take the patient off the waiting list.
Press the Shift and Tab keys at the same time to get to the Room field.
To select a room, click and hold on the arrow to the right of the ward field. A list of available rooms for the Pediatrics ward will appear. Scroll through the list until a suitable room appears. Click on that line. The Drop down list will disappear, and room you have selected will appear in the Room field.
Click on the Save button to save the changes to Joe Ward's patient record.
A confirmation box will be displayed. Click on the OK button.
If you made a mistake in entering the patient information, you can cancel by clicking on the Cancel button. Repeat steps 2 through 5 to change the patient information.
When a patient dies, or has completed his/her stay at the hospital, the patient should be removed/discharged from the hospital to free up the room. A discharge notice is printed at this time.
Click on the Patient Records button on the City Hospital screen. (Fig. 1)
The Patient Information screen will appear with all patients displayed in patient list box. (Fig. 2)
Move the Last Name field, either by pressing the Tab key, or by clicking on the Last Name field with mouse. Type in the name Ward. Notice that the list box on the lower half of the screen now displays only patients with the name Ward. Using the mouse, click on the line containing Joe Ward. This patient's information will be displayed.
Click on the Discharge button. The system will enter today's date as the leave date.
A confirmation box will be displayed. Click on the OK button.
A notice will be printed, containing all the information about his stay.
This function allows new personnel to be added to the hospital staff.
Click on the Personnel Records button on the City Hospital screen (Fig. 1).
The Staff Information screen will appear with all staff displayed in the staff list box (Fig. 3).
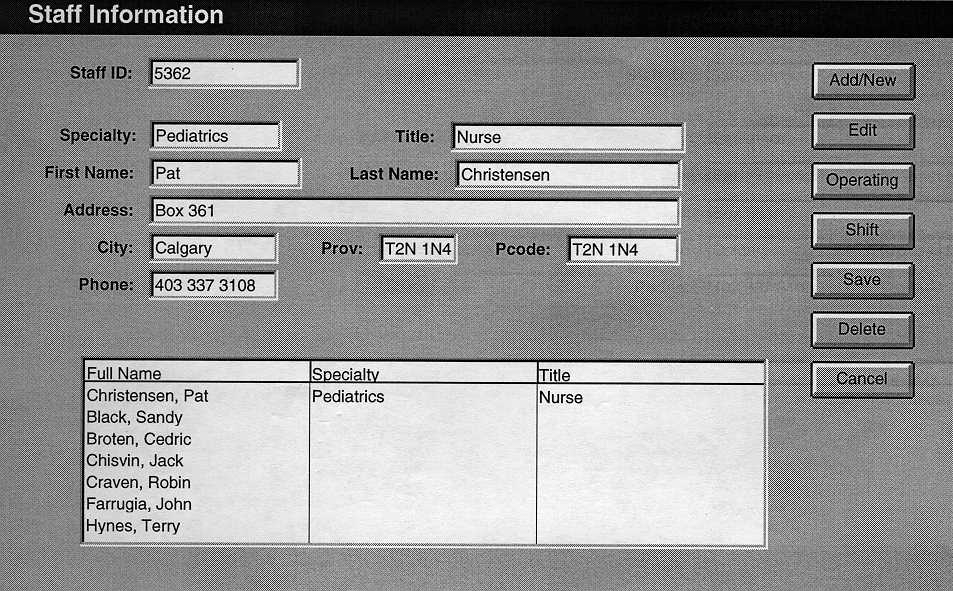
Figure 3
Click on the Add/New button. The staff information fields will be cleared. The cursor should be positioned at the Specialty field.
Each field can be reached by two methods: by using the Tab key to advance to the next field, or by pointing at a field with the mouse, and clicking on that field. We will be using the Tab method.
Click on the Save button to save the staff information you have entered. A window will pop up on the screen asking you to confirm that you want to save the staff member. Click on OK to save the staff member. A message will appear in the bottom left corner indicating that the patient has been saved. The new staff member will appear in the list box.
If you made a mistake in entering the staff information, you can cancel by clicking on the Cancel button. Repeat steps 2 through 4 to add a new staff member.
Click on the Close button to exit from the screen and return to the City Hospital Screen.
This function allows you to display the information for a staff member.
Click on the Personnel Records button on the City Hospital screen (Fig. 1).
The Staff Information screen will appear with all staff members displayed in the staff member list box (Fig. 3).
Click on Christensen, Pat in the Staff member list box on the bottom half of the screen. The information for that staff member will appear in the text fields on the top half of the screen.
Click on the Close button to exit from the screen and return to the City Hospital Screen.
This function allows you to change the information for a staff member.
Click on the Personnel Records button on the City Hospital screen (Fig. 1).
The Staff Information screen will appear with all staff members displayed in the staff member list box (Fig. 3).
Click on Christensen, Pat in the Staff member list box on the bottom half of the screen. The information for that staff member will appear in the text fields on the top half of the screen.
Click on the Address field. Enter a new address for the staff member: 820 734 15th Ave S.W.
Click on the Pcode field. Enter a new postal code for the staff member: T1N 4X6
If you made a mistake in entering the staff information, you can cancel by clicking on the Cancel button. Repeat steps 2 through 5 to update another staff member.
Click on the Save button to save the staff member information you have changed. A window will pop up on the screen asking you to confirm that you want to save the updated staff member. Click on OK to save the staff member. A message will appear in the bottom left corner indicating that the staff member has been saved. The updated staff member information will appear in the list box.
Click on the Close button to exit from the screen and return to the City Hospital Screen.
This function allows you to terminate a staff member from the hospital.
Click on the Personnel Records button on the City Hospital screen (Fig. 1).
The Staff Information screen will appear with all staff members displayed in the staff member list box (Fig. 3).
Click on Christensen, Pat in the Staff member list box on the bottom half of the screen. The information for that staff member will appear in the text fields on the top half of the screen.
Click on the Delete button to terminate the staff member. A window will pop up on the screen asking you to confirm that you want to terminate the staff member. Click OK to terminate the staff member. A message will appear in the bottom left corner indicating that the staff member has been terminated from the staff. The staff member will disappear from the staff member list box.
Click on the Close button to exit from the screen and return to the City Hospital Screen.
This function allows the scheduling for an operation. All unscheduled operations are listed in the Schedules list box at the the bottom of the Operating Room Schedule.
Click on Operating Schedule button on the City Hospital Screen (Fig. 1).
The Operating Room Schedule screen will appear with all scheduled operations displayed in Operating Room Schedule list box (Fig. 4).
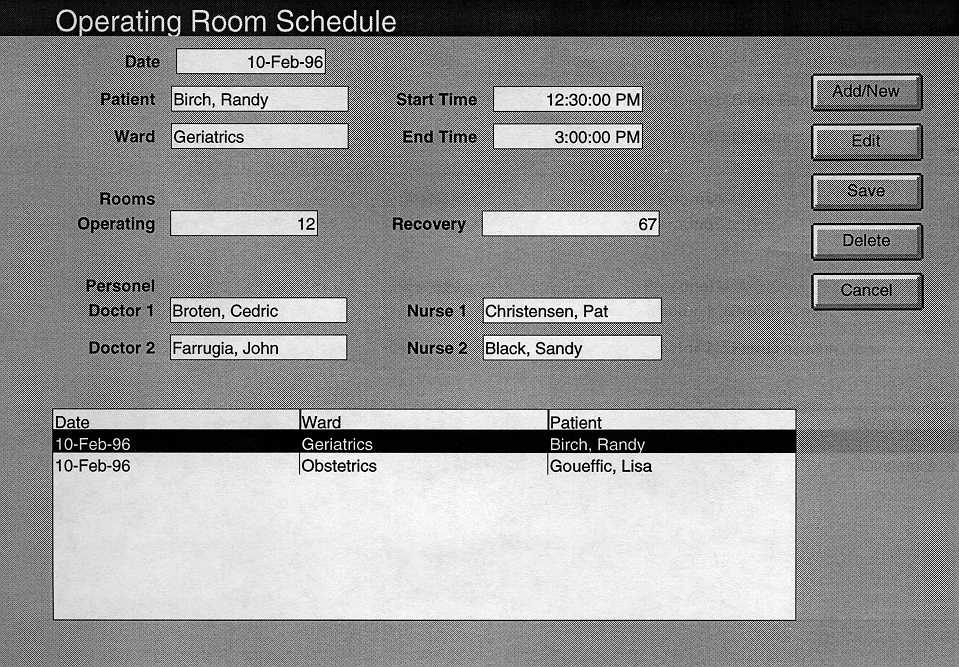
Figure 4
Click on the Add/New button. The Operating Room Schedule fields should be cleared. The cursor should be positioned at the Date field.
Each field can be reached by two methods: by using the Tab key to advance to the next field, or by pointing at a field with the mouse, and clicking on that field. We will be using the Tab method.
Point and click into the Doctor1 field to move your cursor to the Personnel section.
Click on the Save button to save the operating schedule information you have entered. A message will appear in the bottom left corner indicating that the schedule has been saved. The new operating schedule should now appear in the list box.
This function allows for the editing of an already scheduled operating schedule.
Now as we are still in the Operating Room Schedule screen. Click on the Edit button. The Operating Room Schedule fields should be cleared. The cursor should be positioned at the Date field.
To select an already scheduled operation, notice that Operating Room Schedule's List box now displays all already scheduled operations. Point and Click on Joe Ward patient line from the List box. All information related to the specific operation schedule will be filled in the appropriate fields.
Point and click into the Doctor1 field to move your cursor to the Personnel section.
Note that the Operating Room Schedule's List Box now displays all available doctors with Pediatrics specialty. Move your cursor inside the List Box and point and click on Dr Sam Bridges. Note that Bridges, Sam is now displayed in the Doctor 1 field.
If you made a mistake in entering the operating schedule information, you can cancel by clicking on the Cancel button.
Click on the Save button to save the updated operating schedule information you have entered. A message will appear in the bottom left corner indicating that the schedule has been saved. The new operating schedule should now appear in the list box.
This function allows the deletion of an already scheduled operation.
Now as we are still in the Operating Room Schedule screen. Let us delete the above schedule we have created. Notice that Operating Room Schedule's List box now displays all already scheduled operations.
To select an already scheduled operation, Point and Click on Joe Ward patient line from the List box. All information related to the specific operation schedule will be filled in the appropriate fields.
Point and Click on the DELETE Button.
A window should appear on top of the Operating Room Schedule screen with the following message: ARE YOU SURE YOU WANT TO DELETE OPERATION?
Point and Click on the YES button. At this time your selected Operating Room Schedule you selected is deleted from the List Box.
This function allows staff scheduling on a specified ward for a specific period of time.
Click on Staff Schedule button on the City Hospital Screen (Fig. 1).
The Staff Schedule screen will appear with all scheduled staff in Staff Schedule list box along with the date and Ward (Fig. 5).
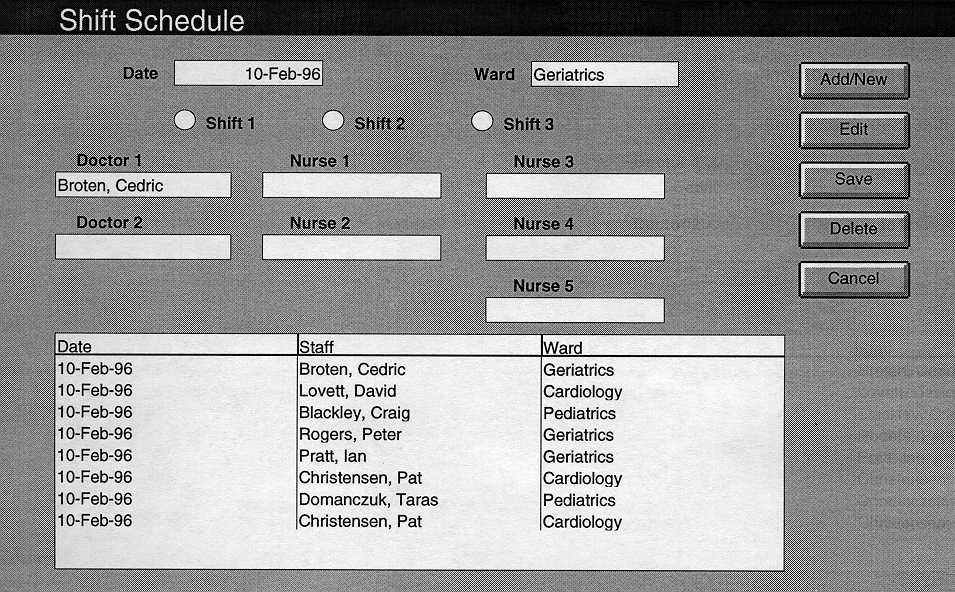
Figure 5
Click on the Add/New button. The Staff Schedule screen fields should be cleared. The cursor should be positioned at the Date field.
Each field can be reached by two methods: by using the Tab key to advance to the next field, or by pointing at a field with the mouse, and clicking on that field. We will be using the Tab method.
Press Tab to advance to shift 2 button
Press Tab to advance to shift 3 button
Press Tab to advance to Doctor 1 field
If you made a mistake in entering the Shift schedule information, you can cancel by clicking on the Cancel button. Repeat steps 2 through 4 to add a new Shift Schedule.
Click on the Save button to save the shift schedule information you have entered. A message will appear in the bottom left corner indicating that the schedule has been saved. The new operating schedule should now appear in the list box.
This function allows for editing of an already scheduled Shift schedule.
Now as we are still in Shift Schedule screen. Click on the Edit button. The Operating Room Schedule fields should be cleared. The cursor should be positioned at the Date field.
To select an already scheduled Shift, notice that Shift Schedule's List box now displays all already scheduled Shifts. Point and Click on a 10-March-96. Notice that all the fields are filled with appropriate data.
Point and click into the Doctor1 field to move your cursor to the Personnel section.
Note that the Shift Schedule's List Box now displays all available doctors with Pediatrics specialty. Move your cursor inside the List Box and point and click on Dr Sam Bridges. Note that Bridges, Sam is now displayed in the Doctor 1 field.
If you made a mistake in entering the operating schedule information, you can cancel by clicking on the Cancel button.
Click on the Save button to save the updated Shift schedule information you have entered. A message will appear in the bottom left corner indicating that the schedule has been saved. The new Shift schedule should now appear in the list box.
This function allows the deletion of an already scheduled shift.
To select an already scheduled Shift, notice that Shift Schedule's List box now displays all already scheduled Shifts. Point and Click on a 30-March-96. Notice that all the fields are filled with appropriate data.
Point and Click on the DELETE Button.
A window should appear on top of the Shift Schedule screen with the following message:
ARE YOU SURE YOU WANT TO DELETE OPERATION?
Point and Click on the YES button. At this time your selected Operating Room Schedule you selected is deleted from the List Box.
Next Section
Previous Section
Back to the User Manual titlepage
Back to the main page