 PowerMax
Realty
 2.1 Introduction
 2.2 Buyer's Search Screen
 2.2.1 Search
 2.2.2 View/Print a Listing
 2.2.3 Previous
 2.2.4 Clear Options
 2.3 Realtor/Administrator Mode
  2.3.1 Search from the Realtor/Administrator mode:
 2.3.2 Make an Offer
 2.3.3 View/Modify a Listing
 2.3.4 Insert a New Listing
 2.3.5 Modify Personal Information
 2.4 Administrator Special Functions
 Reassign
 Modify Personal Information:
Our system will have two different modes of access:
An error message will appear: LOGIN INCORRECT if an incorrect login name or password is entered.
The system is designed to present the buyer with all of the tools needed for a comprehensive search on a single screen. The buyer can perform any of four tasks.
2. The buyer can then VIEW/PRINT the information from a
choice listing by double clicking on it.
3. If the previous set of listings had a more appealing
house, then the PREVIOUS button will reset the screen to show
the listings from the previous search.
4. The buyer is also given the option to reset the search
parameters to the default settings, by clicking on the
CLEAR OPTIONS button.


If the buyer feels any confusion over what tasks can be performed, a context sensitive description is provided with a click of the HELP button.
The buyer is presented with the options of searching for a house on the basis of :
Each of the search options have designated default settings. The buyer can change these settings by manipulating the controls in the options box at the bottom of the screen. A pull-down menu allows choice of the ranges of the price, square footage, style, number of bedrooms, basement, garage, age, and lot size. RENT and BUY are chosen via radio buttons.
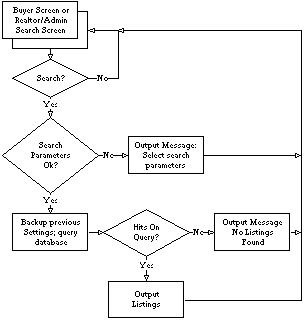
The search is initiated by clicking on the SEARCH button on the bottom of the screen. The system backs up the parameters for the last search, and uses the current settings to perform a query on the data base of listings. If the query is successful, the results are listed in the scroll box on the upper left of the screen. If no houses are found satisfying the buyer's conditions, then a "NOT FOUND" message is displayed instead.
Sample Dialogue:
When a buyer is interested in a listing that was found during a query, double-clicking on it brings up a pop-up window with detailed information on it. This window includes a verbal description of the property as well as a picture in the upper left corner. The details of the listing, such as the asking price/rent, size of the lot/property, the parameters involved in the search, as well as other amenities that were not specified in the search are also displayed. The two tasks of printing a hardcopy and quitting the window are available by clicking on the corresponding buttons located at the bottom of the screen.
From this pop-up window PREVIOUS and NEXT buttons allow a buyer to view the last listing viewed or the next listing from the listbox. Before the user closes the window, a hardcopy can be generated by clicking on the PRINT button.
The following flowchart represents screen changes or action taken based on user input.

Sample Dialogue:
When the buyer wants to access a listing that appeared on the previous search, clicking on the PREVIOUS button at the bottom of the screen accomplishes this.
Each time a search is performed, the settings from the previous search are saved. When the PREVIOUS function is initiated, the previous settings and current settings are swapped, and a new search is immediately performed.
Sample Dialogue:
The search parameters can be reset to default settings with a click of the CLEAR OPTIONS button at the bottom of the buyer's screen.

Sample Dialogue:
The last function to be manipulated determines the description accessed by the HELP window. This HELP window must be closed before the system can continue with any other process.
Realtors and Administrators can access these functions
If a user is a realtor or administrator, and wants to access some of the advanced features such as MAKING OFFERS, INSERT A NEW LISTING, etc., they follow these steps to get into the Realtor/Administrator Screen or mode:
From the Buyer's Search Screen, the realtor or administrator clicks on the GLOBE situated in the top left-hand corner of the screen. After clicking on the icon, a pop-up window will appear with a request for a LOGIN NAME and PASSWORD. Once the proper name and password are entered (after hitting the OK button), the realtor or administrator will find themselves in the Realtor/Administrator screen. If a user comes upon this pop-up screen and is not a realtor or administrator they can quit the screen by hitting the CANCEL button, and the pop-up window will disappear.


Realtor/Administrator Advanced Search Screen:
Click here to see the sample image
When the user wants to begin an options search for possible
listings the following algorithm is followed:
The user presses the SEARCH button. By doing this, the user is now faced with a new screen, called the Realtor/Administrator Advanced Search Screen. The only difference between this screen and the Buyer's Search Screen is that two new buttons appear - the EXIT button, which brings up a pop-up window and supplies one of two choices: 1) EXIT APPLICATION COMPLETELY; or 2) QUIT TO GUEST MODE (screen).

Now the user can start an options search. They can enter in desired options for a listing, such as location, price, etc. These are entered in the exact same way as a buyer would enter this information on the Buyer's Search Screen (Fig. 1). If no listings appear, or the listings look un-inviting the user can proceed one of three ways:
2) the user can leave this screen and return to the
Realtor/Administrator screen by pressing the ADVANCED OPTIONS
button; or,
3) the user can just EXIT which allows for exiting the entire program or returning to the Buyers screen.

It should be noted here that the HELP button can be used at any time, and will have the same look and feel as the Buyer's Search Screen help button, but will be context sensitive for realtors and administrators.
Sample Dialogue:
Another client has suddenly phoned Jill, and has asked her to search for a three bedroom house, in the south-west of Calgary, for under $150,000.00. Jill decided that she will do a search for such a house for her client over the phone and proceeds to do the following:
She presses the SEARCH button. A more advanced search screen appears before her, and she begins to fill the options information. Then she hits the new SEARCH button in this screen. She chooses one of the listing and reads the info to her client. After hanging up with this client, she wants to resume her work from the previous screen and she does this by pressing the ADVANCED OPTIONS button.
A reference number is designed to provide a fast, convenient access to the information of a particular property.
The Realtor/Administrator may highlight a certain property from the listing and the corresponding reference number will be shown under the REFERENCE # field. This number may be used in future reference.
On the other hand, the user may enter the reference number under the REFERENCE # column to access the information of the certain property directly.
Once the MAKE AN OFFER button is pressed, the listing realtor will have to enter the offer, which will be stored in a separate database and can be used for future references. This offer will appear in the listing information pop-up screen for the listing. Note: Offers will only be accessible to the listing realtor for that particular listing.
Make an Offer Screen:
Note: Each property can accept more than one offer.
Note: More clarification is required as to what constitutes an OFFER.

Sample Dialogue:
Click here to see the sample image
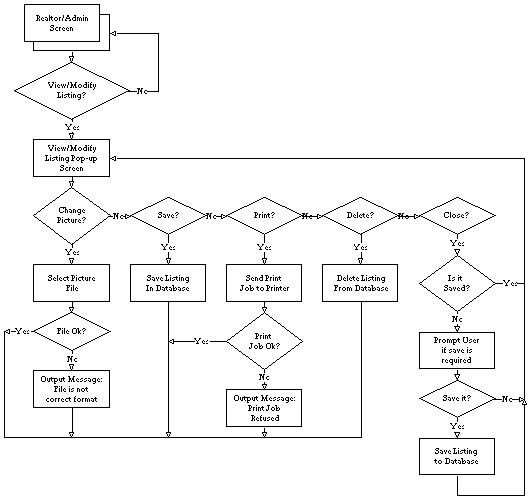
This function allows the Realtor/Administrator to view and/or modify
a listing. A realtor can only modify a listing if it is their own
listing.
A screen almost identical to the Insert New Listing screen appears with the property picture and field data. The functions available are:
Note: If any of the options is left blank or entered incorrectly an error message will appear.
Sample Dialogue:
2) was improperly entered; or
3) was not entered and the MAKE AN OFFER or VIEW/MODIFY LISTING is clicked
Click here to see the sample image
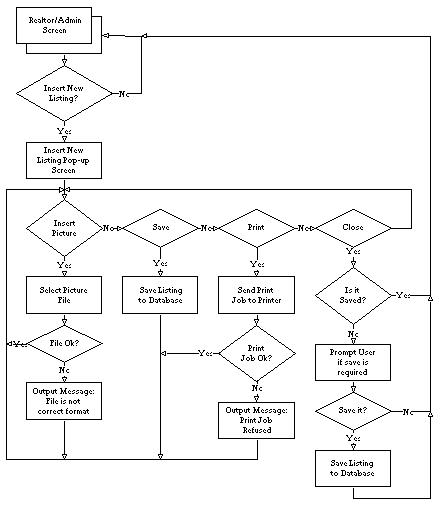
This function allows the Realtor/Administrator to insert a new
listing into the database. Each listing belongs to the realtor
who lists it.
The user can input field data into a labelled, form-type entry system. The functions available at this level are:
When adding the new listing to the database, a new reference number must be associated with the listing.
Sample Dialogue:
Note: If the picture pasting procedure is not followed correctly, an appropriate error message will appear.
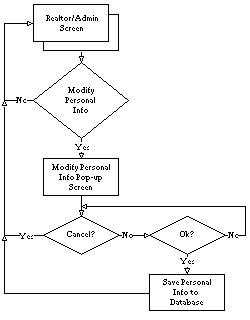
Once the MODIFY PERSONAL INFO button is clicked, the user infomation according to the login will appear.
The user can then verify the information and can make changes if necessary (for instance, his contact phone #, his new pager #, new e-mail address etc.).
Finally, the user can save the information or cancel at anytime.
Sample Dialogue:
Administrator Access Only
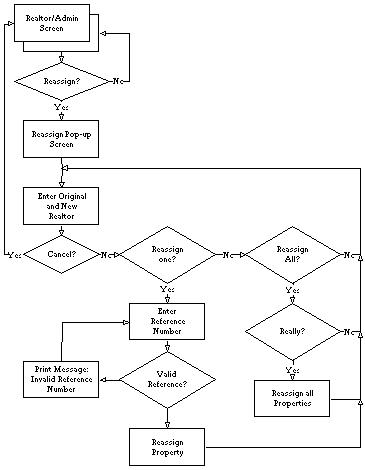
The REASSIGN function is an administrator action that allows the user to transfer one or all listings from one realtor (original) to another realtor (new).
Once the user has clicked on the REASSIGN button the user must select the appropiate original and new realtors. This is done using the scroll bars on the right of the answer box for each type of realtor. These scroll bars allow the user to scroll through an alphabetical list of all the realtors.
Note: The user is unable to select the same realtor in the two lists. Once a realtor is selected from the original list, that name is absent from the second list.
After the realtors have been selected, the user can choose to move one or all of the listings. If the user wants to just reassign one listing, then the reference number for that listing must also be inputed to the right of the REASSIGN ONE radio button.
Note: The user must input a valid reference number for the original realtor otherwise the user will get an error message:
Note: If the user presses the OK button and all fields haven't been selected then an error message appears:
Yes No "
If NO is selected then the user returns to the Realtor/Administator screen.
NOTE: The user can click on the CANCEL button at anytime to exit the reassignment function and return to the Realtor/Administrator screen.
Sample Dialogue:
The MODIFY EMPLOYEE INFO is an administrator action that allows the user to edit an employee's company information or add a new employee.
Once the user has clicked on the MODIFY EMPLOYEE INFO button, the user must select whether to ADD a new employee, DELETE an employee, or CHANGE an employee's company information.
If the user selects CHANGE or DELETE, then the system initiates a list of names that the user can scroll through and select the employee. If DELETE was selected then the user selects the employee and presses OK. If CHANGE was selected then the user selects the employee and the system brings up all of the info on that employee. The user can now modify any of the information and then press OK to save the changes.
If the user selects ADD, then the user enters the correct information in the fields given and presses on the OK button to add the new employee.
NOTE: When the user adds a new employee they can skip entering some of the info but they cannot skip the NAME or the ACCESS LEVEL (realtor or administrator) of the new employee. If they do then an error message will appear:
YES NO"
If YES is selected then the user goes back and enters the pertinent info.
If NO is selected then the user is returned to the Realtor/Administrator screen.
NOTE: If the user clicks OK and some fields are not selected then an error message will appear:
************ It's the same error message as in reassign.

Sample Dialogue: