Virtual Realty Minimalist Manual (Mar. 12, 1996)
The Virtual Realty Database SystemTM
Version 1.0
User Manual
Created exclusively for PowerMax Realty by Twelve Monkeys Ltd.
 
Thursday March 14, 1996
|
|---|
Table of Contents
Twelve Monkeys Homepage
PowerMax Homepage
The Virtual Realty Database System is a powerful online househunting tool designed to
give you easy access to view and maintain current real estate listings, as well as the
associated realtor information. The system is a real estate catalogue designed to efficiently
manage a large number of property listings. Virtual Realty will provide users with a
convenient way to display information about listings, and give real-time exposure of listings
to the whole market. A listing contains the following information:
- Rental/Sale property
- Picture of property
- Location (address, description of view)
- Style (bungalow, split-level etc.)
- Square footage
- Status (Available, Sold/Rented)
- Asking Price
- Amenities
- Number of baths
- Number of bedrooms
- Appliances included
- Garage(s)/parking facilities
- Basement (yes/no)
- Lot size
- Listing realtor
- ID number (reference number) for listing
- Age of house
- Comments by realtor
- Owner info
- Offers made
Not all of the above information will be available to all users. The system is designed
with four different types of users in mind: Buyers, Listing Realtors, Other Realtors, and
Administrators. These are accommodated by three user modes: `Buyer Mode',
`Realtor Mode',
and `Administrator Mode'. The system dedermines if a realtor is the listing realtor for a
particular listing by comparing the user's Logon ID with the information recorded under
`Listing realtor' for that listing. For more information about logging on, see section
3.1 `Logging On'.
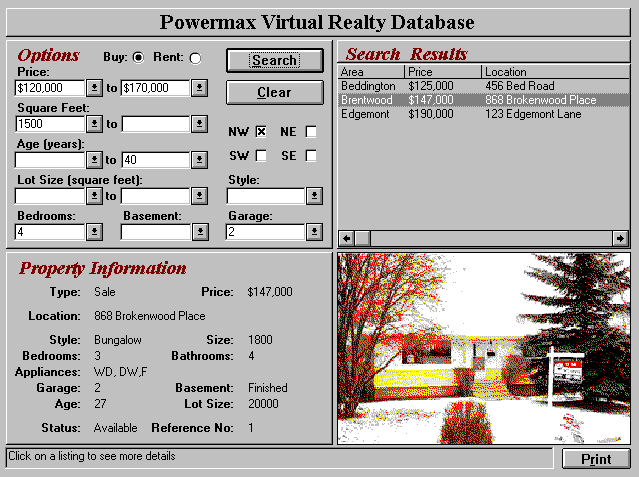
Figure 1: Main Search Screen in Buyer Mode
All users have the ability to search for rental or sale properties using any combination of
the listing details shown above (except `Ref #'). If a search is performed without any options being selected, all listings in the database will be available in the `Search results' box on the screen.
The more options that are selected, the shorter the list will be in the `Search results' box.
For detailed instructions on how to perform a search, see
section 4 `Performing a Listing Search'. Any listing selected from the list in the `Search Results'
box can be viewed (see Section 4.2 `Viewing a Listing') in detail, and
then printed (see `Printing a Listing' section 4.4), if desired.
When a search has been completed, the options can be reset to the defaults by clicking on the
`Clear' button.
The remainder of the functions are not accessible in `Buyer Mode'.
Each listing has a unique `Reference No.'. If the reference number is known, the listing
can be quickly located in Realtor Mode (if it has not been deleted from the database) by using the
`Search by Reference Number' (section 4.1) function. This
function is particularly useful for several reasons:
- if a realtor wants to check if a listing is still available;
- if a realtor wants to enter an offer; or
- if an administrator wants to delete a listing from the database.
Just like its physical counterpart, the Virtual Realty database can accept new listings, and
current listings can be modified or deleted. These can be done while in either `Realtor Mode'
or `Administrator Mode', however listings can only be reassigned from one realtor to another
realtor while in `Administrator Mode'.
Each listing is assigned one listing realtor. The listing realtor is the only user (other than the administrator)
who can modify that listing, enter or view the listing realtor's comments and seller's information, or view the
offers made on that listing. Any realtor or administrator can enter an offer on a listing.
Each realtor can modify only his or her own personal information, but an administrator can
modify any employee's information, and add and delete employees.
Help is available both dynamically and by clicking on the help button at the top of the screen.
Passing the mouse pointer over active regions or buttons on the screen invokes the dynamic
help function. Whenever the pointer moves over an entry field or a button on the screen, a
description of its functionality is displayed in the help text window at the bottom of the
screen.
If more detailed help is required, clicking on the `Help' button generates a pop-up window
displaying a table of contents and an index searching function. The `Help' button is not
available when another pop-up window is active, and is not available while in `Buyer Mode'.
There are four types of help available to the users of this system.
- Dynamic Help
Regardless of the user's access level, there is dynamic help available at all times. Whenever the pointer
moves over a region of the screen associated with some function of the program, a description of its functionality
is displayed in the help area set aside at the bottom of the screen.
Steps:
- Move the mouse pointer over an active area of the screen.
- Read the instructions in the text window at the bottom of the screen.
- Normal Help
There is no 'Help' button for the buyer screen. The dynamic help is designed to be all that is needed for the buyers.
In Realtor or Administrator mode there is a help button supplied with the pop-up dialogue boxes.
Steps:
- Clicking on 'Help' on any pop-up dialogue box to invoke the help system.
- A pop-up window with information relative to the user's current task appears.
- Clicking on 'Close' in the help window will return the user to the previous screen.
- User Manual Help
The user manual has detailed instructions for the use of the system. Items can be found by using the table of contents provided at the beginning of the manual, or the index at the end.
- Twelve Monkeys Help
Along with the purchase of this system, is the availability of the customer service line. We would be happy to answer all questions that are either unclear or are not addressed by the above help systems.
Each user of the Virtual Realty Database System will be assigned to one of the
following groups: Buyer, Realtor, or Administrator. Members of the groups are granted
appropriate database access privileges. When the application is started, the user will be
required to log on by providing a Logon name (user ID) and password. From this, the system will be able
to determine which group the user is a member of and enable or disable the appropriate
system functions. The functions not available to a user will not even be visible. A user in `Buyer Mode' would not be aware that special realtor functions exist.
To prevent a realtor (using some means outside the application) from seeing the offers made
on another realtor's listing, each realtor will be given his/her own offers table which only
(s)he (and administrators) can access.
If an employee is to be temporarily denied access to the system, the administrator can change
that employee's password (and reassign any associated listings). In this way the employee's
record stays on the system and does not have to be reentered at a later date. It is not
necessary for the administrator to know the employee's password to change it.
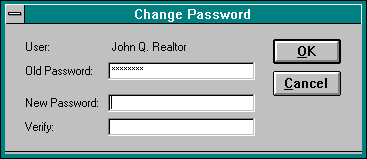
Figure 2: Change Password is accessed only through Administrator Mode
Finally, to prevent someone from determining the contents of the database file by direct
inspection, the file will be encrypted.
To access the Virtual Realty Database System from Windows, the user clicks on either the `VR Logon' icon or the `VR Buyer' icon, depending on the mode of access desired. If the system is to be used by buyers, the `VR Buyer' icon is used. Since no information in the database can be modified while in `Buyer Mode', no logon ID or password is required. The system opens to the main search screen.
If the user needs to be in `Realtor Mode', or `Administrator Mode', the `VR Logon' icon is used. The `Logon' pop-up window appears on the screen. A `Logon name' and corresponding `Password' must be entered correctly to access the system. Each employee is assigned a unique logon name (ID), and password by the administrator. The employee can change his/her own password under `Change Personal Information'. In the event that an employee forgets his/her password, the administrator can assign a new password under `Add/Modify Employee'.
If the user clicks on the `Cancel' button in the `Logon' window, the program is closed, and the user is returned to the windows screen.
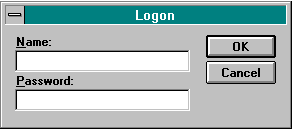
Figure 3: Logon Pop-up Window
To log in:
- click on `VR Logon' icon - the `Logon' pop-up window will appear on the screen
- key in logon name, or click on `Cancel' to exit
- tab to password block
- key in your password
- press `Enter' (or `Return') key on keyboard
If an invalid logon name or password is entered, an error dialogue window appears, informing the user that the information entered was not valid. The user clicks on `OK' and the `Logon' window is redisplayed. When a correct logon name and password are entered, the system determines which group the user is a member of, and displays the main search screen window. If the user is a member of the realtor group, the `Realtor' pulldown menu is also present. If the user is a member of the administrator group, both the `Realtor' and `Administrator' pulldown menus are also present.
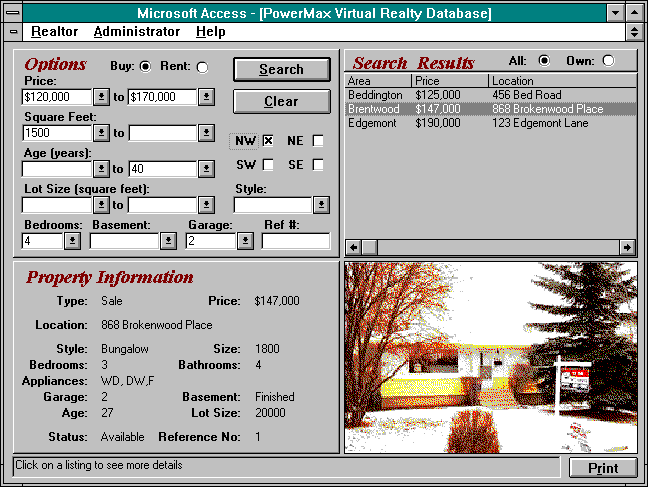
Figure 1: Main Search Screen in Administrator Mode showing administrator's
pulldown menu bar
At this point the system is now up and running and ready to go.
There are three different ways to logoff (or exit) the system from `Realtor Mode' or `Administrator Mode':
- click on `Realtor' in the menu bar and then click on `Exit' from the `Realtor' pulldown menu; or
- press the key combination Alt+Space, then selecting `Close' from the menu displayed; or
- double-click on the system menu button (the small horizontal bar in the top left corner of the screen). This will select the `Close' option automatically.
Each of these methods return the user to the main windows screen.
If the user was in `Buyer Mode', the right mouse button is clicked in each of the four corners of the screen, starting with the top left corner, and moving in a counter-clockwise direction. If this sequence is not followed, control is given back to the main search screen. This sequence can be changed by the system administrator, to ensure ongoing security. This prevents buyers from accidentally closing the application.
The search facility is used for finding listings in the database which
match a user's preferences. It is the only major facility in the
system to which every class of user has access. Accordingly, its use
should be simple and intuitive. A user will give all of the criteria
(options) by which to specify the search and then press the `Search'
button, and all listings matching those options will be displayed.
Once a set of search results has been selected in this way, each
member of that set can be examined for more detail.
There are five different kinds of search options:
- Radio button options, i.e. `Rent/Buy'
(click precisely one of the buttons in order to select the choice
associated with it)
- Check box options, i.e. `NW/NE/SW/SE' boxes
(click any or all of the boxes to select whether or not to accept the
choices associated with them)
- Simple pull-down options, i.e. `Style', `Garage' and `Basement:Yes/No'
(click on the arrow in the box and select from the pull-down window
that appears under the option box to select which particular option is
desired)
- Complex pull-down options, i.e. `Price', `Sq. Feet', `Age', `Lot Size'
(click on either or both the lower limit and the upper limit boxes to
specify a range of values for the particular option)
- Special options for Realtor and Administrator modes,
i.e. `Ref #', `Listings: All/Own'
Figure 4: Main Search Screen showing available search options
How to specify a set of search options:
- Remember that all search criteria are optional. If you are not
interested in the particular option (say, it does not matter to you
how many bathrooms there are in the listings you are searching for)
then you do not have to specify that particular option. For example,
if you do not choose any options, all the listings in the database
will be sent to the `Search Results' list box after the `Search'
button is clicked.
- Remember also that you do not have to specify these options in this
particular order, but price is dependant on whether you are looking to rent or buy.
- Select a price range from the `Price' complex pull-down option.
- Select a property area range from the `Sq. Feet' complex pull-down
option.
- Select a style (e.g. bungalow, duplex, apartment) from the `Style'
simple pull-down option.
- Select the number of bedrooms in the properties from the `Bedrooms'
simple pull-down option.
- Select the number of garage parking spots in the properties from the `Garage'
simple pull-down option.
- Select the range of ages of the properties from the `Age' simple
pull-down option.
- Select the range of lot sizes of the properties from the `Lot Size'
complex pull-down option.
- Select the type of basement you want from the
`Basement' simple pull-down option.
- Select whether or not you want to rent or buy properties from the
`Rent/Buy' radio button option (then select price range if desired).
- Select in which quadrants you wish to search from the `NW/NE/SW/SE'
click box options.
In Realtor and Administrator modes only, you have the following
additional options available to you:
- Search by reference number of a particular listing by typing the number into the
`Ref #' box. The reference number is a number between 1 and
9,999,999. All the other search criteria are ignored when you
specify a reference number, however.
Note: Error Handling
- Invalid data in reference # field:
System will 'beep' if inappropriate data is entered;
system will not initiate search until appropriate data
is entered.
- Select whether you want to see only your own listings or all the
listings that meet the criteria in the search options from the
`Listings: All/Own' radio buttons.
Conducting Your Searches:
Once you have specified all the options for your search, you are ready
to actually to make your search request.
1. Click the `Search' button.
If you want simply to change a few of the options for a new search:
2. Re-enter the options you wish to change.
3. Click the `Search' button.
If you want to clear all your search options:
1. Click the `Clear' button.
After completing a search, your search results will appear in the upper right portion of the search
window. Each listing will be represented by a line in the list. The first listing
will be displayed in detail on the bottom of the screen. To
select another listing to view,
- Click on the up arrow on the scroll bar on the right of the `Search
Results' list box to scroll the listing upward.
- Click on the down arrow on the scroll bar on the right of the `Search
Results' list box to scroll the listing downward.
- Drag the thumb on the scroll bar on the right of the `Search Results'
list box to scroll the listing in the direction of the drag.
- Click on the listing you wish to view in the `Search Results' list
box.
Once you have selected a listing in the `Search Results' list box,
information on that listing will appear in the bottom of the window. If
you wish to view a different listing, repeat the above procedure.
A realtor can view information about a seller/owner for a listing that
"belongs" to her.
Steps:
- Find the listing you want to see seller information for.
View the listing from the search screen. To view seller
information for a particular listing, the listing must
appear on the search screen.
- Click on the "Realtor" pulldown menu.
- Click on "Add/Modify Listing". A pop-up window will
appear.
- Click "View Seller Info". A pop-up window will appear.
- You can view the information and press "OK" when done.
- You can modify seller information by typing in any changes
and clicking "Save".
- You can insert new seller information for a new listing
by filling in the empty fields and clicking "Save".
Note:
Seller information can only be viewed by the listing
realtor for a property. A realtor, Veronica, will not be able to
see seller information for a listing that belongs to another realtor,
Betty.
- Select a listing from the `Search Results' list box so that its
information is displayed in the bottom of the search window.
- Click the `Print' button.
When in Realtor or Administrator mode, the functions of adding or modifying
listings are available from the Realtor pull-down menu on the main search screen.
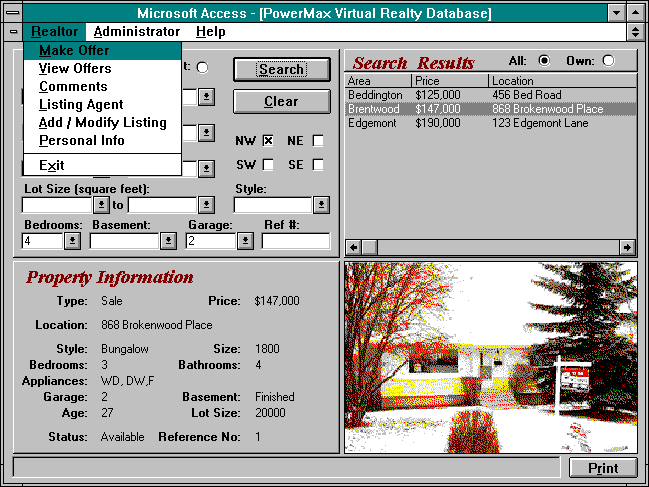
Figure 5: Main Search Screen showing Realtor Menu
A realtor can insert a new listing into the database.
When the realtor inserts the listing, the listing "belongs" to that
realtor.
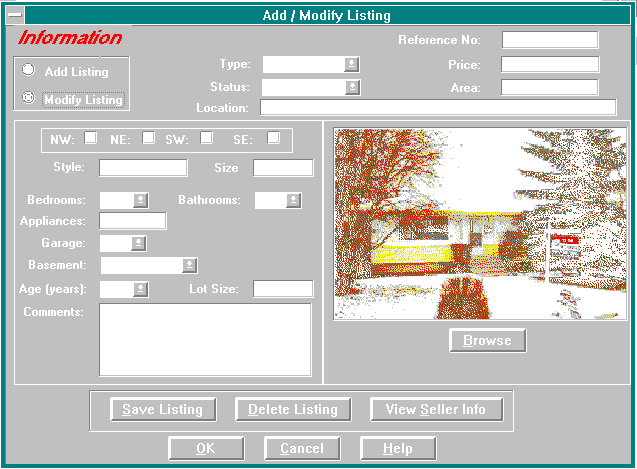
Figure 6: Add/Modify a Listing
Steps:
- Click on the "Realtor" pulldown menu.
- Click on "Add/Modify Listing". A pop-up window
will appear.
- Select the check box "Add Listing". The fields should
be blank after you do this.
- Fill in the information on the pop-up window.
- Click on `View Seller Info' to add information about the
current owners of the listing.
- Click on `Browse Picture' to select a picture file
to associate with the listing. This picture file
must exist in the system already.
- Click on `Save' to save the new listing to the database
or click on `Cancel' to cancel the operation.
Virtual Realty automatically assigns a reference number to a new
listing. It is up to the realtor to ensure that she does not enter
the same listing in twice.
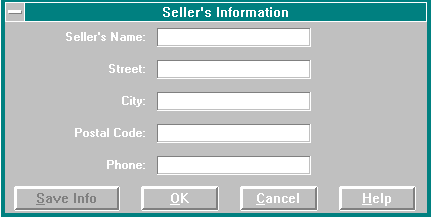
Figure 7: Modify Seller Information.
Accessed via `Add/Modify Listing'
A realtor can modify a listing in the database. A realtor can only
modify a listing that "belongs" to her.
Steps:
- Find the listing to be modified by searching for
it. View the listing from the search screen.
To modify any listing, it must appear on the search
screen.
- Click on the `Realtor' pulldown menu.
- Click on `Add/Modify Listing'. A pop-up window
will appear.
- Select the check box `Modify Listing'. This box
is by set by default when the pop-up window appears.
- Change the appropriate information in the pop-up
window. (eg. as in `Add a new listing')
- Click on `Save' to save the modified listing to the database
or click on `Cancel' to cancel the operation.
A realtor can delete a listing from the database. A realtor
can only delete a listing if that listing "belongs" to her.
Steps:
- Find the listing to be deleted by searching for
it. View the listing from the search screen.
To delete any listing, it must appear on the search
screen.
- Click on the `Realtor' pulldown menu.
- Click on `Add/Modify Listing'. A pop-up window
will appear.
- Click on `Delete'. The listing is now deleted
from the database.
To recover a deleted listing from the database, the system administrator
must recover the listing from the tape backup. There is no facility
to undo the delete listing operation.
An administrator can reassign the listings from one realtor to another. A realtor's
individual listings can be reassigned:
- individually to new realtors; one listing at a time
- all listings reassigned to a single new realtor
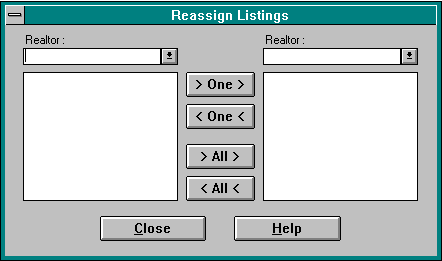
Figure 8: Reassign Listings
To reassign one or more listings from one realtor to another:
- click on the `Administrator' pull down menu
- click on `Reassign Listings' - a pop-up window will appear
- select the realtor you want to reassign from in one `Realtor' box by clicking on the down arrow next to that box
- select the realtor you want to assign to in the other `Realtor' box
- if you want to reassign one listing,
- click on that listing
- click on the `One' button with the arrows pointing in the direction you want to assign to (ie. One>)
- if you want to reassign all listings from one realtor to the other
- click on the `All' button with the arrows pointing in the direction you want to assign to (ie. All>)
- repeat this process until all reassignments are complete.
- click on the `Close' button when finished reassigning listings
The database will immediate reflect the change to listing realtor.
In realtor mode, if a realtor or administrator would like to view additional
information concerning a listing that is currently displayed in the
bottom half of the screen, then the realtor or administrator would
select 'Comments' from the 'Realtor' menu. This additional
information includes realtors' comments about the listing that buyers
should not see - for example, "neighbors say this house is haunted".
Of course, the system must be in realtor or administrator mode for the
realtor or administrator to be able to select 'Comments' from the
'Realtor' menu. Thus a buyer is incapable of viewing the
comments on a listing. After 'Comments' is selected
from the 'Realtor' pull down menu, a dialogue box showing the
comments will pop up. Here is how it works:
- Click on 'Comments' from the 'Realtor' pull-down menu.
- Click on 'OK' to close the 'Comments' box.
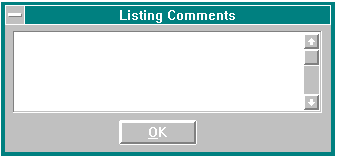
Figure 9: Listing Comments hidden from guest mode
When adding a listing, a realtor can add comments about that particular
listing. These comments can only be accessed by another realtor.
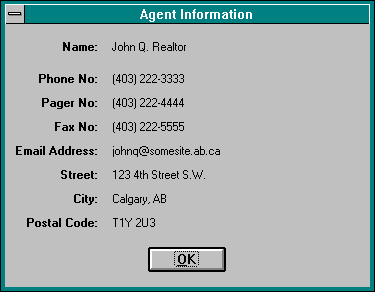
Figure 15:Agent information
To locate the listing realtor for the listing displayed on the screen (while in Realtor or Administrator mode),
- click on the 'Realtor' pulldown menu
- click on 'Agent info' - the listing realtor's information is displayed in a pop-up window
- click on 'OK' when done
The `Make an Offer' menu selection allows a realtor to enter an offer for a property.
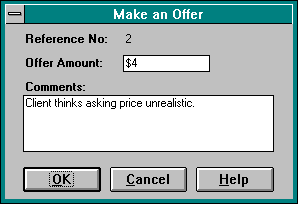
Figure 10: Make an Offer
If a realtor wants to enter an offer for a listing that is not displayed on the screen (s)he must:
Note:
If a user wants to use the shortcut keys then they will be
shown below in brackets beside the steps.
- Enter the listing reference number in `Ref #'
- Click on `Search' button - the detailed information is displayed
- Click on `Realtor' pulldown menu. (Alt-r)
- Click on `Make Offer' (m or use up/down keys)
- Enter the offer
- Click on `OK' to enter offer and return to search screen
The `Display Offers' menu selection allows the listing realtor of
a property to display all offers for a property.
If a realtor wants to display the offers for a listing that is not displayed on the screen (s)he must:
- Enter the listing reference number in `Ref #'
- Click on `Search' button - the detailed information is displayed
- Click on `Realtor' pulldown menu. (Alt-r)
- Click on `View Offers' (v or use up/down keys) - `Offers' pop-up window is displayed
- Click on `OK' to return to search screen
Note:Field requirements
- Reference Number : 1 - 9,999,999
- Offer value : 1 - 9,999,999,999
Decimal ignored
Note: Error Handling
- Invalid reference number
results in an
error message saying "invalid reference" in error
dialogue box
- Invalid offer amount results in an
error message saying "invalid offer" in error
dialogue box
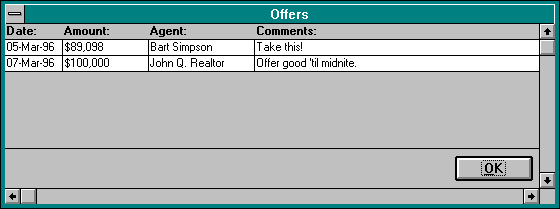
Figure 11: View the Offers on a Listing
While an employee can change his/her own personal information, the administrator has access to two extra functions in the Administrator pull-down menu. These
functions are the 'Reassign Listing' and 'Add/Modify Employee'.

Figure 12: Main Search Screen showing Administrator Menu
The `Personal Info' menu selection allows a realtor to
modify his or her personal information, including:
- phone number
- pager number
- fax number
- e-mail address
- password
- home address
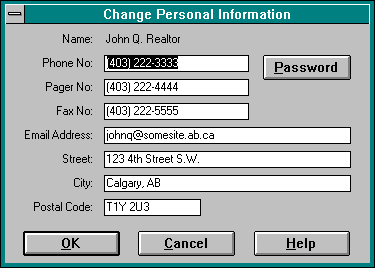
Figure 13: Change Personal Information
If a realtor wishes to modify his/her personal information then
(s)he must:
Note: If a user wants to use the shortcut keys then they will be
shown below in brackets beside the steps.
- Click on `Realtor' pulldown meu. (Alt-r)
- Click on `Personal Info'. (p or use up/down arrows)
- Click on the appropriate field to be modified.
To change the password:
i. Click on `Password'.
ii. Enter old password and press `Enter'
iii. Enter new password and press `Enter'
iv. Re-enter new password to verify and press `Enter'
Note:
password will not be displayed
on screen in plaintext.
- Enter the new information
- Click on `Ok' to save all modifications and return to the search screen.
The `Add/Modify Employee' menu selection allows an administrator to
modify the personal information stored about each employee, including:
- name
- access level
- phone number
- pager number
- fax number
- e-mail address
- password
- home address
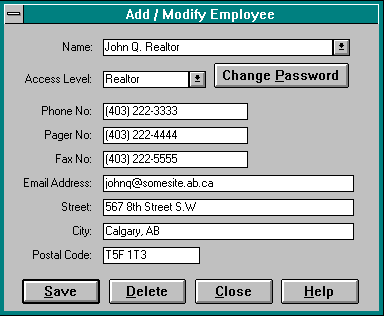
Figure 14: Add/Modify Employee Information
If an administrator wishes to modify employee
information then (s)he must:
Note: If a user wants to use the shortcut keys then they will be
shown below in brackets beside the steps.
- Click on `Administrator' pulldown menu. (Alt-a)
- Click on `Add/Modify Employee'. (A or use up/down arrows)
- Add / Modify Employee
(a) Adding an employee:
i. Enter the employee name
ii. Select the Access Level using the pull-down listbox
iii. Click `Change Password' to assign a new password
iv. Enter the information of the new employee.
v. Click on `Save'.
vi. Click on `Close' to go back to the search screen.
(b) Deleting an employee:
i. Select the employee name from the name pull-down
listbox.
ii. Click on `Delete'.
iii. Click on `OK' to confirm deletion.
iv. Click on `Close' to go back to the search screen.
(c) Modify employee information:
- Select the employee name from the name pull-down
listbox.
- Click on the appropriate field to be modified.
To change the password:
i. Click on `Change Password'.
ii. Enter old password and press `Enter'
iii. Enter new password and press `Enter'
iv. Re-enter new password to verify and press `Enter'
Note:
password will not be displayed
on screen in plaintext.
- Enter the new information.
- Click on `Save' to save all modifications.
- Click on `Close' to go back to the search screen.
Note: Field Requirements
- name: up to 20 char, case insensitive
- password: up to 14 chars, case sensitive
for both name and password
- / \ [ ] : | < > + = ; , ? * are invalid
- access level: must be selected from the listbox
- phone number: (403)555-5555 must include area code
- pager number: (403)555-5555 must include area code
- fax number: (403)555-5555 must include area code
- email address: strings up to 255 char
- street: strings up to 255 char
- city: strings up to 255 char
- postal code: a1b c2d (exactly like that)
Note: Error Handling
- Invalid data in any particular field:
error message saying "improper field data" in error
dialogue box
- Minimal required fields:
It is suggested that at least Name, Access Level (default 'Realtor'),
and Password
be entered.
The other fields are optional.
- Search on sellers - as the system is currently set up, each
listing is associated with a seller. For a user to view
seller information, the ONLY way is to find a listing for the property the
seller owns, modify the listing, then click "View Seller Info".
This is perhaps not very elegant.
- Cannot modify or delete offers made for listings.
- The system does not keep track of potential buyers.
- The way to quit from the 'buyer' mode is to click on four active secret
areas. Kids, for example, may get to know this by observation and
therefore be able to shut down the system prematurely. However,
exiting from buyer mode without a keyboard does have it's difficulties,
and this is the best solution to logging out that we could think
of at this time.
- The buyer cannot enter in a reference code for a search. However,
for a buyer to enter a reference code, a keyboard would be needed
and we thought it would be a better interface for buyers if
they were only faced with using a mouse and not a keyboard.
- Our customers wanted some way in which a listing could be removed
from a search. For example, if the same listing keeps appearing
after doing multiple searches, a customer may want to delete this
listing from appearing in search after search. Unfortunately, we
have not been able to implement this.