Executive Summary and General Description:
Main Window Documentation:
Customer Information Interface Specification:
Order Information Interface Specification:
Product List Interface Specification:
Route List Interface Specification:
Test Plan Specification:
Database Model:
Management Plan:
Glossary:
Editors:
Final Editors:
Screen Snapshots:
HTML:
The BFI001 system, which is being developed by MacroHard Inc. for BFI, will revolve around a standard Windows interface. The system itself will be implemented in MicroSoft Access, and will allow users to obtain a wide variety of business related information. Users will have access to several ranges of data relating to their customers, their products, and the business of taking care of their customers.
Four sets of functions will work closely together to provide the
user with convenience and power. Customer and product records are the first
of these, and will be easily maintainable by the user. As well, new orders
will be simple to place, and routes will be automatically generated on a day-
to-day basis. Aside from these central tasks, many other subtasks exist. For
example, it is possible to print invoices for customers, or to view previous
orders made by a customer. Together these functions will work within the
system to provide all users with the tools they need to make great strides
in todays turbulent economy.
Windows:
The BFI001 system is laid out over five main windows. The main screen consists of buttons that allow the user to select from any of the remaining screens. The remaining windows are broken down by their major functions.
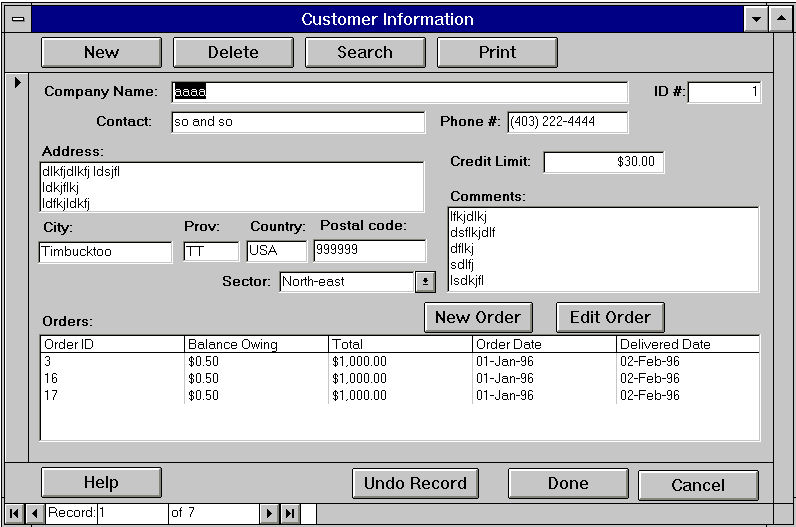
The Customer Information Window contains all information related to
customers. This window allows the user to search for a particular customer, and
to place a new order based on the customer they have selected. The Order
Information Window contains all functions related to the placing of a new
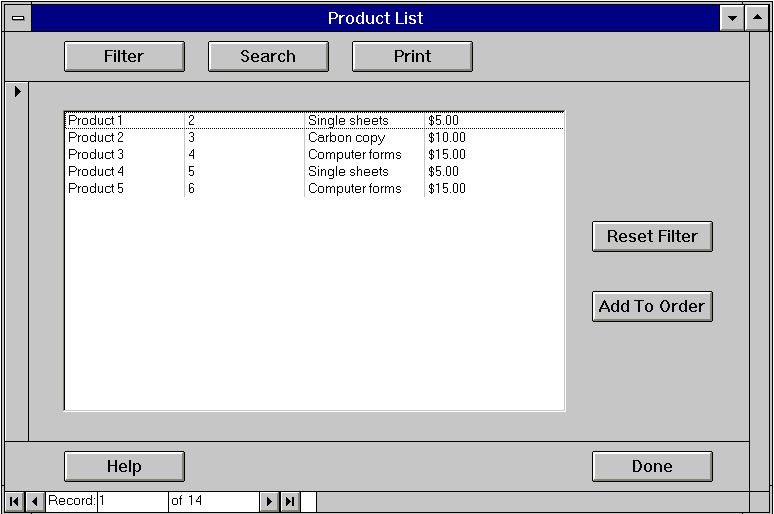
order, or the viewing of a previous order. The Product List Window contains all
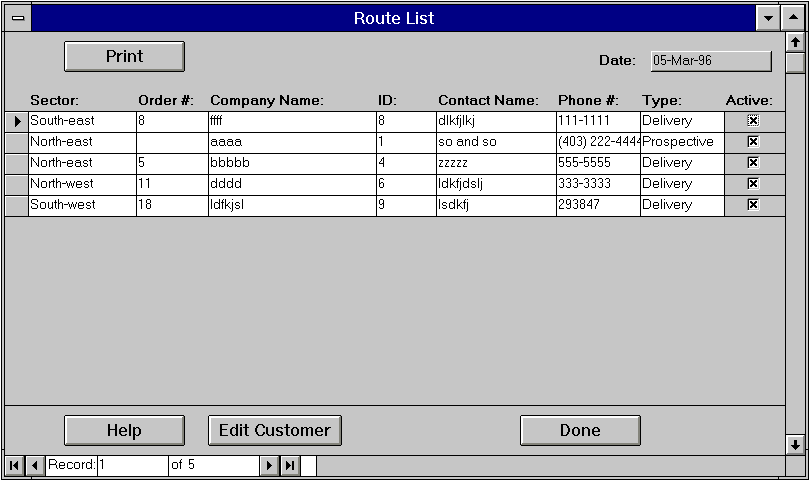
relevant data relating to the products that exist, and the Route List Window
looks up all orders that need to be delivered and prospective customers that
should be visited by the salesman. Several subwindows also exist to allow the user to search for key information, or set print options,
and these are directly tied into one of the four functional windows.
Buttons:
A standard feature contained within our system is the placement of buttons on the screen. Not only are the buttons placed in similar positions from screen to screen, but the buttons found at the top of the screen contain features related to the functionality of that particular screen. The buttons located at the bottom of the screen take care of common tasks that are found on most screens, such as displaying system help, and canceling or saving information on the screen.
Fields:
Fields serve as 'containers' for relaying information to the users obtained from the databases. A large variety of fields exist in each of the different windows. Some fields can be modified, while others will remain fixed, and will be filled in by the system. Please refer to the database model towards the end of this document for more detailed information related to the fields of the system.
Menus
A menu bar is also included in the system, and appears as a constant feature available from any screen. The menu bar will contain several pull down menus, of which all include a small family of functions.
Menu: FILE
Menu: EDIT
Menu: GO
Menu: WINDOWS
Menu: HELP
[Administration]
[Customer/Order Information]
[Product List]
[Route List]
Pseudocode for CreateRouteList:
Description of "Clear Route List" query:
Description of "Create Route List" query:
Description of the "Undelivered Orders" query:
Description of the "Projected Orders" query:
Description of the "Customers' Last Orders" query:
[Exit]
1) Place a new order for a customer. The default order which comes up when a new order is placed by the salesman is the previous order for that customer. The salesman is also given the option to begin a new order with a blank order form.
2) Update and change an order. The program will allow the salesman to change part of an order which has yet to be delivered. The View Product list aids the salesman by assisting him in finding a product. Once a product has been found in the database, the salesman can insert it into the current order.
3) Recall a previous order. All previous orders are kept on file in the system database. This gives the user the capability to conduct research into a customer's ordering habits, or to recall a particular past order on the request of a customer.
There are also some subfunctions which the system has to assist the salesman in placing orders. As previously described there is a link to the View Product List subsystem. This system is used by the salesman to find a particular product.
The salesman will be able to search on the product name and identification number (Please refer to the Product Information Screen implementation details). If the salesman can not exactly remember these he/she can guess as closely as possible and then scroll through the list of products from that point until he/she has found the desired product. After finding the product in question, the salesman has the ability to insert that product into the order.
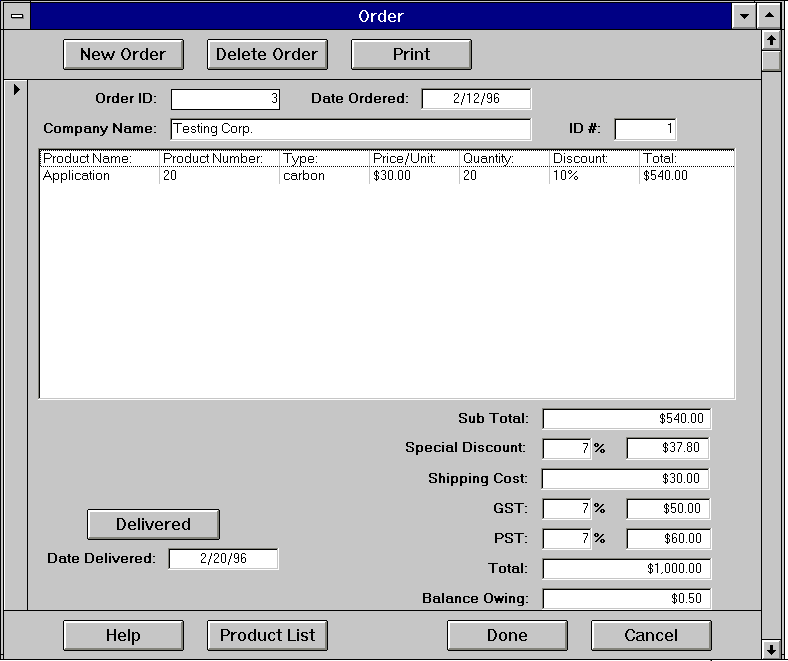
The other subfunction available to the salesman is a Print function. This will print the order to the standard printer defined by Print Manager. As well, all other Print Manager features will be available to the salesman. The Printed order will look like an invoice. At the top will be the name, address, city, province, postal code, contact, and contact phone number of the customer. Below will be an invoice containing the elements of the order. Each product will be listed in the invoice containing such information as the product name, product number, product type, price per unit, quantity, discount percent, discount dollar value and the total for that product. Below that will be the calculations for the entire order, including the subtotal, discounts, shipping, tax number 1, tax number2 (if applicable), grand total, and the balance owing.
Error conditions:
Another type of error that can occur is when the salesman enters incorrectly formatted data into a particular area of the form. When this occurs the system will display the error "Wrong format in field. This is the proper format ______". On the blank line the system will display the proper format for that form. Then
the salesman will be able to select the OK button to close the error message, and the field will be automatically cleared. The salesman can also select the [Help] button and the system will display some help pertaining to the forms.
Button: [Delete]
Button: [New Order]
Button: [Delivered Today]
Button: [Help]
Button: [Product List]
Button: [Done]
Button: [Cancel]
Field: Company Name
Field: Order ID
Entry Field: Date Delivered
Field: Date Ordered
Entry Field: Next Order Date
Entry Field: Product Name
Entry Field: Product ID
Field: Type
Field:Price/Unit
Entry Field: Quantity
Field: Quantity Discount
Field: Discount $
Field: Product Total
Field: Sub-Total
Field: Discount
Field: Shipping & Handling
Field: Tax 1
Field: Tax 2
Field: Grand Total
A) TO PRINT AN ORDER FORM:
B) TO DELETE A PRODUCT FROM AN ORDER
C) TO PLACE A NEW ORDER
D) TO VIEW PRODUCT LIST
General Description:
Main Window
The main window will appear when the application is opened. It will allow the salesperson to go to the main window in the application (on the sales side). In the next phase of development, administrative features, such as adding, deleting or editing products and product types and viewing multiple orders, will be added as well and these will be accessible from this window also.
Descriptions of Buttons
Pseudocode:
Pseudocode:
- Open "Product List" form.
- Enable the [Add to Order] button on the "Product List" form.
This first creates a new route list, if required, then opens up the Route List
Window.
Pseudocode:
- Call CreateRouteList
- Open the database.
- Open the "Stored Variables" table as a recordset.
- Move to the first record in the recordset.
- If "Route List Date" in the recordset is for an earlier day:
- Run the "Clear Route List" query to clear the route list.
- Run the "Create Route List" query.
- Update "Route List Date" to the current date.
- Open "Route List" form.
- Delete all records in the "Route List" table.
- Select all orders from the "Order" table that have an Order ID that matches an Order ID in either the "Undelivered Orders" query or the "Projected Orders" query, and for each selected record create a record in the Route List table with the Customer ID from the Order table in the Customer ID field, the Order ID from the "Undelivered Orders" query in the Order ID field, the Order ID from the "Projected Orders" query in the Last Order ID field, and the value True in the Active field.
- Select the Order ID from all records in the Order table that
have a NULL value for the Delivered Date.
- Select the Order ID from all records in the Order table with
an Order ID matching an Order ID from the "Customers' Last Orders"
query and a Next Order Date that is less than or equal to the current date plus five days.
- Select the maximum Order ID for each set of records in the Order table
grouped by Customer ID.
This will exit the application and MS Access.
The Order Information window is invoked from the Customer Information screen. It is used by the salesman for the following main functions.
Button: [Print]
Here is an example (condensed version) of a printout that will result:
pseudocode begin
print the invoice report of the current order on the screen;
pseudocode end
pseudocode begin (On Current Record Event)
if Delivered Date is not NULL
pseudocode end
set all fields except the Next Order Date to be non-editable;
end if
if the Next Order Date is NULL
Find the last order for this customer;
end if
Set the Next Order Date = Delivered Date - Delivered Date from previous order
+ Delivered Date;
pseudocode begin (On Change of any record in the Line Item subform)
set Subtotal = sum of all product totals (from Line Item table with current Order ID);
pseudocode end
set Special Discount (Dollars) = Special Discount (Percent) * Subtotal;
set Tax1 (Dollars) = Tax1 (Percent) * Subtotal - Special Discount (Dollars) + Shipping Cost;
set Tax2 (Dollars) = Tax2 (Percent) * (Subtotal - Special Discount (Dollars) +
Shipping Cost + Tax1 (Dollars));
set Grand Total = Subtotal - Special Discount (Dollars) + Shipping Cost + Tax1 (Dollars)
+ Tax2 (Dollars);
pseudocode begin
open a confirmation dialogue box to confirm deletion;
pseudocode end
if the user confirms deletion (click [Yes])
delete the current record (automatically removed from Order table with related records);
else (click [No])
close the "Order Information" form;
close the confirmation dialogue box;
endif
back to the "Order Information" form;
pseudocode begin
save the record currently on screen into the Order Info Table;
pseudocode end
create a new record in the Order Info Table;
show the new record on the screen (initially all entries are empty);
set the "Date Ordered" Field to today's date;
set the "shipping cost" Field = distance * shipping rate;
(the shipping rate is hard-coded)
pseudocode begin
set the Delivered Date field to today's date
pseudocode end
pseudocode begin
open the Help Box form;
pseudocode end
pseudocode begin
open the "Product List" form;
pseudocode end
enable the [Add to Order] button on the "Product List" form;
pseudocode begin
close the "Order Information" form (changes are saved automatically by MS Access);
pseudocode end
pseudocode begin
undo all changes on the current record;
pseudocode end
close the "Order Information" form
Field: Customer ID
pseudocode begin (Click on Event)
if Product Name not in the Product Table
pseudocode end
open a warning message box;
else
get the Product ID for that product from the Product Table;
endif
put the Product ID into the field of "Product ID";
search for the Product type of that product in the Product Table;
put the Product type into the field of "Type";
use the Product type to find out the Price/Unit in the Type Table;
put the Price/Unit into the field of "Price/Unit";
the field "Product Total" = (quantity * "Price/Unit") * (1 - quantity discount / 100);
pseudocode begin (Click on Event)
if Product ID not in the Product Table
pseudocode end
open a warning message box;
else
get the Product Name for that product from the Product Table;
endif
put the Product Name into the field of "Product Name";
search for the Product type of that product in the Product Table;
put the Product type into the field of "Type";
use the Product type to find out the Price/Unit in the Type Table;
put the Price/Unit into the field of "Price/Unit";
the field "Product Total" = (quantity * "Price/Unit") * (1 - quantity discount / 100);
pseudocode begin (Click on Event)
if quantity <= 0
pseudocode end
open a warning message box;
else
if quantity >= 10
endif
the field "Quantity discount" = 10%;
else if quantity >= 50
the field "Quantity discount" = 15%;
endif
the field "Product Total" = (quantity * "Price/Unit") * (1 - quantity discount / 100);
1) press the [Print] button
Print produces a hard copy printout of the order on the
screen. This order form can be used as both an invoice for the customer, as
well as a paper file for company records.
1) select the item in the order form that you wish to remove (click on it once)
1) press the [new order] button
The order form is cleared, and you are set to fill in the information for a
new order.
1) TO SAVE CHANGES
1) select "goto Product List Window" from the GO menu, or press the [View
Product List] button. This button brings up the Product List Window, allowing users to add further products to an existing current order.
2) TO SAVE CHANGES AND EXIT WINDOW
1) press the [done] button
Changes made in the database are saved permanently, and the window is closed
down. The user is left with the Customer Information Window, which the Order
Information Window was opened from.
3) TO CANCEL CHANGES MADE TO WINDOW
1) press the [Cancel] button
No changes are saved, and the window closes.
This window is opened by clicking on the [Search] button on the Product List window. The purpose of this window is to allow users to locate a specific product in the product list if they already know all or part of the product's name or ID number.
Window Title: Search for Product

begin pseudocode (On Click event)
Query Description:
begin pseudocode (Before Update event)
begin pseudocode (After Update event)
Query Description:
begin pseudocode (Before Update event)
begin pseudocode (After Update event)
begin pseudocode (On Click event)
This window is opened by clicking on the Filter button in the Product List window. The purpose of this window is to allow users to restrict the products shown in the Product List window to those products which match certain types or price ranges.
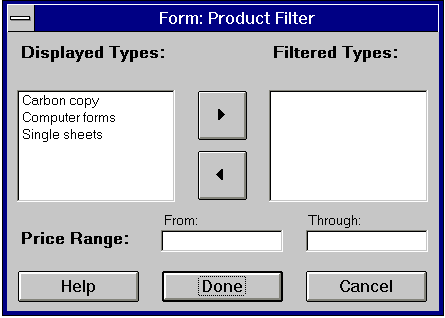
begin pseudocode (On Click event)
begin pseudocode (On Click event)
begin pseudocode (On Click event)
begin pseudocode (On Click event)
Button: Left Arrow
begin pseudocode (On Click event)
List Box: Displayed Types
begin pseudocode (On Double-Click event)
begin pseudocode (On Double-Click event)
The choices given to the user are:
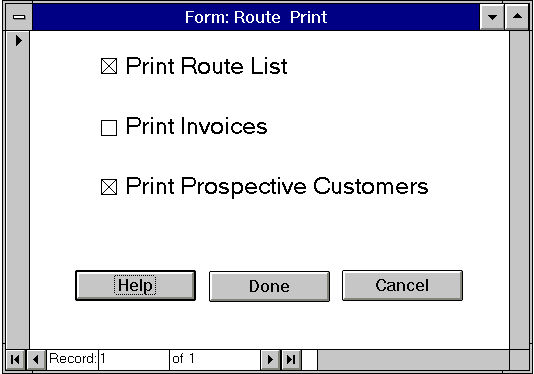
The Print Box is presented to the user when the [Print] button
is pressed on the Route List Window. The purpose of the window is
to allow the user to select what exactly he or she wants to print. On
this screen are three choices with which the user can specify
what exactly he or she would like to print. More than one of these
choices can be specified at any time, thereby saving the user time.
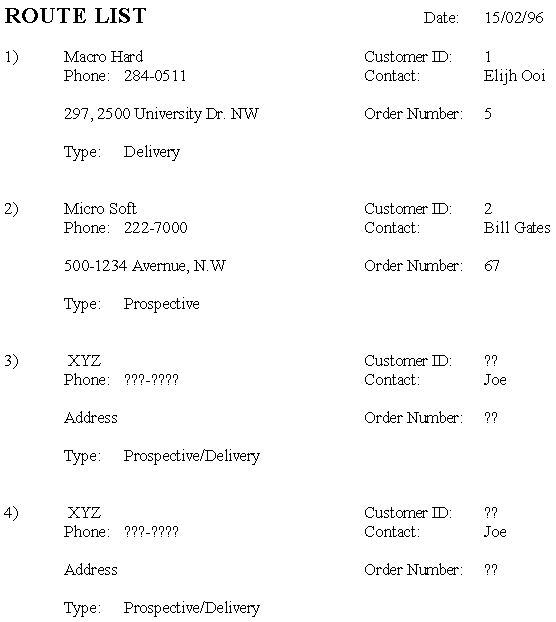
1) Route list
The Choices
The "Route list" choice, when selected, will print out the route,
in order, that the salesman is supposed to take during that day,
including the sector, the company name and address, the contact person,
and the order ID (if any).
Here is a sample route list printout:
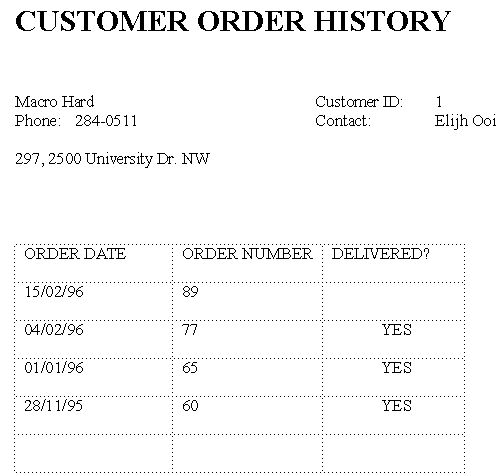
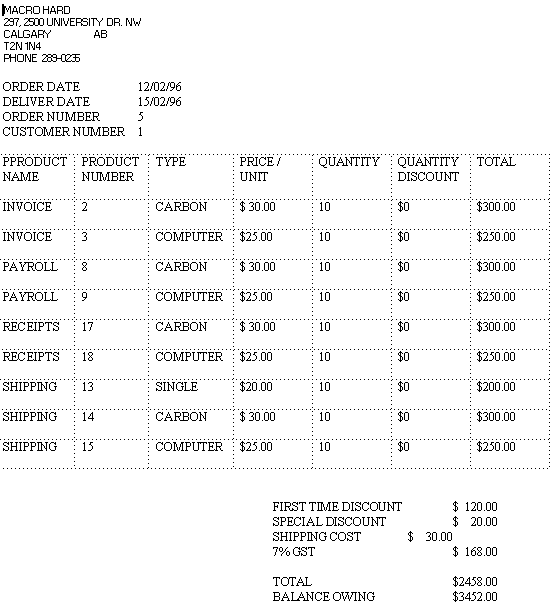
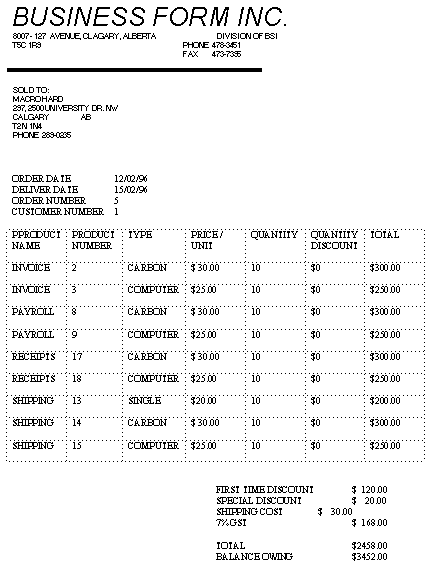
The "Invoices for deliveries" choice, when selected, will print
out all of the invoices for the companies that the salesman is
supposed to visit that day.
Here is a sample invoice (condensed):
The "Prospective customers" choice, when selected, will print out
the projected orders for all of the prospective customers.
The format of the printout has not yet been finalized.
You would like to:
If there is no printer connected to the computer, the printer is not on, the printer is off-line, or the printer has no paper then MS Access will display an appropriate message.
If there are no selections made in the Print Box (no choice is
marked) and the [DONE] button is pressed, then a message dialogue box
will pop out and tell the user to select something before printing
anything. The message box will be closed after the user has finished
reading the message and has clicked on [DONE] button on the message box.
The central objectives surrounding our testing are to ensure that our system is
assembled with as few logical defects as possible, and to minimize the number of
programming bugs and glitches in our system. Our most extensive testing will
be the unit testing of each individual screen. Once we are sure that each
screen is up and running to its highest potential, we will be able to assemble
the pieces to form the complete system. As the pieces are completed and
individually tested, each step of the integration process will be likewise
tested for compatibility amongst components. This integration testing will be
of the utmost importance to make sure that the system can function as a whole.
When all of the tests have been completed, all bugs fixed and all errors in
logic have been worked out, we will put the system through two more types of
testing. These will include passing a set of walkthrough "real life" scenarios
that may occur in connection with our system. This acceptance testing will be
followed up by usability tests done by subjects working with our system.
Through watching these subjects work with the system that we have created, we
will be better able to determine if there are any areas that need
reconsideration before our product is released for use in the offices of BFI.
We have established programming and testing schedules that involve members from
every division of our team. It is our feeling that there may be issues which
our programmers and/or design teams have overlooked or can't see due to their
closeness to the project. Hence other members of our team will be closely
involved in the testing of our system to help discover additional problems and
errors. This will directly boost the quality of the system being built for
BFI.
Our principal objective is to make sure the system is of the highest
functional quality possible. This will be achieved by meeting the
following objectives:
- proper integration between modules
- correct logic
- elimination of bugs and faulty code
We have broken the system down into five basic modules, each of which will be
tested individually after it has been coded, before its final integration into
the system. The five modules consist of the Main Menu screen, the Product List
screen, the Customer Information screen, the Order Information screen, and the
Route List screen. Each of these modules must have its individual components
tested, such as buttons, fields and dialog boxes. There also exists the
underlying "behind the scenes" functionality associated with each model which
must be tested extensively to verify correct data flow within the system. This
deeper aspect of the system will be covered in more detail under integration
testing.
Our unit tests are organized into sections divided by the window. For example,
all the unit tests for the buttons and fields associated with the Customer
Information Window would be described under the heading Customer Information
Window.
Buttons:
In cases where the Test section is empty, to test that button
just press it.
Fields:
The Edit, and Etest will only appear in instances where the
field can be edited. In all other cases the field cannot be
edited. To test these fields, try to type something into that
field. A success would be if nothing happens.
The DClick, and Dtest will only appear in instances where
something is supposed to happen when that field is double
clicked. In all other cases to test the field double click on
the field. If nothing happens, then it is a success.
This means that many of the test descriptions will only have
a field name. This means that it cannot be edited and nothing
should happen when you double click it, ie. it's only purpose is
to display information. So to test these, just make sure that
the fields have the correct information in the correct format.
Button: NEW
Button: DELETE
- No. then the currently displayed record should still be on the
screen, and should still be in the database.
Button: SEARCH
Button: PRINT
Button: HELP
Button: UNDO
Button: DONE
Button: CANCEL
Button: NEW ORDER
Button: EDIT ORDER
Field: ID
Field: CUSTOMER NAME
Field: CONTACT
Field: PHONE-NUMBER
Field: ADDRESS
Field: CITY
Field: PROV
Field: COUNTRY
Field: POSTAL-CODE
Field: SECTOR (Combo box)
Field: CREDIT-LIMIT
Field: COMMENTS
Field: ORDER INFORMATION LIST (list box)
Button: HELP
Button: DONE
Button: CANCEL
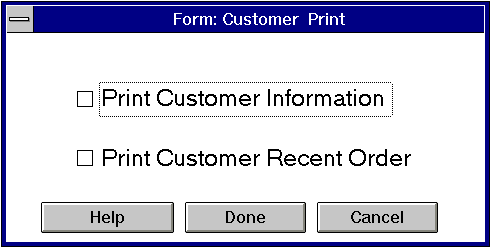
CheckBox: PRINT CUSTOMER INFORMATION
CheckBox:PRINT CUSTOMER'S RECENT ORDERS
Button: HELP
Button: DONE
Button: CANCEL
Field: CUSTOMER ID, COMPANY NAME, CONTACT NAME, PHONE NUMBER
Button: PRINT
Button: SEARCH
Button: FILTER
Button: HELP
Button: ADD TO ORDER
Button: DONE
Field: PRODUCT LIST
Button: DONE
Button: CANCEL
Button: HELP
Button: >
Button: < (Identical to > except in opposite direction.)
Field: FILTER
Field: SELECTION (Identical to Filter except in opposite direction.)
Field: FROM PRICE
Field: THROUGH PRICE
Button: DONE
Button: CANCEL
Button: HELP
Field: PRODUCT ID
Button: PRINT
Button: DELETE ORDER
Button: NEW ORDER
Button: HELP
Button: VIEW PRODUCT LIST
Button: DONE
Button: CANCEL
Button: DELIVERED TODAY
Field: ORDER ID
Field: ORDER DATE
Field: DATE DELIVERED
Field: NEXT ORDER DATE
Field: PRODUCT NAME
Field: PRODUCT ID
Field: TYPE
Field: PRICE/UNIT
Field: QUANTITY
Field: DISCOUNT $
Field: PRODUCT TOTAL
Field: SUB-TOTAL
Field: DISCOUNT (PERCENT)
Field: DISCOUNT (DOLLARS)
Field: SHIPPING & HANDLING
Field: TAX 1 (PERCENT)
Field: TAX 1 (DOLLARS)
Field: TAX 2 (PERCENT)
Field: TAX 2 (DOLLARS)
Field: GRAND TOTAL
Field: BALANCE OWING
Button: HELP
Button: EDIT CUSTOMER
Button: DONE
Button: PRINT
Field: ROUTE LIST DISPLAY
Button: HELP
Button: DONE
Button: CANCEL
Checkbox: PRINT ROUTE LIST
Checkbox: PRINT INVOICES
Checkbox: PRINT INFO ABOUT PROSPECTIVE CUSTOMERS
Our integration plan calls for a bottom up approach, beginning with
testing by running unit tests screen by screen. The integration tests will
be conducted while connecting the various pieces of the system together. For
example, some functions in the product list affect the information on
order information window. These features will be tested in the integration
tests.
FILTER screen from product list
The test consists of performing a filter, pressing done, and then verifying
that only those products which passed the filter conditions remain in the
product list.
EDIT CUSTOMER from route list window
This can be tested by choosing a customer from the route list and then
pressing EDIT CUSTOMER. If the customer information window pops up
with all of the highlighted customer's information filled in, and which
the user can then edit, then it works properly.
While testing, some unexpected errors are likely occur. Depending
on whether error-handling code has been put in, this may cause MS Access
either to display a message with the error number and cancel the action
that caused the error, or to go into a debugging mode, displaying the
code that caused the problem. If either of these events occurs, or a
logic error is observed (incorrect computation, etc.), the bug should be
reported to the project manager (Gillian Posey) in the following format or a
similar format, and she will either correct the error herself or assign the
problem to the appropriate person. If the tester believes that they see the
solution to the problem, they should describe it when reporting the bug.
_____________________________________________________________________________
This is a group of hypothetical situations that will serve several
purposes. First, these walkthroughs are a way of testing the integration
of the modules with each other. Second, the walkthroughs can be used as a
script for our demonstration. Third, these walkthroughs can be used as a
method of studying the usability of our system.
Situation 1:
As time permits, we would like to take the time to sit down with some test
subjects and to get their reaction to the system. These subjects would include
some of the actual end users (employees of BFI) and some people totally
unassociated with the project. Usability testing would help us to locate
potential problems relating to ease of use in our system that may have been
overlooked during the design phase. These changes would then be incorporated
into the next release of our product.
The actual usability tests would be set up similar to an interview,
where one person from our team would meet with an interviewee. The interviewer
would then ask the interviewee to try to accomplish a number of predefined
tasks, and all feedback from the user would be documented in detail. This
will provide us with important feedback to be used towards the further
improvement of the system.
Based on the fact that we have eleven members on our team, multiple
goals can be set because not everyone will be working on every aspect of the
testing and coding of the modules at the same time. Please bear in mind that
these are proposed dates only, and can be changed as required, of which the
only is exception is the acceptance testing, which is our scheduled
presentation of our system to BFI on March 26.
Friday March 8, 1996:
Monday March 11, 1996:
Friday March 15, 1996:
Monday March 18, 1996:
Thursday March 21, 1996:
Saturday March 24, 1996:
Sunday March 24, 1996:
Tuesday March 26, 1996:
Testing will be done in the following teams (still subject to acceptance
by the rest of the group):
Testing Team 1: (unit testing of Product List Screen)
Testing Team 2: (unit testing of Customer Information Screen)
Testing Team 3: (unit testing of Order Information Screen)
Testing Team 4: (unit testing of Route List Screen)
Testing Team 5: (integration testing of system)
Testing Team 6: (walkthroughs)
Testing Team 7: (usability testing - if time allows)
Testing is an important means that we need to use to ensure the
quality of the products we create. It is absolutely essential that we test
each individual piece of our program at the lowest levels possible to ensure
that every error in coding and logic is found and rooted out. Testing now,
though a long and involved process, will potentially save large amounts of
money in software maintenance costs down the line. Testing is a crucial and
central aspect that has to be given top priority by MacroHard to ensure that
the final product we produce for BFI will be of the finest fuctional quality.
The program manager will be responsible for integrating the
work of other programmers (or interface designers) into single
application, and will also keep track of the current work
assignments and ensure that everyone is working with the most
current version of the database and whatever object(s) they
are working on. She will also keep backup copies of all
previous versions of the application, and will probably do
most of the non-routine programming (e.g. anything that
cannot be done using Wizards). She may assign integration
testing and the creation of suitable test data to other
individuals.
Changes to the application and assignments may be decided in
group meetings, but the program manager will be responsible
for keeping track of all agreed-upon changes and assignments.
When it is not feasible to call a group meeting to decide an
issue, the program manager may make a decision unilaterally,
although this should only occur for minor details.
Other programmers and designers will mainly be responsible for
designing and formatting forms and reports and creating
associated objects, such as the underlying queries for the form
or report and its lists and combo boxes. They may also write
some of the associated event code (especially code that can be
produced using wizards), but not without the knowledge of the
program manager. They may not edit any code except their
own, although they should advise the program manager of any
bugs that they encounter. If they see the solution to a bug,
they should describe it or include it in comments within the
code.
Only one person will be responsible for changes to any object
(e.g. a form or report, including its underlying queries) at
one time, unless a group of people have agreed to work together
using a single copy of the application, and no one will be
allowed to modify any object in the application without the
knowledge and agreement of the program manager.
Each individual is expected to test their own work and advise
the program manager of any problems, but all changes will also
be tested by at least one other person, both in isolation and
together with the remainder of the application.
In general, several work assignments will be made at one time
in a meeting and all people involved will receive a copy of the
most recent tested and approved version of the application.
Their work will be submitted at an agreed-upon time and then
integrated into a single application, which will become the
current version after testing has been completed. The first
version of the application will be called "BCI01.DB", the
second will be called "BCI02.DB", and so on.
The tables in the database must never be modified without the
knowledge and approval of the program manager. Fields in a
table will not ordinarily be renamed or deleted once they
have been used in any part of the application, although new
fields may be added.
Any field that is bound to the query underlying a form or report
should have the same name (not caption) as the field that it is
bound to, and fields in the current application will not
ordinarily be renamed. If a field on a form is replaced with a
new one, the new one should be given the old name once the old
field is deleted. Buttons in a form will also not be renamed,
although their captions may be changed. Buttons and unbound fields
should be given informative names when they are created.
Testing group:
Joon-Sae Park
Introduction:
Objectives:
- proper functioning of individual modules
- each screen functions properly as set out in the specifications
- intercommunication and functionality
- the system functions the way we describe it in the
design document
- achieved through all levels of testing that we plan
to implement on the system
Unit Testing:
Button - the name of the button
Field - the name of the field
Customer Information Window:
Buttons:
Success:
If all the fields are cleared, allowing the user to enter the
corresponding information into the appropriate fields.
Test:
This can be checked by searching again for the old record
and making sure that any changes made were saved.
Success:
If a dialog box pops up asking the user to confirm the
deletion (and warning them that all the customer's orders will be
deleted as well), after which the user responds.
- Yes. then the currently displayed record should no longer be
contained in the database, and all the associated orders and line
items will be deleted as well. (If this is a new record that
hasn't yet been saved, the fields will just be cleared.)
- Test:
This can be checked by performing a search for this
record. If the search turns up empty then it has
passed the test. The Order and Line Item tables should be
examined as well to make sure that the customer's orders
have been deleted.
- Test:
This can be checked by performing a search for this record.
If the search finds this record, then it has passed the
test.
Success:
If the search customer dialog window pops up, then this
button performs correctly.
Success: If a print dialog box pops up.
Success:
If the help window pops up with information pertaining to
the customer information window.
Success:
If a message box appears asking the user to confirm this action. If
the user responds Yes, all the information returns to the state at
the last save, otherwise the record remains unchanged.
Test:
This can be checked by first saving the current customer,
making a few changes to some of the records, and then
pressing UNDO. Try both confirming and not confirming the operation.
Success:
If the customer information window closes, and any changes are
saved.
Test:
This can be checked by first changing address, and then
pressing DONE. Re-enter the customer information window, and
search for that customer. If the address has kept the
changes, then this button works.
Success:
If a message box appears asking the user to confirm this action. If
the user responds Yes, the customer information window closes, and
none of the changes are saved, otherwise the customer information
window remains open, with the changes still intact.
Test:
This can be checked by first changing the address, and then pressing
CANCEL and confirming the operation. Re-enter the customer
information window, and search for that customer. If the address is
the same as the one before the change was made, then this button
works. (Also try not confirming the operation.)
Success:
If the order information window opens with a new record. (If the
current record is a new record that hasn't been saved, a message box
will appear asking the user if they want to save the record. If they
respond Yes, then the record should be saved and the order
information window opened, otherwise they should remain in the
customer information window. The customer record must have been
created before the order information window can be opened.)
Test:
(1) Click on this button from a previously saved customer record.
Success:
If the order information window pops up with the selected order
information. If no order has been selected, then this button should
display a message box telling the user to select an order.
Fields:
Edit:
Customer's name should change.
ETest:
Click on the customer field and type in a different name.
Edit:
Contact should change.
Etest:
Click on the contact field and type in a different contact
name.
Edit:
Phone number should change.
Etest:
Click on the phone-number field and type in a different
phone number.
Edit:
Address should change.
Etest:
Click on the address field and type in a different address.
Edit:
City should change.
Etest:
Click on the city field and type in a different city.
Edit:
Province should change.
Etest:
Click on the prov field and type in a different province.
Edit:
Country should change.
Etest:
Click on the country field and type in a different country.
Edit:
Postal-code should change.
Etest:
Click on the postal-code field and type in a different
postal-code.
Edit:
If user enters something not in the list and then tries to
enter a different field a message box should pop up telling
user to choose something from the list.
Etest:
Click on the sector field and type in something that is not in
the list and then click on the city field.
Click on the sector field and type in something that is in the
list and then click on the city field.
Edit:
If the credit-limit changes. Further it should only accept
numbers.
Etest:
Click on the credit-limit field and type in a number. Also
try typing non-numerical characters.
Success:
If non-numerical characters are entered, a beep should be heard and
a message displayed when the field is exited.
Edit:
Comments should change.
Etest:
Click on the comments field and type in some comments.
DClick:
The order information window should pop up with the associated
information.
Dtest:
Double click on one of the orders.
Customer Information Print Box
Buttons:
Success:
If the help window pops up with help about this window
Success:
- If a selection is made, prints the selected reports in the correct
formats with information from the customer record currently
displayed in the customer window, then closes the window. (For
demonstration purposes, displaying the text in print preview will
be sufficient.)
Success:
Closes the window.
Success:
If the customer information is displayed in a print preview format.
(After pressing DONE)
Success:
If the most recent order is displayed in a print preview
format. (After pressing DONE)
Success:
If the help window pops up with help about customer search.
Success:
Closes the box, and the selected customer (if any) is displayed in
the customer information window. If no customer is selected, the
customer information window will be unchanged.
Success:
If this window closes and the customer information window has not
changed from the time when we entered the search window to the time
when we exited it.
Edit:
The closest match to what we type should be displayed in any of these
fields that we edit (sorted by the appropriate field) and all the
fields should be updated to display the information for the same
customer when one field has been edited.
Etest:
Click on each of the fields, making a different selection in each.
Success:
A list of all products currently listed in the product list window is
printed (displayed in print preview).
Success:
Opens the Search for Product window.
Success:
Opens the filter product window.
Success:
Opens the help window with information about the product list
window.
Success:
**Note that this button is grayed out and disabled unless the
Product List window was invoked from the Order Information
window and an item in the product list listbox is
highlighted.
Test:
Click on one of the products in the list box, and then click
on this button. Try adding a product twice.
Success:
Should close this window.
DClick:
**If the window was invoked from the order information window,
then it should add the selected product to the current order, ie.
it should perform same action as ADD TO ORDER button.
Otherwise, nothing should happen.
Dtest:
Double click on one of the products in the list box.
Success:
- If FROM PRICE > THROUGH PRICE, displays an error message advising
the user.
Test:
Try this button with various combinations of filter criteria.
Success:
Should close this window, and return to the Product List
window, with no changes made, ie. the information in the
product list window from before entering this screen and after
exiting should be the same.
Success:
A help window should open up with information about the
filter product list window.
Success:
This button is greyed out and disabled unless an item
in the left box is highlighted. If so, a single click on this
button will move that item into the right box.
Test:
Click on the button with an item highlighted, and with no
items highlighted.
Fields:
Single click:
Highlights that item.
DClick:
Will move associated item to the other box.
Test:
Click on the item while another item is highlighted, while
no items are highlighted, and while that item is highlighted.
Double click on an item under the same conditions.
Success:
Accepts numbers, doesn't accept other characters.
Etest:
Try entering both numerical and non-numerical characters.
Success:
Accepts numbers, doesn't accept other characters.
Etest:
Try entering both numerical and non-numerical characters.
Success:
Should close this window and return to the Product List
window, with the matching record at the top of the list.
Test:
Click on the button under the following conditions:
1. A product ID has been selected.
Success:
Should return to the Product List window, with no changes
made. The product list will be identical to what it was
before the Search window was invoked.
Test:
Same as for DONE button above.
Success:
Should open the help window with information about the
search for product window.
Edit:
Should display the closest matching product in order by product ID.
If there is no match for the user's entry, should display an error
message when the user tries to leave the field. When the field is
exited, the PRODUCT NAME field should be updated to display the
corresponding product name.
ETest:
Type in both an existing and a non-existing product ID, then try
exiting the field.
Field:
PRODUCT NAME (Same as for the Product ID)
Success:
Prints (in print preview) the order information currently displayed
on the screen. If the current record is a new one that hasn't been
saved, it will ask the user if the want the record to be saved first.
If they respond "Yes", then the record will be saved then printed,
otherwise they remain in the order information screen and nothing is
printed.
Success:
Displays a message box to confirm the deletion. Deletes the order
and the related line items if the user confirms the deletion, and
doesn't otherwise. (If the order is a new one that hasn't been
saved, it will just clear the fields.)
Success:
The information shown in the order form is removed, and the user
will be presented with a fresh screen to enter a new order.
Success:
A help window with information about the order information
screen should pop up.
Success:
The Product List window pops up with the ADD TO ORDER
button and double clicking enabled (Refer to Product list
window in preceding section)
Success:
Closes the order information screen and saves all information
about the current order.
Test:
Make an order and press the DONE button. Reenter the order
information screen by double clicking on this order in the
order list box. Verify that all information is correct prior
to pressing the DONE button.
Success:
The CANCEL button should first present a message to the user
informing them that they will lose the most recent changes to the
information on the screen.
Test:
Press cancel button.
1) Proceed with cancellation and then retrieve this order to verify
that changes were not saved.
Success:
The current date is displayed in the DATE DELIVERED field.
Edit:
Should not be editable (assigned automatically by MS Access).
Etest:
Verify that this is not editable.
Edit:
Should not be editable.
Etest:
Verify that it is not editable and that it automatically puts in the
current date when a new order is created.
Edit:
It is important that the field only accept input according
to one of the valid date formats, and that it only accept dates less
than or equal to the current date.
ETest:
Click on the date delivered field and try typing both acceptable and
unacceptable date formats.
Edit:
Should only accept valid date formats for dates greater than or equal
to the current date. If this field is blank when the order is marked
as delivered, this should automatically be filled in with a date
obtained by taking the difference between the delivery dates for this
order and the last one and adding it to this order's delivery date
(if there is no previous order, it will prompt the user for a date).
ETest:
(1) Click on the next order date and try entering both valid and
invalid dates.
Edit:
The system must look at all input, and verify whether or not
it is a valid product name. If it is not a valid name, the
system should inform the user of the problem. If the name is
valid, the system should then proceed to fill in the fields
id, type, product number, and price/unit automatically
according to the information in the data tables. If the
Product ID is filled in instead by the user, the system should
then fill in the appropriate product name.
ETest:
Click on product name field and try to type in a valid product
name, and then try typing an invalid product name.
Edit:
The system must look at all input, and verify whether or not
it is a valid product id. If it is not a valid id, the system
should inform the user of the problem. If the id is valid, the
system should then proceed to fill in the fields name, type,
product number, and price/unit automatically according to the
information contained in the data tables. If the product name
has been filled in instead by the user, the system should then
fill in the appropriate product ID.
ETest:
Click on the product id field and then try typing in a valid
product id and then an invalid one.
Test:
Verify that the correct product type is displayed automatically when
a product name or ID is selected and that the field can't be edited.
Test:
Verify that the correct price/unit is displayed automatically when
a product name or ID is selected and that the field can't be edited.
Edit:
Must be entered by user, and must be a positive integer. When a
quantity has been entered, the appropriate quantity discount (if any)
should be displayed automatically in the QUANTITY DISCOUNT field,
e.g. 10% for orders of 10 boxes or more, and 15% for orders of 50
boxes or more.
ETest:
Try adding products without putting in a quantity, making invalid
entries, and entering different quantities (with different
discounts).
Edit:
Should only be editable by an administrator (not implemented in this
version, so the field will be non-editable always).
ETest:
Ensure that field is filled in based on value set in admin
section (the value will be placed directly in the table for this
version).
Test:
Check that this equals (1 - quantity discount) * product price *
quantity. This should be non-editable.
Test:
Check that this equals the sum of the product totals. This should
be non-editable.
Test:
This field should be non-editable in this version (in a later
version, administrators will be able to edit it). For testing, we
will put a value directly in the table.
Test:
Check that this equals (DISCOUNT * SUB-TOTAL). It should be
non-editable.
Test:
Check that this equals the distance to the customer's sector
multiplied by the shipping rate (which is hard-coded in this
version). It should be non-editable.
Test:
This field should be non-editable and display the appropriate value
(hard-coded in this version).
Test:
Check that this equals (TAX1 (PERCENT) * (SUBTOTAL - DISCOUNT
(DOLLARS) + SHIPPING & HANDLING)). It should be non-editable.
Test:
This field should be non-editable and display the appropriate value
(hard-coded in this version).
Test:
Check that this equals (TAX2 (PERCENT) * (SUBTOTAL - DISCOUNT
(DOLLARS) + SHIPPING & HANDLING + TAX1 (DOLLARS))). It should be
non-editable.
Test:
Check that this equals SUBTOTAL - DISCOUNT (DOLLARS) + SHIPPING &
HANDLING + TAX 1 (DOLLARS) + TAX 2 (DOLLARS). It should be
non-editable.
Edit:
This field should only accept numbers as input and should display
them in a currency format.
Etest:
Try entering both numeric and non-numeric characters.
Success:
The help window window pops up with information about the
route list window.
Success:
The Customer Information window pops up with all of the
selected customer's information filled in, for the user to
change at their own discretion.
Test:
Highlight a customer in the Route List Display Area, then
click the Edit Customer Button.
Success:
The window closes and returns to the previous window, all
changes are saved.
Success:
The Print Box pops up, prompting the user what to do.
Success:
After clicking on a customer, it becomes highlighted.
After clicking on the active field pertaining to a customer,
then that field is toggled on or off.
Test:
Click on a customer.
Success:
A help window pops up with information about the route list
print box.
Success:
All of the entries that are marked with 'X's in the Active
field are printed out in the correct report formats.
There are several possible error conditions:
- There is a printer error - these errors will be handled by MS
Access and the Print Manager provided with Windows, and we will not
be testing them.
Test:
- The list has no active entries to be printed:
- Click the DONE button when one report is selected.
- The list has some active entries:
- Click the DONE button when one report is selected.
Success:
The window is shut and the user is returned to the Route
List Window.
Success:
The 'X' inside of the box is toggled on or off.
Success:
The 'X' inside of the box is toggled on or off.
Success:
The 'X' inside of the box is toggled on or off.
For all the print windows the same test may be done. After clicking the
print button, the appropriate window should come up. Within each of the
windows, pressing OK should result in the requested for information being
sent to the printer. (For demonstration purposes, it will be sufficient
to display what would be sent to the printer in a print preview format.)
Pressing Done should result in the associated print window closing and
return control to the window from which it was called.
For all the search windows the same test may be done. After clicking the
search button, the appropriate search window should come up. After
performing a search and pressing OK, the search window should close and
the searched-for information should appear in the relevant locations. For
example, the top of a list box, or appropriate information filling the
associated fields. If Cancel was pressed, then the information on the
window which called the search window should not have changed.
ADD TO ORDER: This button should only be enabled when entering from the order
information screen. This can be easily tested by entering it from the
order information screen, and then entering it from the main window.
Pressing the button should result in the selected order being added to
the order list in the order list window. All the fields except quantity
and discount should be filled in. This can be easily tested by choosing
a product and pressing Add to Order. It only remains to be seen whether
this order was added to the current order in the order list window. There
is the special case that the user tried to add a product that was already on
the order list. A message should pop up telling the user this in these
cases. Double-clicking on a product should result in the same actions as
add to order.
Search for customer information. A customer calls on the
phone and wants to know what he currently has on order. The employee
needs to select Customer Information from the main screen, and then clicks
on the Search button. The employee would then enter any one of the
customer's company name, phone number, or contact person, and then select
an order to review.
Situation 2:
Add a new customer. The employee would select Customer Information from the
main window, and click on the New Customer button. Now all of the fields
on the Customer Information screen are blank, so the employee needs to enter
all relevant information and then click on Done to add the customer. If
the customer wants to place an order immediately, the employee could click
on New Order to place an order.
Situation 3:
Placing an order. A customer calls on the phone and wants to order a new
supply of business forms. The employee would select Customer Information
from the main window, and then locate the information for that customer
using the Search for Customer screen. The employee would then click on
New Order to open the Order window. The employee can either directly
enter the products into the list of items, or click on the Product List
button to select items from the Product List window.
Situation 4:
Changing an order. A customer wants to change the quantity of one item
and add another item to an order which has been placed but not yet
delivered. The employee would select Customer Information from the main
screen, search for the correct customer, select the order from the list
of orders, and then click on Edit Order. Now the Order window displays
the information on the order in question, so the employee can change the
appropriate information.
Situation 5:
Viewing product information. A potential customer calls to inquire
whether BFI supplies a certain type of form. The employee would select
Product Information from the main window. The employee could then either
scroll through the product list until an appropriate product is found, or
she could use the Search for Product function to locate the product based
on the product's name or ID number. Now all information about the
product is displayed in the product list box.
Situation 6:
Viewing restricted product information. A customer wants to know what
BFI supplies in the price range $15-20. The employee would select
Product Information from the main screen, and then click on the Filter
button. Then he would enter the values 15 and 20 into the two boxes
labeled Price, and click on Done to return to the list with only
products in that price range remaining in the list.
Situation 7:
Printing daily route list. At the beginning of the day, the salesperson
wants to know what deliveries he has to make and which customers he has
to visit that day. From the main window, he selects Route List and the
current day's route is displayed. Now he can print the list by clicking
on the Print button.
- completion of Main screen
- module testing of Main screen complete (5)
- completion of Order Information Screen
- module testing of Order Information screen (3)
- integration of all five modules complete, and
functioning
- completion of integration testing - walkthrough
testing (5) (6)
- completion of usability testing if time allows (7)
- demonstration of system to BFI, (acceptance testing)
- Scott Jensen
- Gillian Posey
- Premila Jeyaraj
- Tony Ho
- Soon Poh-Oon
- Scott Jensen
- Jason Archibald
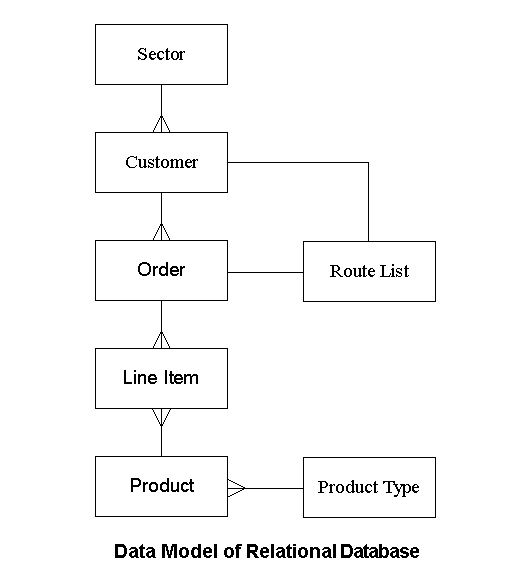
Tables and Field Definitions
Sector
- Sector ID
Type: Counter
Type: Text, 50 characters
Type: Number (byte - 0 to 255)
Type: Number (double)
- Customer ID
Type: Counter
Type: Text, 50 characters
Type: Text, 50 characters
Type: Text, 14 characters
Type: Text, 255 characters
Type: Text, 50 characters
Type: Text, 2 characters
- Country
Type: Text, 50 characters
Type: Text, 7 characters
Type: Number, long integer
Type: Number, currency
Type: Memo
- Type ID
Type: Counter
Type: Text, 50 characters
- Price per box
Type: Number, currency
- Product ID
Order
Type: Counter
Type: Text, 50 characters
Type: Memo
Type: Number, long integer
- Order ID
Type: Counter
Type: Number, long integer
Type: Date/time
Type: Date/time
Type: Date/time
Type: Number, percent
Type: Number, currency
Type: Number, percent
Type: Number, percent
Type: Number, currency
Type: Number, currency
Line Item (a single line on an order, giving the order for one product)
- Line Number
Route List
Type: Counter
Type: Number, long integer
Type: Number, long integer
Type: Number, integer
Type: Number, currency
Type: Number, percent
- Customer ID
Type: Number, long integer
Type: Number, long integer
Type: Number, long integer
Type: Yes/No
Stored Variables
- Route List Date
Type: Date/Time
The Program Manager:
Combo box:
This is a combination of a text field with a list. If the user types in the
field, the first item in the list that starts with the characters that the
user has typed will be displayed as the user types. The text in the field
will be highlighted if it matches something in the list, and will not be if
it doesn't. The user may also click on a button to the left of the field
to display the list, then scroll through it and make a selection with the mouse.
(This list may have multiple columns, but only one value will appear in the
input field). Normally, the user must enter or select an item that is in the
list.
Counter:
Fields with this type have a positive integer assigned automatically in
sequence (for each field) by MS Access.
List box:
This is a box displaying a list of records (usually with multiple columns).
The user may scroll through the list and select any item in the list by
clicking on it with the mouse.
Scroll bar:
A scroll bar is a bar to the right or at the bottom of a window or box, that
allows the user to move the text displayed in the window or box by dragging
it with the mouse or clicking on the arrows at each end of it.
(To drag something with a mouse, move the mouse cursor over the object,
press the left mouse button down, and then hold the button down while
moving the object to a new position by moving the mouse cursor.)