User Interface and Interaction
3.1 Interface Overview:
The HMS has been designed with a graphical user interface that enables some
direct manipulation of information. The interface is based on a point and
click access system for functions. A mouse or another suitable pointing
device is used to click various 'buttons' that correspond to various system
functions. This interface design is not unlike that seen in popular Microsoft
windows applications.
To select functions, the user simply has to 'point and click'. Manipulation
of text data will then be done using the keyboard. This type of graphical
interface was chosen so make the system unimposing and user friendly. The
chief goal of the interface design team was to build a system interface that
most individuals could utilize with minimal training. A good system is one
that gets used!
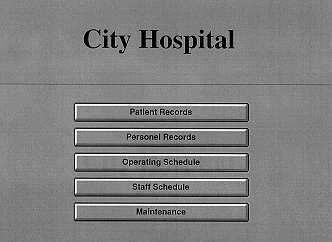
The system has a main dialogue screen that enables the user to select primary
function groupings. These groupings are identical to those found in section
two of this report. Whenever a particular function grouping is chosen, a
screen particular to that group will be displayed, allowing the user to
direct processing as required. When a particular function is exited, the
system will return to the main selection screen. It should be noted that
unless the user chooses to exit a particular function screen, the system will
remain active at the screen. This feature was chosen to facilitate ease of
performing multiple iterations of the same task.
Unfortunately, due to unforeseen circumstances,a design for the maintenance
functions screen is not available at this time. It should be noted as well
that this function has also been omitted from the main selection screen. This
was due primarily to the last minute addition of this group of functions to the
system.
3.2 Detailed Interface Description:
3.2.1 Screen Name: Main Selection Screen:
- Label Parts:
There are buttons to get to the Patient Records, Personnel
Records, Operating Schedule, Staff Schedule, and Maintenance screens.
- Add:
- Modify:
- Delete:
- Save:
- Close:
- There is no close or exit button as it is assumed that this system will always
be running.
3.2.2 Screen Name: Patient Information:
- Label Parts:
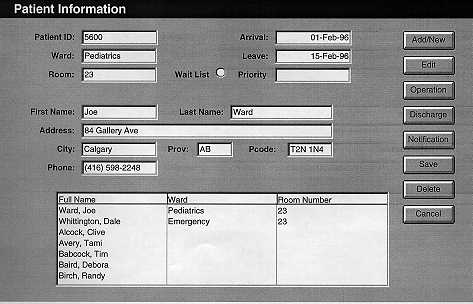
- There are fields in which to enter the patient's ID number, the ward that they
are admitted to, the room that they are assigned to, their admission date,
their expected leave date, if they are on the waiting list or not, their first
name and last name, address, city, province, postal code,and phone number.
-
There is also a list box where the patient information, for example what room
they are in, can be viewed.
-
There are six buttons on this screen:
- "Add/New" - to add a new patient to the system
- "Operating" - to check the patient's operating schedule
- "Undo" - to modify any information on the screen
- "Save" - to save the information to the data base
- "Delete" - to delete the patient's information
- "Close" - to close the screen
- Add:
- By clicking on the Add/New button you will get a blank screen in which to add
the new patient's information. To get to the individual fields one should use
the tab button.
- If there is a room available then they are immediately admitted to the
hospital, otherwise they are put on the waiting list.
- Modify:
- To modify the patient's information hit the Undo button and then correct the
relevant information.
- Delete:
- To delete a patient hit the Delete button.
- Save:
- To save the patient's information hit the Save button. This will add the
information to the data base.
- Close:
To close the screen and go back to the main screen hit the Close button.
- Error Messages:
- A message will come up asking the user if they want to delete any information
after hitting the delete button.
- A message will come asking the user if they are sure that they want to save the
information after hitting the save button.
- A message will come up telling the user that he has to save the information
if they hit the close button without hitting the save button.
- Algorithms:
- Screen Name: Patient Information
- Records the following information:
- Patient ID
- Ward - (to which the patient is assigned)
- Room/Waitlist Priority
- Arrival date
- Expected leave date
- First Name
- Last Name
- Address
- City
- Province
- Postal Code
- Phone number
- This screen allows you to perform the following functions:
3.2.3 Screen Name: Staff information:
- Label Parts:
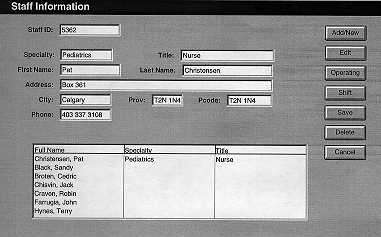
- There are fields in which to enter the staff member's ID number, their
specialty, their title (Doctor, Supervising or Regular Nurse), their first and
last names, their address, city, prov, pcode, and phone number.
-
There are six buttons on this screen:
- "Add/New" - to add a new staff member to the system
- "Operating" - to check the staff member's operating schedule
- "Shift" - to check the staff member's shift schedule
- "Undo" - to modify any information on the screen
- "Save" - to save the information to the data base
- "Delete" - to delete the staff member's information
- "Close" - to close the screen
- There is also a list box where the staff member's information can be viewed.
- Add:
- By clicking on the Add/New button you will get a blank screen in which to add
the new staff member's information. To get to the individual fields one should
use the tab button.
- Modify:
- To modify the staff member's information hit the Undo button and then correct
the relevant information.
- Delete:
- To delete a staff member hit the Delete button.
- Save:
- To save the staff member's information hit the Save button. This will add the
information to the data base.
- Close:
- To close the screen and go back to the main screen hit the Close button.
- Error Messages:
- A message will come up asking the user if they want to delete any information
after hitting the delete button.
-
A message box will come up asking the user to verify the ward schedule
information. It will state if an extra doctor is needed on a particular ward
for a particular shift etc.
-
A message will come up telling the user that he has to save the information
if they hit the close button without hitting the save button.
- Algorithms:
- Staff Information Screen
- Records the following information:
- Staff ID
- Specialty
- Title (Doctor, Nurse, Supervisor Nurse)
- First Name
- Last Name
- Address
- City,
- Province
- Postal Code
- Phone number
- This screen allows you to perform the following functions:
3.2.4 Screen Name: Operating Room Schedule:
- Label Parts:
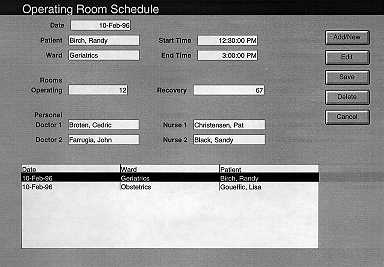
- There are fields in which to add the date, operation number, start time of the
operation, and expected end time of the operation, and the patient to be
operated on.
-
There are list boxes that will allow the user to choose the ward that the
patient is coming from, the operating room number, the recovery room number,
the two Doctors available to perform the operation, and the two nurses that are
available to assist the Doctors.
-
There is also a scroll box where the O/R schedule can be viewed.
-
There are six buttons on this screen:
- "Add/New" - to add a new operation to the system
- "Undo" - to modify any information on the screen
- "Save" - to save the information to the data base
- "Delete" - to delete the operation information
- "Close" - to close the screen
- Add:
- To add an operation to the schedule hit the Add/New button and precede to
enter the necessary information.
- Modify:
- To modify the information hit the Undue button, and then go about editing the
necessary information.
- Delete:
- To delete information hit the Delete button.
- Save:
- To save the O/R schedule information hit the save button. This will add the
information to the data base.
- Close:
- To close the screen and go back to the main screen hit the Close button.
- Error Messages:
- A message will come up asking the user if they want to delete any information
after hitting the delete button.
-
A message will come asking the user if they are sure that they want to save the
information after hitting the save button.
-
A message will come up telling the user that he has to save the information
if they hit the close button without hitting the save button.
- Algorithms:
- Screen Name: Operating Room Schedule
- Records the following information:
- Date of operation
- Start time of operation
- End time of operation
- Pateint's name
- Ward
- Operating room number
- Recovery room number
- Doctor 1's name
- Doctor 2's name
- Nurse 1's name
- Nurse 2's name
- This screen allows you to perform the following functions:
- Browse:
The default mode for the O/R schedule screen is browsing. There is
no specific browse button. To browse the O/R schedule database enter
information in any one of the fields. It will actively search the
database for the O/R schedule with that particular information
pertaining to that field. The O/R schedule that matches that information
will appear in the list box on the bottom of the screen. To narrow the
search just enter in more fields. To perform an action on a specific
patient you must click on the O/R schedule in the list box.
- Add New O/R schedule:
The Add/New button allows you to add new operation to the database.
- clear( O/R schedule)
- edit( O/R schedule) - enter edit mode
- enter data
- hit Save or Cancel button - Save and Cancel functions follow later
- Edit O/R schedule Record:
The Edit button allows you to change an O/R schedule.
An O/R schedule is selected via browsing.
- edit( O/R schedule) - enter edit mode
- hit Save or Cancel button - Save and Cancel functions follow later
- Save O/R schedule Information:
The Save button allows you to save any changes that you have made to
the O/R schedule record.
- update record
- exit edit mode
- Delete O/R schedule Record:
The Delete button allows you to remove an O/R schedule from the database.
An O/R schedule is selected via browsing.
- confirm delete
- if yes then remove row from database and clear screen
- if no do no-op.
- Cancel:
The Cancel button performs two functions:
- closes the O/R schedule window if no changes were made.
- if a new record was added or a record was edited
- confirm cancel without saving
- if yes then exit edit mode without saving changes
- if no then do no-op.
3.2.5 Screen Name: Shift Schedule:
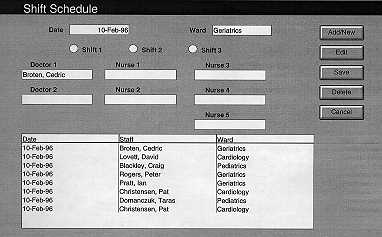
- Label Parts:
- There are fields in which to enter the information for date.
-
There are radial buttons to pick the particular shift to schedule (Shift 1, 2
or 3).
-
There are list boxes from which to choose the ward to work in, and the Doctors
and Nurses that are available to work during a particular shift.
-
There are six buttons on this screen:
- "Add/New" - to add new information for a particular shift to the system
- "Undo" - to modify any information on the screen
- "Save" - to save the information to the data base
- "Delete" - to delete the shift information
- "Close" - to close the screen
- Add:
- To add shift schedule information hit the Add/New button and enter the relevant
information.
- Modify:
- To modify the shift information hit the Undo button and then correct the
relevant information.
- Delete:
- To delete a shift schedule hit the Delete button.
- Save:
- To save the shift schedule information hit the Save button. This will add the
information to the data base.
- Close:
- To close the screen and go back to the main screen hit the Close button.
- Error Messages:
- A message will come up asking the user if they want to delete any information
after hitting the delete button.
-
A message box will come up asking the user to verify the ward schedule
information. It will state if an extra doctor is needed on a particular ward
for a particular shift etc.
-
A message will come up telling the user that he has to save the information
if they hit the close button without hitting the save button.
- Algorithms:
- Screen Name: Shift Schedule
- Records the following information:
- Date of schedule
- Ward for schedule
- Shift period
- Doctor 1's name
- Doctor 2's name
- Nurse 1's name
- Nurse 2's name
- Nurse 3's name
- Nurse 4's name
- Nurse 5's name
- This screen allows you to perform the following functions:
- Browse:
The default mode for the Shift schedule screen is browsing. There is
no specific browse button. To browse the Shift schedule database enter
information in any one of the fields. It will actively search the
database for the Shift schedule with that particular information
pertaining to that field. The Shift schedule that matches that information
will appear in the list box on the bottom of the screen. To narrow the
search just enter in more fields. To perform an action on a specific
patient you must click on the Shift schedule in the list box.
- Add New Shift schedule:
The Add/New button allows you to add new operation to the database.
- clear( Shift schedule)
- edit( Shift schedule) - enter edit mode
- enter data
- hit Save or Cancel button - Save and Cancel functions follow later
- Edit Shift schedule Record:
The Edit button allows you to change an Shift schedule.
An Shift schedule is selected via browsing.
- edit( Shift schedule) - enter edit mode
- hit Save or Cancel button - Save and Cancel functions follow later
- Save Shift schedule Information:
The Save button allows you to save any changes that you have made to
the Shift schedule record.
- update record
- exit edit mode
- Delete Shift schedule Record:
The Delete button allows you to remove an Shift schedule from the database.
An Shift schedule is selected via browsing.
- confirm delete
- if yes then remove row from database and clear screen
- if no do no-op.
- Cancel:
The Cancel button performs two functions:
- closes the Shift schedule window if no changes were made.
- if a new record was added or a record was edited
- confirm cancel without saving
- if yes then exit edit mode without saving changes
- if no then do no-op.
Next Section
Previous Section
Back to the Final Design Document titlepage
Back to the main page
Last Modified Mar. 5, 1996 by
Darrell Nash