|
|
- Purpose of Security
- Security Button Selection
- Add Security Level
- Modify Security Level
- Delete Security Level
- Sort Security Level
- Print All Security Levels
- Return to Main Menu
|
|
As employees, in general, don't have access to all functions of the system, we have to pre-define the access of each security level so that we can restrict the type of information that employees have access to. The Process Security Operation is divided into five submodules - Add Security Level, Modify Security Level, Delete Security Level, Sort Security Level by different order and Print Security Level Information.
|
|

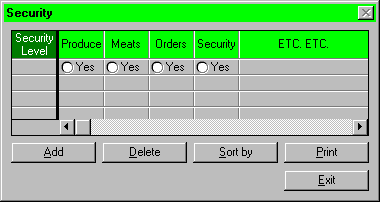
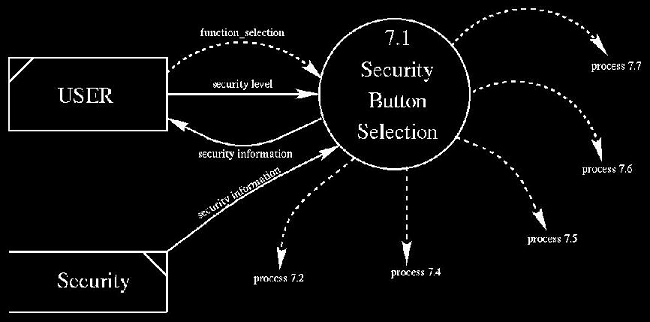
The SecurityInterface appears when a user clicks on the Security button in the Main Menu Interface, provided that the use has high security level to make any changes on the security data store. The Security Interface displays all security levels that are currently in use.
|
|

Purpose: Allow user to add, view, modify, delete, and print information about security levels
Inputs:
- Mouse action
- Security Level
Outputs:
- security interface with a list of security levels that are currently in use
Calls:
- 7.2 Add Security Level
- 7.4 Delete Security Level
- 7.5 Sort Security Level
- 7.6 Print Security Level
- 7.7 Return to Main Menu
Called by:
- Main Menu
Assumption:
- User who may get into this process has already been checked that he/she has high enough security level.
Error conditions:
- None.
if (getMenuChoice() == "Add")
 then Add New Security Level to the Security database
else if (getMenuChoice() == "Delete")
 then Delete selected Security Level from Security database
else if (getMenuChoice() == "Sort by")
 then Displays the Sort by Interface
else if (getMenuChoice() == "Print")
 then Print all security levels that are currently in use
else if (getMenuChoice() == "Exit")
 then return to main menu
|
|
To add a new security level, the user presses on a blank line. Then, the user can enter a new security level that he/she wants to add to the database and selects what kind of information that employees with the new security level have access to. Once this is done, the user has to click on the Add botton in order to add the new security level to the database. On success, a dialogue box which says "The new security level is added" is being displayed. Then, the window "Security" with all currently available security levels together with the new security level is being displayed on the screen.
If the security level is being used, it results in a dialogue box being displayed which reads "The Security Level is being used" and the new entry will not be added to the database. Then, the window "Security" with all currently available security levels is being displayed on the screen.
If the user does not grant any access permission to the new security level, it results in a dialogue box being displayed which says "No access permission is granted to the new security level. Failure to add a new security level" and the new entry will not be added to the database. Then, the window "Security" with all currently available security levels is being displayed on the screen.

Inputs:
- Security level - from user
- Mouse Action - from user
Outputs:
- Secuirty Interface with all security levels currently in use and the new Instance of "security level" that have just been added to the data store "Securities"
- Message to screen
Asumption:
- User who may get to this process has already been checked that he/she has high enough security level to add a new security level to the Securities database.
Error conditions:
- Security level is already in use.
- No permission is allowed to the new security level.
Algorithm:
if inputs from user are syntactically correct
  then securities[Security level] := Security level
     Send security level to data store (Securities) to be added
     if datastore reported success
       then print_to_user `ok'
       else print_to_user 'Security level is already in use'
     end if
  else print_to_user `Invalid Input'
end if
return to the interface to allow user to choose other options or
go back to the main menu
|
|
To modify a security level, the user clicks on the row containing the information of that security level. Then, the user can directly edit the fields. On success, the database will be updated and the window "Security" with all currently available security levels together with the modified entry is being displayed on the screen.
If the user removes all access permission of the security level, a dialogue box which says "No access permission is granted. Failure to modify the security level" is being displayed on the screen. The database will not be updated.

Purpose: Allow user to modify information of an existing security level
Inputs:
- Security level
- Mouse Action
Outputs:
- Security Interface with all security levels together with the modified entry
- Message to screen
Error conditions:
- User tries to modify the name of the security level
- User tries to remove all access permission of the security level
Algorithm:
if user trys to remove all access permission of the security level
  then print_to_user "Can't remove all access permission"
else if user trys to modify the name of the security level
  then print_to_user "Can't change name of the security level"
if user clicks on a radio button
  then toggle state of that permission of security_level
       where the radio button is clicked on
|
|
To delete a security level from the database, the user selects the security level that he/she wants to remove by pressing on that row. Once it is selected, the user clicks on the Delete button which results in a confirmation box which asks the user if this is the correct security level to be deleted. If the user answers no, i.e. it is not the correct security level to be deleted, then the database will not be updated and the window "Security" with all currently availble security levels together with the one the user does not delete is being displayed. On success, the database will be updated with the selected security level removed from the database. Then, the window "Security" with all currently available security levels, not including the one that is deleted, is being displayed.
If there exists employees having the selected security level that is about to be deleted, it results in a dialogue box being displayed. It informs the user that the selected security level cannot be deleted because there are employees having that security level and the user has to change the security level of those employees before deleting the selected entry. Therefore, the database will not be updated. Then, the window "Security" with all currently available security levels including the entry selected by the user is being displayed.

Purpose: Delete a security level
Inputs:
- Security level - from user
- Mouse Action
Outputs:
- Security Level Interface with all information of security levels that are currently in use except the one that just deleted
- Message to screen
Error conditions:
- User trys to delete a security level that is currently in use
Algorithm:
if there exists employee(s) that is assigned to the
selected security level to be deleted
  then print_to_user "There exists employee(s) in security
         level, selected security level cannot be deleted"
         else print_to_user 'Are you really want to delete?'
     if user clicks on the button "yes"
       then delete selected security level from database
            update information shown inside security interface
       else do nothing
     endif
endif
|
|
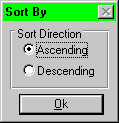
 Data on the Security window is, by default, sorted by
the security levels in ascending order. However, the user might want to
sort the security levels in descending order. This can be done by clicking
on the "Sort by" botton which results in displaying a Sort By
menu with two options - ascending and descending. Then, the user presses
on the word "descending" which results in putting a check mark
besides the word "descending." Then, data will be listed according
to the security levels in descending order.

Purpose:
Allow user to read information about security levels in ascending order
or descending order
Input:
- Mouse Action (mouse control action)
Output:
- Displays a list of all the security levels in ascending or descending order
Error conditions:
- None
Algorithm:
if user clicks on the 'Sort by' button
  then display two-option sort menu - ascending and descending
endif
if user clicks on the 'ascending' button
  then display list of all security levels in ascending order
else /* i.e. 'descending' button is pressed */
  display list of all security levels in descending order
endif
|
|
User may obtain a hard copy of all security levels that are currently available in the system by pressing the Print botton. When the Print botton is clicked, a print options box will be displayed. After choosing the destination for the print job and pressing the OK button, a printout with all the information that is shown on the Security window will be produced.

Purpose: Print all security levels that are currently in use.
Input:
- None
Output:
- print a list of all security levels
Error conditions:
- None
Algorithm:
Print all security level information in a report form to printer.
Order will be same as the current ordering on the screen.
|
|
Once modification of security information is done, the user can press the Exit button resulting in terminating all process security operation and the main menu being displayed.

Purpose: Return to the Main Menu
Input:
- Mouse Action
Output:
- Return to main menu and display the main menu interface
Error condition:
- attempts to return to the main menu while generating a report for printing
- attempts to return to the main menu while other processes have not been finished
Algorithm:
if there is any security report being generated
  then print_to_user "Do you want to abort printing
                             security level report"
     if user presses on a "Yes" button
       then abort generating security level report and print job
     else continue generating security level report and send it
          to the printer and don't go back to the main menu
     endif
else if other processes have not been finished yet
  then print_to_user "Do you want to abort the current process"
       if user presses on a "Yes" button
         then abort that process and return to the main menu
         else continue the current process
       endif
endif
