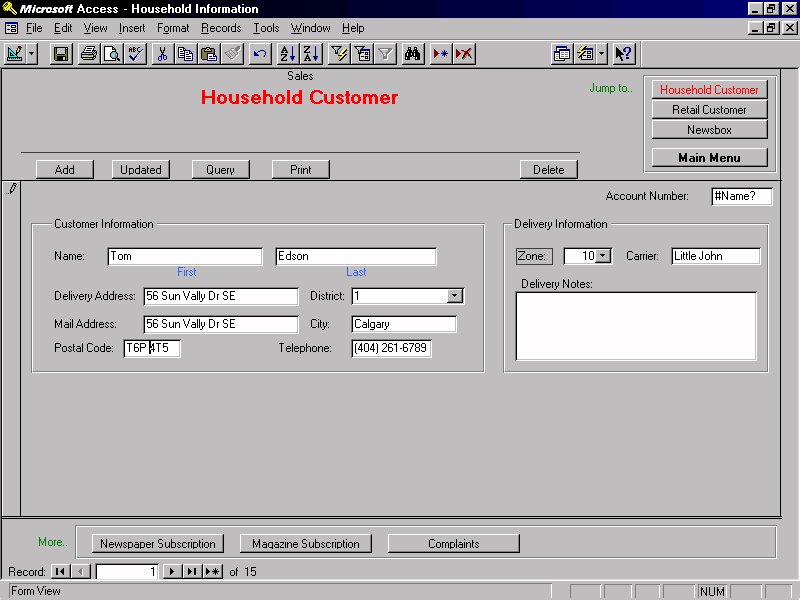
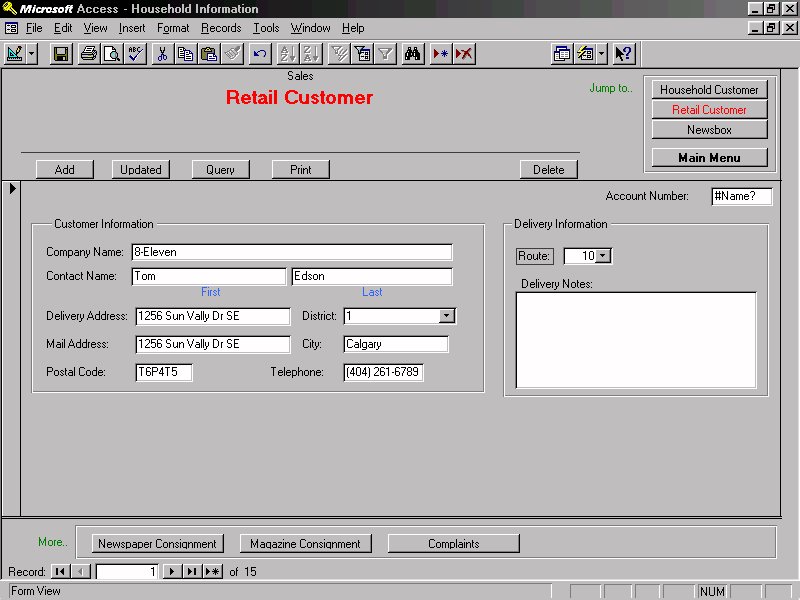
This section covers operations dealing with the household
customer's GUI. To reach the customer interface the user must press,
on the main menu, the Customers button. In the Customer
interface the user can switch among the three types of customers
(retail, household, and news box). By pressing the tab labeled
Households the system switches to the household customers'
GUI. The system will maintain the name, address, phone number, the
district, the zone id (for that portion or the district), the carrier
id (of the carrier servicing that zone), the current delivery status,
publications delivered, special delivery information, and billing
information for each household customer. Users will enter all
information through the interface. There is a return to main menu tab
located present in the interface that will close the Customer
interface screen and return the use to the main menu.
Back to Top
Add Household Customer
- Pressing the ADD button at the top of the interface screen allocates
new space in the database for a new household record and makes available
to the user a data entry screen. In the data entry screen the user fills
the empty fields with vital information about the new customer. The vital
information includes the following: Account Number (automatically generated),
District, Zone, Name (first, last and middle initial), customer address,
phone number, and postal code. The district and zone are entered using
drop boxes; this avoids selecting erroneous districts or zones. The name
fields require character strings, all alphabetic, and the middle initial
field requires a single alphabetic character (NOTE: the name fields will
accept any input since type checking will not be performed). The address
field accepts a string . The postal code field will accept six characters
but they must be alternating alphabetic and numeric characters. The last
remaining field of the vital information is the special delivery notice.
The special delivery field is a comment field, consisting of characters,
that contains any special instructions that the customer wants fulfilled.
Once the vital information has been entered the database is updated by
pressing the UPDATE button and closing the data entry window and the user
is returned to the Customer interface.
Delete a Household Customer
- Pressing the DELETE button at the top of the interface screen will
remove the customer currently specified from the database. The user will
be issued a warning and will be prompted if they wish to continue or forget
the action. To specify a customer see Querying a Customer.
Modifying a Household Customer
- In the data entry window the user can change any of the fields. of
the selected customer. When the modifications are complete the database
is updated with the changes by pressing the UPDATE button and closing the
data entry window. Closing the data entry window the user is returned to
the Customer interface. To select a customer see Querying a Customer.
Back to Top
Querying a Household Customer
- Querying a customer is analogous to finding a customer in the database.
Pressing the QUERY button opens a query window where the user can enter
the name of the customer, the last name must be specified but the other
name fields can be left blank, and/or the customers account number. If
the name is specified and there are multiple occurrences of the target
name a list will be produced and from this list the user can select the
appropriate customer and the selected customer will be displayed in the
Customer interface. If the selected customer is not the desired customer
the user can select another customer from the list. Pressing OK closes
the list and returns the user to the Customer interface. There are also
arrow button on the Customer interface screen that allow the user to skip
from one record to the next (i.e., pressing the right arrow moves to the
next customer record in the database while pressing the left arrow moves
to the previous customer record in the database). The record currently
displayed in the Customer interface is termed selected.
Printing a Household Customer
- Pressing the PRINT button causes the vital information about the currently
selected customer and their present subscription status to be printed.
The subscription status includes the newspapers currently being delivered,
the magazines currently subscribed to, the number of magazines remaining
in each subscription, and any complaints made by the customer (see Customer
Complaints).
Back to Top
Associating a Household with a Carrier
- Associating a household with a carrier is accomplished by assigning
a customer to a zone. Since all zones have an associated carrier the act
of assigning a zone serves to assign a carrier.
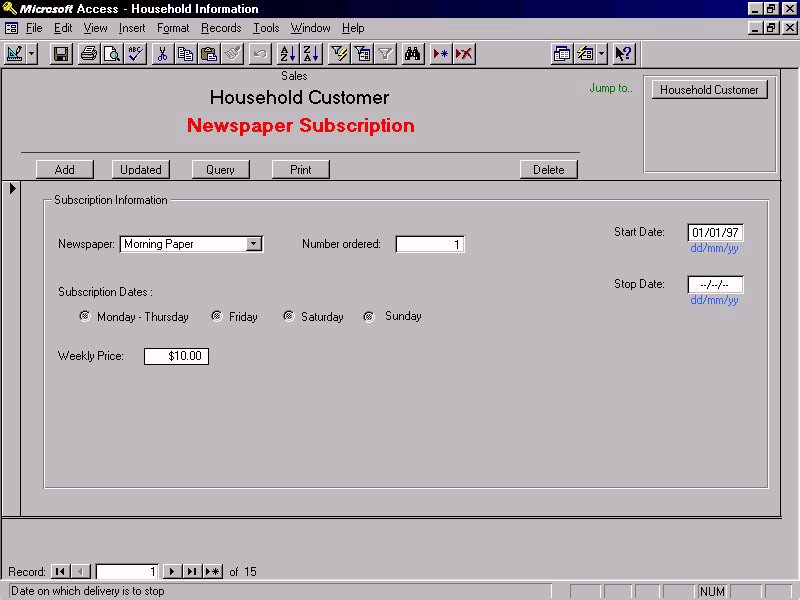
Subscribe a Household to a Newspaper
- Located on the bottom tool bar of the Customer interface there is a
button labeled Newspaper Subscription Info. Pressing this button
enables the Newspaper Subscription Information sub-window. The sub-window
allows the user to add a subscription to the selected customer. To subscribe
to a new newspaper the user presses the ADD button, which clears all fields
in the window. Then the user selects the desired newspaper via a pull down
menu, all newspapers printed by Northam will be contained on the pull down
list. Once a newspaper has been chosen the user is able to specify the
days delivery is to occur; this is accomplished by highlighting any or
all of the four radio buttons which correspond to Monday to Thursday, Friday,
Saturday, and Sunday delivery, respectively. Then the user can specify
the number of copies to be delivered in the "Issues Ordered"
field. Located at the top of the Newspaper Subscription Info window
is an UPDATE button and a DELETE button. Pressing the UPDATE button will
subscribe the customer to that newspaper i.e., the database will be updated
with the changes. Then the user can repeat the process or return to the
Customer interface by pressing the HOUSEHOLD CUSTOMER button.
Back to Top
Un-subscribe a Household from a Newspaper
- Located on the bottom tool bar of the Customer interface there is a
button labeled Newspaper Subscription Info. Pressing this button
brings up the Newspaper Subscription Information sub-window. The sub-window
allows the user to cancel the selected customer's newspaper delivery. The
user finds the appropiate newspaper by either querying for the newspaper
or scrolling through the records. Once the correct newspaper is found pressing
the DELETE button cancels the customers subscription. The user can then
return to the Customer Interface or repeat the process.
Suspend/Restart Household Delivery
- To suspend delivery, in case the household goes on vacation, the user,
from the Customer interface, presses the Newspaper Subscription Info
button to bring up the Newspaper Subscription Information sub-window. Present
in the sub-window are two fields termed "Start Date" and "Stop
Date" and these fields represent the starting date of delivery suspension
and resume date of delivery. By entering a date, in DDMMYY form, in both
fields the customer essentially has delivery suspended for the time period
between and including the two dates. Pressing UPDATE, located at the top
of the window, will update the suspension information in the database.
All dates not in the proper form will not be accepted and a warning will
be issued and the fields will be cleared.
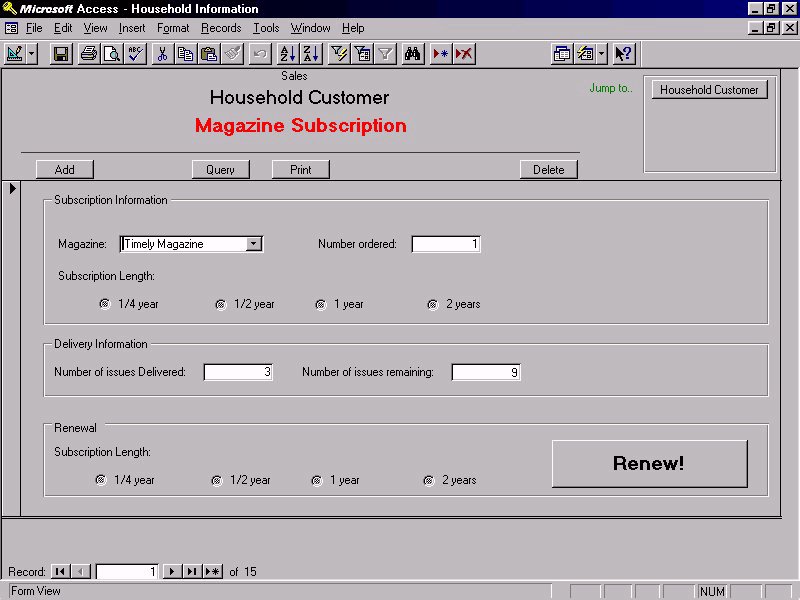
Subscribe a Household to a Magazine
- Located on the bottom tool bar of the Customer interface there is a
button labeled Magazine Subscription Info. Pressing this button
brings up the Magazine Subscription Information sub-window. The sub-window
allows the user to add a subscription to the selected customer. To subscribe
to a new magazine the user presses the ADD button then selects the desired
magazine via a pull down menu, all magazines carried by Northam will be
contained on the pull down list. Once a magazine has been chosen the user
is able to specify the subscription length; this is accomplished by highlighting
one of the four radio buttons which correspond to a quarter year, a half
year, one year, or two year subscriptions, respectively. Then the user
can specify the number of copies to be delivered by entering a integer
in the "Issues Ordered" field. Located at the top of the Magazine
Subscription Info window is the UPDATE button. Pressing the UPDATE
button will subscribe the customer to that magazine i.e., the database
will be updated with the changes. Then the user can repeat the process
or return to the Customer interface .
Back to Top
Un-subscribe a Household from a Magazine
- Located on the bottom tool bar of the Customer interface there is a
button labeled Magazine Subscription Info. Pressing this button
brings up the Magazine Subscription Information sub-window. The sub-window
allows the user to cancel the selected customer's magazine subscription.
The user finds the appropiate magzaine by either querying for the magazine
or scrolling through the records. Once the desired magazine is found pressing
delete will cnacel the customers subscription. The user can return to the
customer interface or repeat the process.
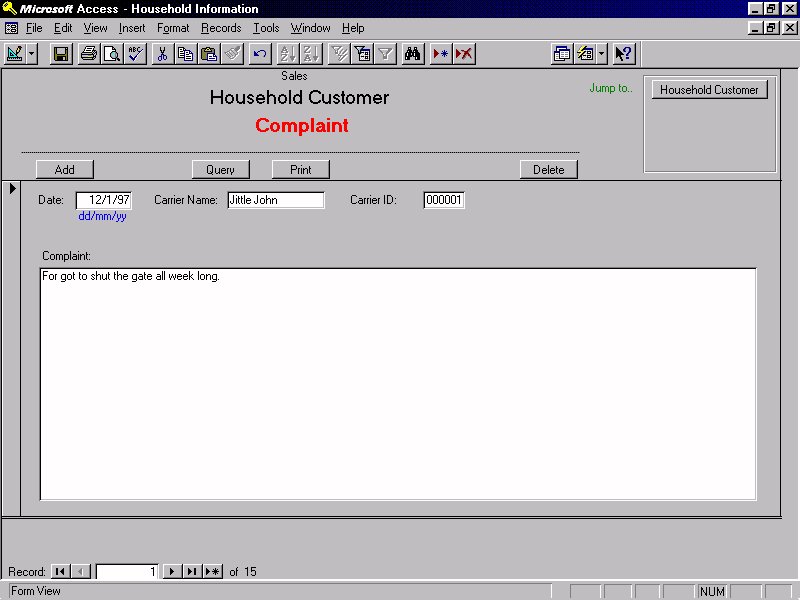
Household Complaints
- A customer can always lodge a complaint for the records. To do so the
user must, from the Customer interface, press the button labeled "Complaints".
This will bring up a window where the user fills in the customers complaint
in a large text box (see data dictionary for maximum size of complaint).
Pressing ADD will close the complain window and update the database. If
nothing was filled in the complaint box the user is just returned to the
Customer interface.
Creating a Household Invoice
- At the bottom of the Customer interface there is a button labeled Billing
and pressing this button results in the production of a invoice for the
customer. The invoice will contain all information pertaining to that customer's
account, including all publications being delivered, the customer's current
balance, and the customer's vital information. The invoice will be displayed
on screen in addition to the production of a hard copy. The hard copy will
contain the Northam letter head, at the top of the invoice.
Back to Top
NEWS BOX FUNCTIONS
This section covers operations dealing with the news box customer GUI,
which belongs under the customer interface. To reach the customer interface
the user must press the Customer button on the main menu. In the
Customer interface the user can switch between the three types of customers:
Customer, Retail Outlet, and News Box. By pressing the tab labeled News
Boxes the system switches to news box customers GUI. The system will
contain the Box ID, Route, Product, the quantity that has to be delivered
daily, a table of the Delivery Dates, # of Products Delivered, # of Products
Returned and Money Collected, and the location/address. All information
will be entered through the interface.
Add a News Box
- Pressing the add button at the top of the interface screen allocates
new space in the database for a new news box record and makes available
to the user a data entry screen. In the data entry screen the user presses
the ADD button and then fills in the empty fields with vital information
about the new news box. The vital information includes: Account Number
(automatically generated), District, Route, Product, the quantity that
has to be delivered daily, a table of the Delivery Dates, # of Products
Delivered, # of Products Returned and Money Collected, and location/address.
After filling out all the information fields, the user then clicks the
ADD button to store the new News Box record into the existing database.
The district, route, and product are selected from pop-up menus. This ensures
that no erroneous districts or routes are entered.
Modify a News Box
- Pressing the query button at the top of the interface screen allows
you to search for a particular news box by different field criteria. The
user searches by Box ID, clicks the OK button, and the specified news box
data entry will appear onto the screen. The user fills in the new information
about the current news box. The new information may include: District,
Route, Product, the quantity that has to be delivered daily, a table of
the Delivery Dates, # of Products Delivered, # of Products Returned and
Money Collected, and location/address. The user can not change the Box
ID field. This is automatically generated by the system upon the addition
of the news box. The user selects the UPDATE button to store the modified
News Box record into the existing database.
Delete a News Box
- Pressing the query button at the top of the interface screen allows
you to search for a particular news box by different field criteria. The
user searches by Account Number, clicks the OK button, and the specified
news box data entry will appear onto the screen. The user then press the
DELETE button at the top of the interface screen. This will remove the
current data entry from the existing database.
Back to Top
Enter number of Unsold Newspapers
- Pressing the query button at the top of the interface screen allows
you to search for a particular news box by different field criteria. The
user searches by Account Number, clicks the OK button, and the specified
news box data entry will appear onto the screen. In the table, the user
enters the number of unsold newspapers in the # returned field with the
corresponding date. The user then selects the UPDATE button and the modified
news box record is saved in the existing database.
Change Route Number
- Pressing the query button at the top of the interface screen allows
you to search for a particular news box by different field criteria. The
user searches by Account Number, clicks the OK button, and the specified
news box data entry will appear onto the screen. The user can now select
a new route from the route pull down menu by highlighting the desired route.
The user then selects the UPDATE button and the modified news box record
is saved in the existing database.
Enter the Amount of Money Collected
- Pressing the query button at the top of the interface screen allows
you to search for a particular news box by different field criteria. The
user searches by Account Number, clicks the OK button, and the specified
news box data entry will appear onto the screen. In the table, the user
enters the amount of money collected in the Money Collected field with
the corresponding date. The user then selects the UPDATE button and the
modified news box record is saved in the existing database.
Change the Number of Papers to be Delivered
- Pressing the query button at the top of the interface screen allows
you to search for a particular news box by different field criteria. The
user searches by Account Number, clicks the OK button, and the specified
news box data entry will appear onto the screen. The user enters the number
of papers to be delivered in their appropriate daily boxes/fields. The
user then selects the UPDATE button and the modified news box record is
saved in the existing database.
Back to Top
Make a Complaint
- Pressing the query button at the top of the interface screen allows
you to search for a particular news box by different field criteria. The
user searches by Account Number, clicks the OK button, and the specified
news box data entry will appear onto the screen. In the news box form,
a Complaint button is provided for the user to enter any complaints/comments
that customers might have on the current news box. When selected, a pop-up
window will be made available to the user to input the complaints made.
The user then selects the UPDATE button and the complaint is added to the
news box record and the database is updated.
RETAIL OUTLET FUNCTIONS
This section covers the operations dealing with the retail outlet GUI,
which belongs under the customer interface. To reach the customer interface
the user must press the Customer button on the main menu. In the
Customer interface the user can switch between the three types of customers:
Household, Retail Outlet, and News Box. By pressing the tab labeled
Retail Outlet, the system switches to the retail outlet GUI. The system
will contain the Account Number, the Route and the District where the retail
outlet belongs. It also contains additional customer information such as
vendor name, contact person (first and last names), address and postal
code of the contact person, telephone number, and special delivery notices.
Back to Top
Add a Retail Customer
- Pressing the add button at the top of the interface screen allocates
new space in the database for a new retail outlet record and makes available
to the user a data entry screen. In the data entry screen the user fills
in the empty fields with vital information about the new retail outlet.
The vital information includes: Account Number, the Route and the District
where the retail outlet belongs, vendor name, delivery address, contact
person (first and last names), address and postal code of the contact person,
telephone number, and special delivery notices. After filling out all the
information fields, the user then clicks the UPDATE button to store the
new Retail outlet record into the existing database. The district and route
are selected from pop-up menus. This ensures that no erroneous districts
or routes are entered.
Modify a Retail Customer
- Pressing the query button at the top of the interface screen allows
you to search for a particular retail outlet by different field criteria.
The user searches by Account Number, clicks the OK button, and the specified
retail outlet data entry will appear onto the screen. The user fills in
the new information about the current retail outlet. The new information
may include: Account Number, Route, District, vendor name, contact person
(first and last names), address and postal code of the retail outlet, telephone
number, and special delivery notices. The user can not change the Account
Number field. This is automatically generated by the system upon the addition
of the retail outlet. The user selects the UPDATE button to store the modified
Retail outlet record into the existing database.
Delete a Retail Customer
- Pressing the query button at the top of the interface screen allows
you to search for a particular retail outlet by different field criteria.
The user searches by Account Number, clicks the OK button, and the specified
retail outlet data entry will appear onto the screen. The user then selects
the DELETE button at the top of the interface screen. This will remove
the current data entry from the existing database.
Associate Route with Retail Customer
- Pressing the query button at the top of the interface screen allows
you to search for a particular retail outlet by different field criteria.
The user searches by Account Number, clicks the OK button, and the specified
retail outlet data entry will appear onto the screen. The user can now
select a new route from the route pull down menu by highlighting the desired
route. The user then selects the UPDATE button and the modified news box
record is saved in the existing database.
Back to Top
Enter Number Of Unsold Magazine Publications
- Selecting the query button at the top of the interface screen allows
you to search for a particular retail outlet by different field criteria.
The user searches by Account Number, clicks the OK button, and the specified
retail outlet data entry will appear onto the screen. Within the retail
outlet data entry form, the user selects Magazine Consignment Information
button. This will bring up the Magazine Consignment Information data entry
form which contains the following vital information: Magazine Title, Issues
ordered, Daily Quantity to be Delivered, and a table of the Magazine title,
Date of last Delivery, # of Copies Delivered, and # of Copies Returned.
To enter the number of unsold magazine publications, the user selects the
# of Copies Returned column that corresponds to the right magazine title
and date and inputs the new data information. Pressing the UPDATE button
saves the new information and at the same time closes the data entry form.
Enter Number Of Unsold Newspaper Publications
- Selecting the query button at the top of the interface screen allows
you to search for a particular retail outlet by different field criteria.
The user searches by Account Number, clicks the OK button, and the specified
retail outlet data entry will appear onto the screen. Within the retail
outlet data entry form, the user selects Newspaper Consignment Information
button. This will bring up the Newspaper Consignment Information data entry
form which contains the following vital information: Newspaper Title, Issues
ordered, The Daily Quantity to be delivered, and a table of the Newspaper
title, Date of last Delivery, # of Copies Delivered and # of Copies Returned.
To enter the number of unsold newspaper publications, the user selects
the # of Copies Returned column that corresponds to the right newspaper
title and date and inputs the new data information. Pressing the UPDATE
button saves the new information and at the same time closes the data entry
form.
Change The Number Of Magazine Publications To Be Delivered For Each
Day
- Selecting the query button at the top of the interface screen allows
you to search for a particular retail outlet by different field criteria.
The user searches by Account Number, clicks the OK button, and the specified
retail outlet data entry will appear onto the screen. Within the retail
outlet data entry form, the user selects Magazine Consignment Information
button. This will bring up the Magazine Consignment Information data entry
form which contains the following vital information: Magazine Title, Issues
ordered, Daily Quantity to be Delivered, and a table of the Magazine title,
Date of last Delivery, # of Copies Delivered, and # of Copies Returned.
The user enters the number of papers to be delivered in their appropriate
daily boxes/fields. The user then selects the UPDATE button and the modified
news box record is saved in the existing database.
Back to Top
Change The Number Of Newspaper Publications To Be Delivered For Each
Day
- Selecting the query button at the top of the interface screen allows
you to search for a particular retail outlet by different field criteria.
The user searches by Account Number, clicks the OK button, and the specified
retail outlet data entry will appear onto the screen. Within the retail
outlet data entry form, the user selects Newspaper Consignment Information
button. This will bring up the Newspaper Consignment Information data entry
form which contains the following vital information: Newspaper Title, Issues
ordered, Daily Quantity to be Delivered, and a table of the Newspaper title,
Date of last Delivery, # of Copies Delivered, and # of Copies Returned.
The user enters the number of papers to be delivered in their appropriate
daily boxes/fields. The user then selects the UPDATE button and the modified
news box record is saved in the existing database.
Subscribe/Un-subscribe To Magazine
- Selecting the query button at the top of the interface screen allows
you to search for a particular retail outlet by different field criteria.
The user searches by Account Number, clicks the OK button, and the specified
retail outlet data entry will appear onto the screen. The user then selects
the modify button at the top of the interface screen. This allows the user
to modify the fields of the current data entry. Within the retail outlet
data entry form, the user selects the Magazine Consignment Information
button. This will bring up the Magazine Consignment Information data entry
form which contains the following vital information: Magazine Title, Issues
ordered, Daily Quantity to be Delivered, and a table of the Magazine title,
Date of last Delivery, # of Copies Delivered, and # of Copies Returned.
1) To subscribe a magazine:
The user selects the ADD button at the top of the Magazine Subscription
Information data entry form and a blank entry form is made available. The
user fills out all the vital information for a magazine subscription and
clicks the UPDATE button to save the new subscription in the existing database.
This will take the user back to the previous magazine subscription data
entry form, which will already be updated.
2) To cancel a magazine subscription:
The user selects, from the data table, the particular instance/row of
magazine subscription to be canceled (This is attained by highlighting
the desired instance or row). By clicking on the DELETE button, the highlighted
magazine subscription row will be deleted from the table and from the existing
database. This will take the user back to the previous magazine subscription
data entry form, which will already be updated.
Back to Top
Add/Cancel a Newspaper Consignment
- Selecting the query button at the top of the interface screen allows
you to search for a particular retail outlet by different field criteria.
The user searches by Account Number, clicks the OK button, and the specified
retail outlet data entry will appear onto the screen. Within the retail
outlet data entry form, the user selects Newspaper consignment Information
button. This will bring up the Newspaper consignment Information data entry
form which contains the following vital information: Newspaper Title, Issues
ordered, Daily Quantity to be Delivered, and a table of the Newspaper title,
Date of last Delivery, # of Copies Delivered, and # of Copies Returned.
1) To add a newspaper consignment:
The user selects the ADD button at the top of the Newspaper consignment
Information data entry form and a blank entry form is made available. The
user fills out all the vital information for a newspaper consignment and
clicks the UPDATE button to save the new consignment in the existing database.
This will take the user back to the previous newspaper consignment data
entry form, which will already be updated.
2) To cancel a newspaper consignment:
The user selects, from the data table, the particular instance/row of
newspaper consignment to be canceled (This is attained by highlighting
the desired instance or row). By clicking on the DELETE button, the highlighted
newspaper consignment row will be deleted from the table and from the existing
database. This will take the user back to the previous newspaper consignment
data entry form, which will already be updated.
Issue Invoice
- At the bottom of the Customer interface there is a button labeled BILLING
and pressing this button results in the production of a invoice for the
customer. The invoice will contain all information pertaining to that customer's
account, including all publications being delivered, the customer's current
balance, and the customer's vital information. The invoice will be displayed
on screen in addition to the production of a hard copy. The hard copy will
contain the Northam letter head, at the top of the invoice.
Make a Complaint
- Pressing the query button at the top of the interface screen allows
you to search for a particular retail outlet by different field criteria.
The user searches by Account Number, clicks the OK button, and the specified
retail outlet data entry will appear onto the screen. In the retail outlet
form, a Complaint button is provided for the user to enter any complaints/comments
that customers might have on the current retail outlet. When selected,
a pop-up window will be made available to the user to input the complaints
made. The user then selects the ADD button and the new retail outlet record
is saved in the existing database.
Back to Top
GENERAL DELIVERY FUNCTIONS:
All delivery functions are accessible through the "Deliveries"
submenu selection from the startup menu. The "Deliveries" interface
encapsulates four distinct but similar GUIs that correspond to: carrier
information, route information, zone information, and district information.
Districts are divided into zones to facilitate carrier distribution of
publications. The creation of zones will permit Northam to separate carriers
from routes. By doing so Northam will be given the flexibility of changing
a carrier without affecting the household in a zone and a household can
be changed without affecting the carrier. This make database maintenance
simpler and more efficient.
The similarity between interfaces requires common actions to have the
same or a familiar set of procedures (i.e., adding/deleting/modifying/querying
records will be the same for routes, zones, carriers, and districts).
CARRIER FUNCTIONS
This section covers operations dealing with the Carrier's GUI in the
Delivery interface. To reach the Delivery sub-window the user must press,
on the main menu, the Delivery button. By pressing the tab labeled
Carriers the system switches to the carrier GUI. The system will
maintain the name, address, phone number, the zone id (for a portion of
a particular district), and the carrier id (the carriers unique id). Users
will enter all information through the interface. There is a return to
main menu tab located in the interface that will close the Delivery interface
screen and return the use to the main menu.
Add a Carrier
- Pressing the ADD button at the top of the interface screen allocates
new space in the database for a new carrier record and makes available
to the user a data entry screen. In the data entry screen the user fills
the empty fields with vital information about the new carrier. The vital
information includes the following: Carrier ID(automatically generated),
Delivery Zone, Name (first, last and middle initial), the carrier's address,
phone number, and postal code. The zone is entered using a drop box; this
avoids selecting a erroneous zones. The name fields require character strings
that are all alphabetic and the middle initial field requires a single
alphabetic character (NOTE: the name fields will accept any input since
type checking will not be performed). The address field accepts a string.
The postal code field will accept six characters but they must be alternating
alphabetic and numeric characters. Once the vital information has been
entered the database is updated by choosing the UPDATE button and closing
the data entry window and the user is returned to the Delivery interface.
Delete a Carrier
- Pressing the DELETE button at the top of the interface screen will
remove the carrier currently specified from the database. The user will
be issued a warning and will be prompted if they wish to continue or forget
the action. To select a carrier see Querying a Carrier.
Back to Top
Modifying a Carrier
- In the data entry window the user can change any of the fields. When
the modifications are complete the database is updated with the changes
by pressing the UPDATE button and closing the data entry window. Before
the database is updated the user will be prompted with a message to accept
the changes. At this point the user has the option of accepting the changes
or forgetting them. Closing the data entry window the user is returned
to the Delivery interface.
Querying a Carrier
Querying a carrier is analogous to finding a carrier in the database.
Pressing the QUERY button opens a query window where the user can enter
the name of the carrier, the last name must be specified but the other
name fields can be left blank, and/or the carrier's Carrier ID. If the
name is specified and there are multiple occurrences of the target name
a list will be produced and from this list the user can select the appropriate
Carrier and the selected customer will be displayed in the Delivery interface.
If the selected carrier is not the desired carrier the user can select
another carrier from the list. Pressing UPDATE closes the list and returns
the user to the Delivery interface. There are also arrow button on the
Delivery interface screen that allow the user to skip from one record to
the next (i.e., pressing the right arrow moves to the next customer record
in the database while pressing the left arrow moves to the previous customer
record in the database). The record currently displayed in the Delivery
interface is refered to as selected.
Printing a Carrier
- Pressing the PRINT button causes the vital information about the currently
selected carrier and any complaints filed against them by customers to
be printed.
Changing a Carrier's Zone
- To change a carrier's delivery zone press the MODIFY button on the
Delivery interface. This will bring up the modify window. By changing the
zone field, via the pull down menu, changes the carrier's delivery zone.
Back to Top
DELIVERY ROUTE FUNCTIONS
This section covers operations dealing with the Route GUI of the Delivery
interface . To reach the Delivery interface the user must press, on the
main menu, the DELIVERY button. By pressing the tab labeled Routes the
system switches to the route GUI. For each route the system maintains a
Truck ID and a list of drop sites for the route. Users will enter all information
through the interface. There is a return to main menu tab located present
in the interface that will close the Delivery interface screen and return
the use to the main menu.
Add a Route
- Pressing the ADD button at the top of the interface screen allocates
new space in the database for a new route record and makes available to
the user a data entry screen. In the data entry screen the user fills the
empty Truck ID field and the system automatically fills the route number.
The system checks if the Truck ID is valid i.e., in use on the system,
if not the system notifies the user and clears the field. Once the Truck
ID has been entered the database is updated by choosing the UPDATE button
and closing the data entry window and the user is returned to the Delivery
interface. The list of drop sites is updated as new customers are added
to the delivery route. Initially a newly added route will have no sites
visible in the drop list.
Delete a Route
- Pressing the DELETE button at the top of the interface screen will
remove the route currently selected from the database. The user will be
issued a warning and will be prompted if they wish to continue or forget
the action. To select a carrier see Querying a route. In order for a route
to be deleted the drop list of that route must be empty, otherwise an error
message will be produced and the deletion will not occur.
Back to Top
Modifying a Route
- If the currently selected route contains no drop sites then the only
modification possible is to change the Truck ID, provided that a valid
Truck ID is given. If the current route's drop list is non-empty then the
user has the ability to reorder the drop locations to suit the driver's
needs. The process of reordering the drop locations is purely subjective
and is not critical to the functioning of the system. To reorder the drop
sites, in the drop list, the user highlights an address they wish to move
in the list. Then using the two arrow keys adjacent to the drop list the
user can move the address up or down in the drop list. Once the desired
location in the drop list is determine the user can select a different
address and repeat the process. When the modifications are complete the
database is updated with the changes by pressing the UPDATE button and
closing the data entry window. Before the database is updated the user
will be prompted with a message to accept the changes. At this point the
user has the option of accepting the changes or forgetting them. Closing
the data entry window the user is returned to the Delivery interface. To
specify a route see Querying a Route.
Querying a Route
- Querying a route is analogous to finding a route in the database. Pressing
the QUERY button opens a query window where the user must enter the Route
ID, via a pull down menu. The system will then find the route and display
all details pertaining to the route in the Delivery interface including
the drop list. There are also arrow buttons on the Delivery interface screen
that allow the user to skip from one record to the next (i.e., pressing
the right arrow moves to the next route record in the database while pressing
the left arrow moves to the previous route record in the database). The
record currently displayed in the Delivery interface is termed selected.
Printing a Route
- Pressing the PRINT button causes the drop list and Truck ID to be printed
for the selected route. The print function also searches the household,
news box, and retail customer databases to determine the amount of each
publication are to be delivered to each drop site and this information
is also printed.
Back to Top
DISTRICT FUNCTIONS
This section covers operations dealing with the District GUI of the
Delivery interface . To reach the Delivery interface the user must press,
on the main menu, the DELIVERY button. By pressing the tab labeled
Districts the system switches to the district GUI. For each district
the system maintains an unique district number and some demographic information.
Since Northam has not specified the details of the demographic information,
functional aspects of demographic collection has been omitted from this
document.Users will not have to enter any information through the interface
because the system internally generates all information in the database.
There is a return to main menu tab located present in the interface that
will close the Delivery interface screen and return the use to the main
menu.
Add a District
- Pressing the ADD button at the top of the interface screen allocates
new space in the database for a new district record. Since all information
stored for a district is automatically generated e.g., the District Number
and demographic information, the user is not required to enter any data.
When the UPDATE button is pressed the system assigns the new district a
unique District Number. Then as customers are added to the district the
system begins collecting demographic information for that district.
Delete a District
- The delete button has no effect in this interface because deleteing
a district serves no real purpose.
Back to Top
Modifying a District
- Since all actions occurring to the district database are generated
automatically by the system the MODIFY button is non-functional and it
will not be active when the District GUI is enabled.
Querying a District
- Querying a district is analogous to finding a district in the database.
Pressing the QUERY button opens a query window where the user must enter
the District Number, via a pull down menu. The system will then find the
district and display all details pertaining to the district in the Delivery
interface including the demographic information gathered. There are also
arrow button on the Delivery interface screen that allow the user to skip
from one district record to the next (i.e., pressing the right arrow moves
to the next district record in the database while pressing the left arrow
moves to the previous route record in the database). The record currently
displayed in the Delivery interface is termed selected.
Printing a District
- Pressing the PRINT button causes the District Number and all demographic
information collected by the system to be printed for the selected for
district.
Back to Top
ZONE FUNCTIONS
This section covers operations dealing with the Zone GUI of the Delivery
interface . To reach the Delivery interface the user must press, on the
main menu, the DELIVERY button. By pressing the tab labeled Zones the
system switches to the zone GUI. For each zone the system maintains an
unique Zone Number and a distinct Drop Number. The Drop Number relates
the zones to drop sites on a given route; thereby indirectly linking zones
to routes. There is a return to main menu tab located present in the interface
that will close the Delivery interface screen and return the use to the
main menu.
Add a Zone
- Pressing the ADD button at the top of the interface screen allocates
new space in the database for a new zone record and makes available to
the user the data entry window. In the data entry window the system automatically
generates a new Zone Number. The user then has to associate the new zone
with a route (See Associating a zone with a route). All zone/route combinations
are displayed in a display box (note: many zones can be associated with
one route but many routes cannot be associated with one zone) called the
zone/route list. Once the route has been associated with a route
the user can press the UPDATE button which closes the data entry window
and returns the user to the Delivery interface.
Delete a Zone
- Pressing the DELETE button at the top of the interface screen will
remove the zone currently selected from the database. The user will be
issued a warning and will be prompted if they wish to continue or forget
the action. To select a carrier see Querying a Zone. In order for a zone
to be deleted there must be no customers in the zone, otherwise an error
message will be produced and the deletion will not occur.
Back to Top
Modifying a Zone
- The only modification possible is to change the route the zone is associated
with (Associating a zone with a route). When the modifications are complete
the database is updated with the changes by pressing the UPDATE button
and closing the data entry window. Before the database is updated the user
will be prompted with a message to accept the changes. At this point the
user has the option of accepting the changes or forgetting them. To select
a zone see Querying a Zone.
Querying a Zone
- This function is essentially unavailable in the system because all
zones are listed with their associated routes. To see a zone's relationships
the user must scroll through zone list. The Query button is disabled
in the Zone GUI. A zone is highlighted by clicking on a zone in the zone/route
list. The highlighted zone is termed selected.
Printing a Zone
- Pressing the PRINT button causes the zone/route list to be printed.
Associating a Zone with a Route
Associating a zone with a route can be performed when the "ADD"
or "MODIFY" buttons are pressed. Depressing either of these button
brings up the data entry window for the Zone GUI. In the window the unique
zone number will be displayed in a text box adjacent to a pull down menu.
The pull down menu contain all possible routes in the system by choosing
the desired route form the pull down menu will associate the zone with
a route. Pressing OK will close the data entry window and update the database.
The newly added zone or the modified record will be visible in the zone/route
list.
Back to Top
PUBLICATION FUNCTIONS:
Publication functions pertain to Magazine and Newspapers.
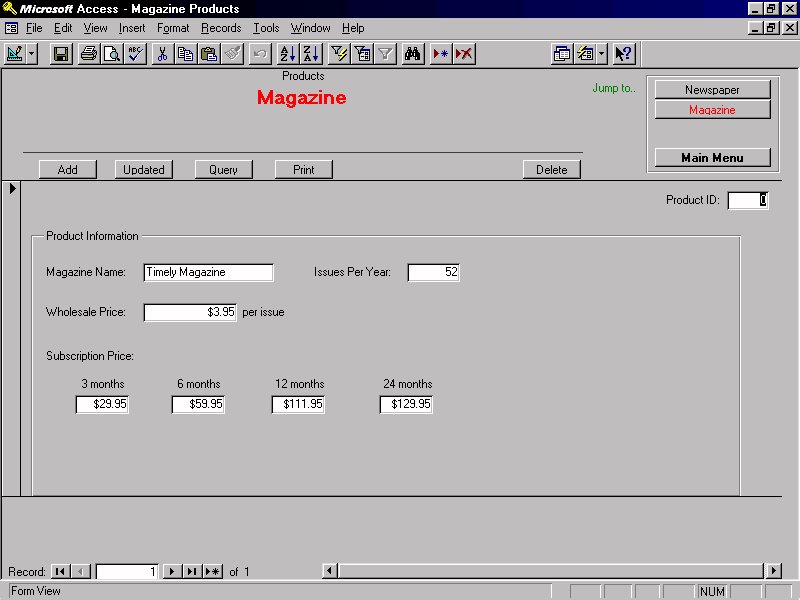
MAGAZINE INFORMATION FUNCTIONS
This section covers the operations dealing with the magazine information
GUI, which belongs under the product information interface. To reach the
product information interface the user must press the Product Information
button on the main menu. In the product information interface the user
can switch between the three types of product information: Newspaper information,
and Magazine information. By pressing the tab labeled Magazine information,
the system switches to the magazine information GUI. The system will
contain the product ID, magazine name, publisher name, frequency of issue
(weekly, biweekly, monthly, bimonthly or quarterly), and retail outlet
prices.
Back to Top
Add a Magazine information
- Pressing the ADD button at the top of the interface screen allocates
new space in the database for a new magazine information record and makes
available to the user a data entry screen. In the data entry screen the
user fills in the empty fields with vital information about the new magazine
information. The vital information includes: product ID, magazine name,
publisher name, frequency of issue, and retail outlet prices. After filling
out all the information fields, the user then clicks the UPDATE button
to store the new Magazine information record into the existing database.
The product ID is generated automatically by the system.
Modify a Magazine information
- Pressing the QUERY button at the top of the interface screen allows
you to search for a particular magazine information by different field
criteria. The user searches by product ID, clicks the OK button, and the
specified magazine information data entry will appear onto the screen.
The user fills in the new information about the current magazine information.
The new information may include: product ID, magazine name, publisher name,
frequency of issue, and retail outlet price. The user can not change the
product information ID field. This is automatically generated by the system
upon the addition of the magazine information. The user selects the UPDATE
button to store the modified Magazine information record into the existing
database.
Delete a Magazine information
- Pressing the QUERY button at the top of the interface screen allows
you to search for a particular magazine information by different field
criteria. The user searches by product information ID, clicks the OK button,
and the specified magazine information data entry will appear onto the
screen. The user then presses the DELETE button at the top of the interface
screen. This will remove the current data entry from the existing database.
Back to Top
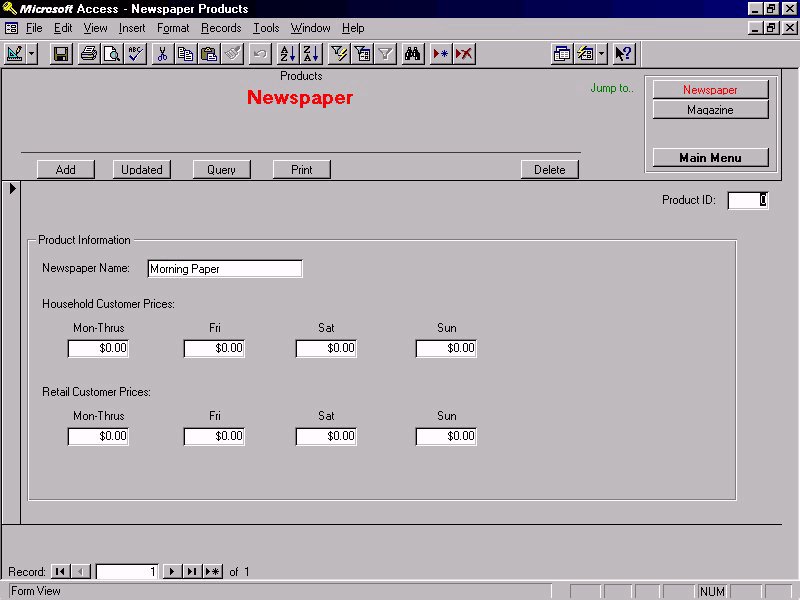
NEWSPAPER INFORMATION FUNCTIONS
This section covers the operations dealing with the newspaper information
GUI, which belongs under the product information interface. To reach the
product information interface the user must press the Product Information
button on the main menu. In the product information interface the user
can switch between the three types of product information: Newspaper information,
and Magazine information. By pressing the tab labeled newspaper information,
the system switches to the newspaper information GUI. The system will
contain the product ID, newspaper name, and the household delivery and
retail outlet prices.
Back to Top
Add a Newspaper Information
- Pressing the ADDbutton at the top of the interface screen allocates
new space in the database for a new newspaper information record and makes
available to the user a data entry screen. In the data entry screen the
user fills in the empty fields with vital information about the new newspaper
information. The vital information includes: product ID, newspaper name,
household delivery prices, and retail outlet price. After filling out all
the information fields, the user then clicks the UPDATE button to
store the new newspaper information record into the existing database.
The product ID is generated automatically by the system.
Modify a Newspaper Information
- Pressing the QUERY button at the top of the interface screen allows
you to search for a particular newspaper information by different field
criteria. The user searches by product ID, clicks the OK button, and the
specified newspaper information data entry will appear onto the screen.
The user fills in the new information about the current newspaper information.
The new information may include: product information ID, newspaper name,
household delivery prices, and retail outlet price. The user can not change
the product information ID field. This is automatically generated by the
system upon the addition of the newspaper information. The user selects
the UPDATE button to store the modified newspaper information record into
the existing database.
Delete a Newspaper Information
- Pressing the query button at the top of the interface screen allows
you to search for a particular newspaper information by different field
criteria. The user searches by product information ID, clicks the OK button,
and the specified newspaper information data entry will appear onto the
screen. The user then presses the DELETE button at the top of the interface
screen. This will remove the current data entry from the existing database.
Back to Top
REPORTS:
The functions in this submenu are more global in their implementation
and scope. Pressing the Reports button from the main menu bring
up the reports submenu which, for now, gives the user the choice of producing
all invoices for the system or producing all demographic information stored
in the system. There is a Main Menu button that returns the user
to the main menu.
Global Invoice Generation
- Pressing Invoices button will print all invoices for all customers
in the system.
Global Demographic Production
- Pressing the Demographic button prints the demographics stored
by the system for each district.
Global Delivery List Generation
Both global actions can be canceled at any time during their creation
by pressing the Cancel button.

Back to Top
Back to Overall Design Document