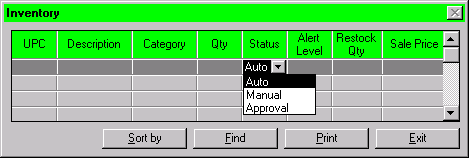
 The Inventory Window
is loaded when a user clicks on the Inventory button in
the Main Menu. This window consists of two main sections:
The inventory table, and the Operation buttons.
Description of each field:
- UPC - Integer (5 digits)
The UPC is not a 5 digit value, it is a 12 digit value.
- UPC is a primary key, there can be only one record in this table which has this UPC code
- Description - Text (length = 256)
- Description is a short description of the product for those who don't know what the UPC relates to, this is usually the product name
- Quantity - Integer
- Quantity describes the current unit number (or weight) of that particular item in the store
- Sales Price - Real
- Sales Price is the price the store is currently selling the product for
- Status - Enumerated value
- Status is either "automatic", "manual","manager approval" These values determine the process by which the product is reordered
- Alert level - Integer
- When Quantity less than or equal to Alert level, the system will automatically reorder the product (if automatic)
- Restock Qty - Integer
- This is the number of items of this product that will be automatically reordered by the system if Quantity is less than or equal to Alert level
This table displays the records contained in the inventory database. It is most likely that a direct connection will be used between the display grid and the actual database (for easy sorts and finds). This will also result in automatic updates of changes performed by the user onto the grid.
Users are allowed to alter certain fields in the inventory grid in order to update some of the information. Note that only users with proper security access can change these fields. Those users without access will find the fields "locked" (read-only).
The fields that are alterable include:
- Quantity
- Sale Price
- Status
- Alert Level
- Target Restock quantity
All other fields will be "locked" (read-only), in order to stop the user from callously changing their data.
Before an update of the database occurs from a change performed by the user, the data input will be error checked to check ranges and ensure that the changes are valid. These range checks also include the validation that the input is numeric (if the field contains numeric data) and not alphabetic.
If any of these tests fail, an appropiate error message will appear and prompt to enter in proper data. The user will not be allowed off the grid until proper data is entered or the user cancels the change (by pressing ESC).
Inventory table should have a field used for memo keeping by the employees which should be displayed for the products.
- This button is used in order to produce a paper
copy of all the information stored in the
inventory table.
The Print button will first load a standard Print Setup Dialog box, which will allow the user to adjust the current printer, and the format of the pages.
The PRINT function will produce the report:
- in the current sorted order shown on the grid
- one record per line
- formating it with headers/footers (format is not determined)
- to the page size and format as given in the Print Setup Dialog Box
Then the job will be sent to the printer to print.
- Find
 The Find
button allows a user to locate a particular
record in the inventory table. This button loads
a seperate window called the Find Form and allows
the user to enter field specific data in order to
locate a record.
 The Find Form is a GENERIC dialog box. It will be used by all Find buttons on all windows, this will remove possible redundancy in the program. Upon creation of this form (by possible cloning techniques), the form will dynamically setup a list of labels and associated Input Areas which coorespond to the searchable fields in the table. A Search button and a Cancel button will appear then at the bottom of the form.
The Input Areas will be interface objects (such as a text box, dropdown combo box, or selection buttons) that relate to the data that field can contain.
For example:
The Status field in the Orders table is a dropdown combo box containing predefined selections
The Status Input Area on the Find Form will be the same (a dropdown combo box containing the same predefined selections)
NOTE:
It is possible to set up default criteria in this form. This can be static (the same criteria appears everytime the form loads), OR it can be dynamic (either the criteria from the last find is shown or possibly a user-defined criteria is set)
When the user has completed entering the data that they wish to search on, they will press the Search button.
If no data was entered in any of the above fields, the Search button will return the messsage:
No data was entered, please enter something into one of the above fields.
If data is given, the Search button will then search the table (using the quickest and most appropiate method possible).
If a record is found that matchs the criteria given, the Find Form will close and the table on the main window will scroll through the records in the grid to the first record that matched the search criteria is visible.
If though, no records were located, the following message will be displayed:
Sorry, no record could be found matching those criteria.
The Find Form will stay open, and allow the user to enter another search.
The Cancel button will close the Find Form without a search being performed. This allows a user to get rid of the form if it was loaded by mistake or no more searches need be performed.
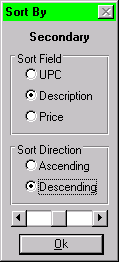
- Sort
- The Sort button allows the user to sort the table
using whichever field they deem usefull. This
button will load the Sort Form which will
faciliate this.
The Sort Form is a GENERIC dialog box. It will be called by all Sort buttons on all the windows in the application. The Sort Form will be created much like the Find Form (described above). It will dynamically create a list of selection buttons each of which designates a particular field in the table. (Note that not all fields need be listed, only those that can be sorted by).
The sort form will contain a scroll bar that will allow users to enter multiple field sorts (such as by Description AND Price), by enabling the user to scroll to the next sort type (Primary, Secondary, Tertiary, etc.)
The scroll bar for sorting criteria seems really awkward. There is no indication that when it's all the way left the first sort criteria is displayed etc.


 At the
bottom of the Sort Form will be two more
selection buttons, the Ascending and Descending
buttons. These allow the user to determine in
which direction the records will be sorted in. As
well, there will be a Sort button and a Cancel
button.
 NOTE:
It is possible to set up a default selection in this form. This can be static (the same selection appears everytime the form loads), OR it can be dynamic (either the selection from the last sort is shown or possibly a user-defined selection is set)
When the Sort button is pressed, the button will first determine if any selection has been made.
If no selection has been made, the button will show the following message:
No sort criteria entered. Please select a field to sort by.
If no sort order has been selected, the button will show the following message:
No sort direction selected. Please select either Ascending or Descending.
If successful, the table will be rebuilt (possibly using SQL) and the records will be displayed in that order on the table on the main window. The Sort Form will then be closed.
If the Cancel button is pressed, the Sort Form will be automatically closed with no sort being performed.
- Exit
- If the user presses this button, the inventory
window (and Sort and Find forms if they are open)
will be closed.
As all data is updated immediately through the grid, no data need be stored at this point.
The Inventory Window, corresponds almost directly to the Inventory Table stored in the database.
The following fields of that table are loaded into the grid:
- UPC
- Quantity
- Sale Price
- Status
- Alert Level
- Target Restock Quantity
As well, using the UPC as a primary key, the following fields are loaded out of the Product Table in the database:
- Description
- Category
All records that are changed are restored in the database automatically
As well, the User Security level must be available to disable any fields on the grid that the particular user can not access.
Printing will export a formatted document to the printer (how this document will be formatted is not yet determined).
The list of Categories must also be loaded from somewhere (in order to populate the drop down combo box in the grid). This data can be stored in an INI file or in its own table in the database (whatever is decided).
Other "from user" inputs are detailed in each of the button descriptions.

